On The Road Home, Gelandewagen Ambulance Build Thread

devonojas

Member
One reason I wanted to get the roof install finished was so that I could attend the G Wagen Sommerfestival a few hours from Berlin. The festival is organized by Joerg Sand, who I've mentioned as the publisher of G Wagen International magazine, a partner in GFG and my advisor on this project. It was a great little break from the build. I wish I had taken more photos, but I was super busy learning as much as possible from all of the G enthusiasts and experts. It was an amazing experience and I'm honored to have been present.

Here are some of the photos and videos that I did manage to take.


The G Raid 6x6 is a BEAST:

IMG_9309.jpgIMG_8275.jpgIMG_8276.jpgIMG_8288.jpgIMG_8751.jpgIMG_9178.jpg
 

Attachments

  • IMG_9310.jpg
    IMG_9310.jpg
    321.8 KB · Views: 15

devonojas

Member
Ready For Future Operations

If you're into awesome stuff, you should enjoy this.

The full PDF is too big to upload, but if you dig you should be able to find through Google.

Screen-Shot-2018-11-15-at-9.34.43-PM.jpgScreen-Shot-2018-11-15-at-9.34.57-PM.jpgScreen-Shot-2018-11-15-at-9.38.07-PM.jpgScreen-Shot-2018-11-15-at-9.38.37-PM.jpg
 

devonojas

Member
WINDOWS

We installed Dometic Seitz windows. They're pretty standard on European campers. They're double glazed, have integrated blackout shades and bug screens. The only downfall is that the clear plastic, so ours are already very scratched up from squeeing through tight trails. There is a German company that makes glass replacements that can be swapped out for the clear plastic part. They are here:

https://www.vanglas.de/

I decided not to replace the glass. I don't like the way they have reduced sight lines, and it seems easy enough to replace the plastic at some point. What I would really like to figure out is something like the screen protectors people put on smartphones. That stuff is strong and could easily be peeled off and replaced. If anyone has leads on this idea I would appreciate it!

We only hit a couple of snags on the window install. Our walls are too thick to use the included screws and the specced screw size was really hard to find: 3.9 x 45mm. It took me a couple of days to find them. Also, we needed to find something to fill the gap between the inner and outer parts of the window caused by the extra thick wall. We used black soft closed cell foam and it looks great.

Our old windows leaked badly. I was pretty freaked out about the new windows not being water tight. Actually, waterproofing deserves its own lengthy post. I'll get to that later. The way you're supposed to waterproof Seitz windows is by filling a trough inside of the outer lip with Sika 221i, or similar, with enough glue to contact the wall everywhere. It's a really clean look from the outside, but you almost never see it done like this because they leak and then people go nuts with sealant from the outside. Instead, we decided to carefully mask a caulk line from the outside and go slightly nuts from the beginning. It came out really clean and doesn't leak at all. See pics of Kassandra doing beyond pro level masking job. Love it when she helps out!

We were limited on window size on all sides. The counter in the front, the open doors in the back and the aluminum support rails on the top and bottom. We got the biggest windows we could fit.
 

Attachments

  • IMG_7511.jpg
    IMG_7511.jpg
    198.7 KB · Views: 78
  • IMG_7530.jpg
    IMG_7530.jpg
    109.9 KB · Views: 76
  • IMG_7532.jpg
    IMG_7532.jpg
    117.2 KB · Views: 72
  • IMG_7534.jpg
    IMG_7534.jpg
    146.2 KB · Views: 96
  • IMG_7542.jpg
    IMG_7542.jpg
    217.8 KB · Views: 99
  • IMG_7547.jpg
    IMG_7547.jpg
    160.3 KB · Views: 98
  • IMG_7568.jpg
    IMG_7568.jpg
    121.6 KB · Views: 88
Looking good!

It’s great to hear that you had issues as well (not that I wish you had them). It just so easy to think others don’t go through the same issues that you do when we all just post the highlights and the things that went well.

Cheers!


Sent from my iPhone using Tapatalk
 

mog

Kodiak Buckaroo
WINDOWS

I decided not to replace the glass. I don't like the way they have reduced sight lines, and it seems easy enough to replace the plastic at some point. What I would really like to figure out is something like the screen protectors people put on smartphones. That stuff is strong and could easily be peeled off and replaced. If anyone has leads on this idea I would appreciate it!

Although this is designed as a security film to protect glass home/business windows, perhaps it would give some scratch protection if applied on the outside of your camper windows (it is normally applied inside on glass windows.
3M™ Scotchshield™ Safety & Security Window Films,

Or perhaps even better would be their Anti-Graffiti films which appear to be designed to go on the outside and protect from scratches. It looks like multiple layers, so you just peel off the outer layer when the 'scratching' gets heavy.
Anti-Graffiti Coating – 3M Scotchgard™ Multi-Layer Protective Film 1004
 
Last edited:

devonojas

Member
Although this is designed as a security film to protect glass home/business windows, perhaps it would give some scratch protection if applied on the outside of your camper windows (it is normally applied inside on glass windows.
3M™ Scotchshield™ Safety & Security Window Films,

Or perhaps even better would be their Anti-Graffiti films which appear to be designed to go on the outside and protect from scratches. It looks like multiple layers, so you just peel off the outer layer when the 'scratching' gets heavy.
Anti-Graffiti Coating – 3M Scotchgard™ Multi-Layer Protective Film 1004


I love this and I’m going to look deeper for sure. If it works out I will add to the Seitz windows thread.

Thanks!!
 

Ozrockrat

Expedition Leader
Also if you know anyone in the aviation industry there is a film they put on the leading edges of helicopter blades. I don’t have the details anymore but the sample I had was basically indestructible and no impact on visibility.
 

devonojas

Member
WATEPROOFING

This is kind of a boring topic, so if it has no relevance to you just skip this post, but ask anyone with a camper (built or bought) for their story about leaks and they will have one. Even on our FWC we had a leak that took us several months and multiple FWC dealerships to find and fix. So as soon as I cut out the roof and created several seams I was worried about waterproofing.

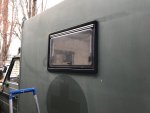
In Europe, Sika 221i is basically what campers are made of. It's the glue that holds everything together and the seal that keeps water out of FRP panel bodies, roof vents, etc. I can't even begin to imagine how many tubes of this I have in the truck to date. It's great stuff. I had gotten really confident with it since I knew that my windows were water tight.

When the first big rain came after I had installed the roof I was only a little nervous. I drove across Berlin in a serious downpour and when I opened up the box it seemed fine at first. But under closer inspection I found a small amount of water leaked all around the bottom of the new curb for the pop top. My mind was blown. The seal looked so good! I asked an experienced builder and he told me to put a LOT of Sika. I increased my bead from less than one cm to about 2 cm. It was a huge bead. After the next big rain I found that the seal had improved, but a small amount or water was still coming through in many places. I am still in disbelief, that this happened, and why it happened.

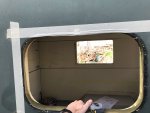
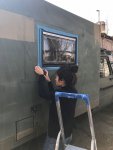
I made this discovery when I tried to paint over a vent that I installed with a Sika bead around it. Remember when I said that the brand of spray paint was important? Well, when I sprayed over this Sika bead I noticed that the paint melted the Sika! This was probably the most ridiculous disaster of the build. I had painted my whole pop-top with this paint that melts Sika. When I inspected the Sika more carefully I found that it could just peel right off with almost no effort. Keep in mind that this stuff is usually bonded like epoxy and when it's dry it has a rubber tire like texture.

This lead to an arduous, multi day, process of removing all of the Sika along the bottom of the pop-top, wire wheeling all of the paint off of the bottom of the profile and re-applying to the bare aluminum. It seems to have fixed the problem, but with this issue definitely had me feeling like there were unseeable forces working against me. I consulted with all of the most experienced people I know, and none of them could believe it. I still don't know what the base of this sparVar spraypaint is, or the chemical reason this happens, but one thing is 100% sure:

NEVER COMBINE THESE TWO PRODUCTS!!!

It's too bad because this paint looks amazing and comes in the period correct German army Bronze Green color.

Luckily I was able to solve this before installing all of my plywood furniture panels. No harm done, but probably a week or so added to the duration of the project.


DV005-ppic_Sika_Kartusche_Sikaflex-221i_300ml_0.jpgimg_2743_blanc.jpg

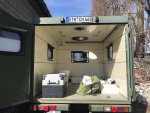
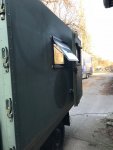
Oh, and here's a pic of the said rain storm where I was easily able to discover any possible leak:

IMG_9772.jpeg
 

devonojas

Member
Around this time I finally settled on a material for the cabinetry. One of my main businesses is designing and building custom audio equipment. I'm known for using spiral cut marine grade douglas fir. I love the look of the crazy psychedelic looking grain on spiral cut soft woods, and as a side benefit it's much lighter than the typical birch ply most people use. After doing some testing I decided that I could get away with 12mm thickness, which is actually the thickest this particular product comes in Germany. I think it's a beautiful material that I've never seen in the USA. It's 12mm thick and has 7 thin veneer grade plies. There are almost no voids.

IMG_9778.jpeg

The challenge with working with a material like this is that it's not graded for use in furniture--in other words it's a commodity grade product. It can be really challenging to work around imperfections in the face. After much searching, picking and creative cut layouts I was able to get almost all of the surfaces to have continuous grain. Most people probably think that this material is just cheap and light, but I actually worked really hard to get it to look this way.

Here's a progress shot of the cabinetry build.

IMG_9975.jpegIMG_9978.jpeg

I used 2x2x20mm aluminum angle profiles for the internal framing, and no backs. I can't imagine a lighter construction, except for maybe 100% aluminum which would be really cold to live with anyway. I'm really happy with the chosen materials and the fit and finish.

For interior shelves and wipable surfaces I used a white veneered 12mm multi ply birch. It is stiffer and stronger and supports our weight on the benches.

The counter and tables are made from a special ultra light core plywood for weight sensitive applications. Although they're 20mm thick they're very light.
 

devonojas

Member
DIESEL HEATER INSTALL

All of these G Ambulances have Eberspacher diesel heaters installed in the ambulance box. Mine appears to have been replaced fairly recently because it looks almost new.

The heaters are installed in an aluminum box, at the center of the front wall, right where I wanted to put my fresh water tank. I had to relocate it to the area in front of the passenger side wheel well.

This corner of the truck was really difficult to lay out. I had to relocate the water heater and pump multiple times to get everything to fit right. Although it looks rather simple, the stove exhaust line, water drain line, sink drain and heater all had to pass through the bottom of the box while leaving enough room for the gray water tank. I also discovered that there is a big aluminum support beam right where I was planning on drilling my penetrations. Here's a pic of where everything ended up.

IMG_0074.jpeg

The biggest challenge was making a mounting plate. These heaters are really intended to sit on a piece of sheet metal and not 5 cm of foam insulation that needs to be protected from water. Originally the heater sat on a part of the box that was made specifically for it, with no insulation and the aluminum skin wrapped up and protected the insulation. Here you can see the original pass through for the fuel line, exhaust and air intake:

IMG_7521.jpeg

My solution was to make a top mounted mounting plate with a 100 mm diameter PVC pipe that sealed at the top and bottom with Sika. I was worried about the hot exhaust pipe burning the PVC, but there's about an inch of space between them. I've been monitoring it closely and it shows no signs of getting hot.


IMG_0024.jpegIMG_0027.jpegIMG_0028.jpeg

IMG_1072.jpg
 
Last edited:

devonojas

Member
WATER HEATER

I installed a 24V electric water heater made by Elgena. It's made specifically for RVs and boats with 24V electrical systems and supposed to be efficient enough to use in this kind of configuration.

At first I could find no information in English. I ordered the heater from Reimo, where they also didn't speak English. After installing the heater, but before powering it up, I found the only english on the product: "WARNING: MAXIMUM PRESSURE 2.0 BAR. NOT FOR PRESSURIZED WATER SYSTEMS." of course, my water system is pressurized and the Reimo dealer would have known that as I was ordering a pump on the same order. Anyway, this was kind of a raod block for several weeks. I was trying to get more information from Elgena and Reimo but didn't hear anything back for a long time. When someone from Elgena finally did email me back they were very helpful. He told me that the tank on the model I had is plastic and would break under the 2.5 bar pressure of the systems pump. The good news is that they have a stainless steel tank that they market under the model name of Nautical Compact. They would just have to make me one with a 24V heating element, and it would just take about two weeks. Problem solved, but of course my plastic tank model was not returnable. Oh well, these guys are quite affordable. Here's a pic of the two. Very similar.

BUYER BEWARE: IF YOU'RE GOING TO BUY AN ELGENA WATER HEATER FOR YOUR RIG, AND YOU HAVE A PRESSURIZED HOT WATER SYSTEM, YOU NEED TO BUY A NAUTICAL COMPACT, THE UNIT ON THE LEFT. If you're using a submersible, low pressure pump, either is fine.

IMG_0031.jpeg

As you can see, the new boiler is a little bigger, so I had to slightly re-orient it at the same location.

IMG_0033.jpeg
 

Victorian

Approved Vendor : Total Composites
Another great looking plywood is "Tischlerplatte" . Can't buy it in North America but going standard in Germany.
 

devonojas

Member
PLUMBING

Outdoor shower and fresh water fill:


IMG_9552.jpeg

Water tank with fill, vent and feel barbs installed:

IMG_9752.jpeg

Tank installed in the cabin:

IMG_9814.jpeg

Cassette toilet (will be hidden inside of cabinetry):

IMG_9816.jpeg

gray and drain lines passing through the bottom of the cabin:

IMG_9788.jpeg

I was really excited to have access to these super light flexible hoses they use in European campers. The first surprise was that it was much harder than I expected to get the hose onto the barbed joints. The second surprise was that most of the joints leaked. I had to go through the whole plumbing system and tighten all of the hose clams, sometimes even adding a second hose clamp to get the joint to stop leaking. When I first installed everything I was really worried about cracking the plastic joints by over tightening the hose clamps. I now know that you need to tighten them more than you think. Make them tight!

IMG_0313.jpeg
 

Forum statistics

Threads
185,424
Messages
2,874,288
Members
224,720
Latest member
Bad Taste
Top