How do I sew a sidewall.

robert

Expedition Leader
This what I carry with extra stuff in it. https://www.extremeoutback.com/product/27/The+Ultimate+Puncture+Repair+Kit+Part#+001-009.html

View attachment 438405

The long tire irons are harbor freight and the short ones are motorcycle. The glue and talc came from Nappa and if you want to carry a tube then just make sure the stem is in the right position and not the real fat truck stem. The best bead breaker I've found is the hi-lift Jack. They are a pita to lube up and use but nothing beats it for breaking a bead. Watch the you tube videos on breaking down and mounting tires and practice if you get the chance. It's impossibly hard if you do them wrong and fairly easy once you know the trick. I think I could change a tire with the motorcycle irons if I had to.

View attachment 438406

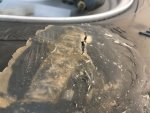
The other rear tire had a cut in the tread area that needed to be sewn today so now both tires are sewn. Previously a stick went thru it. I could only get inside the tire thru the beadlock ring so I wrestled my arm in enough to put a tube patch on the tire then installed a tube. Tube patches are only thin rubber and it bubbled out. Tire patches have cords in them. If you noticed in picture of the patch it tells you what way position the bead needs to be lined up. There are different patches available for bias and radial. Our local Tractor Supply Company had both but the biggest patch said bias tractor use only. Not sure any of that matters in a pinch. The brand they sold was Slime and they worked great. I'm going to beat both tires for 4 days and plan on doing a poker run on Friday. I'm only going to run 14 psi so that ought to be a good test. Wish me luck!

That's a really nice kit you have. Maybe I'm not seeing it but a valve stem puller/insertion tool makes putting in new valve stems a lot easier and they're usually under $10.

Harbor Freight also sells a swan neck bead breaker for under $20 whereas Amazon wants better than $30 for what looks to be the same tool. I've seen them that have a tire lever on the other end so it's two tools in one but I'm sure they're more expensive. https://www.harborfreight.com/automotive-motorcycle/tire-wheel/tire-bead-breaker-with-swan-neck-67403.html

ETA: No, I don't carry as extensive a kit as you do. I only have the small tubes of glue- always carry an unopened one as they dry out over time. I'd also have to use the can of Anti-Monkey Butt powder or Gold bond instead of talc. I'm interested in hearing how your tires hold up though, I can't recall hearing about any high speed buggy runs with repairs so it ought to be a good test.
 
Last edited:

Stumpalump

Expedition Leader
The star cross shaped valve core tool above the talc is 4 tools in one. Removes valve cores, chases threads and screews on the valve stem like a valve cap so you can pop the valve stem in.


image.jpg

The problem with it is you have to open the tire up enough to get the core started in the hole. The tool to have and I need to order is the long version made to push thru the hole then over to where you can easily screew on the valve core. They look like this.

image.jpeg

There is a gadget/gimmick that claims you can swap valve cores withou removing the tire bead. It uses a funnel to squeeze the valve core and then you pound it in. Pro point made them but here it is under a different name.

https://www.ebay.com/itm/HALTEC-510...302589341302?_trksid=p2385738.m4383.l4275.c10

It probably works in perfect conditions but if you have ever installed them then you know that some go easy and some don't. Here is a vid of the gadget. IDK...

https://m.youtube.com/watch?v=9l4pJNg9k0I
 

NMC_EXP

Explorer
Another use for the 4-way valve tool is when mounting a tube type tire, screw it on the valve stem while you're prying the 2nd bead on to the wheel. That prevent the valve stem from disappearing down the hole.

Re terminology:

The valve core is the Schrader valve that threads into the valve stem.

The valve stem is the mostly rubber gadget that pops into the hole in a tubeless wheel.

Tubes have integral valve stems which come in various designs. If you use the wrong tube design it will be trouble including when you have it partially aired up and the tube will reorient inside the tire. Then the valve stem will be sucked into the abyss. At that point the only solution is an ice pick to deflate it and start over.

If you're patching tubes, a deflator is handy. Uses compressed air to create a venturi effect and suck the tube flat. I've seen it break tubeless beads but they have to be loose to start with.

http://www.tyreshopdirect.com/tube-deflator-aspirator-561-p.asp

I use a duck bill bead hammer and a short handled 8 lb sledge to break beads. The hi-lift option looks to me like to much risk of damaging the internal structure of the tire.
 

Stumpalump

Expedition Leader
Another use for the 4-way valve tool is when mounting a tube type tire, screw it on the valve stem while you're prying the 2nd bead on to the wheel. That prevent the valve stem from disappearing down the hole.

Re terminology:

The valve core is the Schrader valve that threads into the valve stem.

The valve stem is the mostly rubber gadget that pops into the hole in a tubeless wheel.

Tubes have integral valve stems which come in various designs. If you use the wrong tube design it will be trouble including when you have it partially aired up and the tube will reorient inside the tire. Then the valve stem will be sucked into the abyss. At that point the only solution is an ice pick to deflate it and start over.

If you're patching tubes, a deflator is handy. Uses compressed air to create a venturi effect and suck the tube flat. I've seen it break tubeless beads but they have to be loose to start with.

http://www.tyreshopdirect.com/tube-deflator-aspirator-561-p.asp

I use a duck bill bead hammer and a short handled 8 lb sledge to break beads. The hi-lift option looks to me like to much risk of damaging the internal structure of the tire.

I like that deflater tool! I know that when seating a bead with starting fluid and a match (and that works great) if you do it with the valve core in it will works but then it sucks the bead right back off as the gasses cool. If the core is out it sucks air in and the bead stays put.

As far as removing a bead I think all options need to be on the table. I've had some so stubborn that the only way to get them off was by driving over the tire. Another thing I do on dirtbikes or the tractor is drive on them flat for a while. It helps loosen them up a little.

I installed the Maxxis tires in this thread with internal beadlocks by hand. I do have a harbor freight manual tire machine but to be honest it only worked on the easy tires. Brute force, the hi lift and irons did 80% of the work. I was plumb whooped after wrestling all 8 those big tires. http://forum.expeditionportal.com/threads/188124-Maxxis-Razr-MT
 

NMC_EXP

Explorer
The deflator was a lot easier than trying to squeeze all the air out of a tube so you could patch it. It would suck them dead flat.

I put myself thru college working at a truck stop pumping fuel and fixing tractor-trailer tires. No way I could do that now - that is a job of work.

We had a machine to break down the semi tires. Unless it was rusted to the wheel it was quicker and easier to break beads with a duck bill hammer and sledge then use tire irons.
 

robert

Expedition Leader
Doh, I saw the 4-way and even though I know what they're for I've never used one for that purpose and it didn't cross my mind to do so since I've had one of the cable type in my little tire kit since I put it together. I've got a four way tool in my kit as well. I haven't seen one of the pusher type tools- that's really cool and would save a lot of headache.


Note to self- buy one of those pusher tools. LOL
 

JimmyHall

New member
Putting a mechanical repair on the slice is probably a good Idea. I have sewn a sidewall with stainless welding rod 1/16" diameter through drilled holes. Then filled the remainder gaps with urethane door and window sealant. With a good patch it should hold for the purpose, and be less conspicuous than bolts. Space the holes no more than 1/2" apart, and put the loose ends under the stitches.
 

jgaz

Adventurer
Another use for the 4-way valve tool is when mounting a tube type tire, screw it on the valve stem while you're prying the 2nd bead on to the wheel. That prevent the valve stem from disappearing down the hole.

Re terminology:

The valve core is the Schrader valve that threads into the valve stem.

The valve stem is the mostly rubber gadget that pops into the hole in a tubeless wheel.

Tubes have integral valve stems which come in various designs. If you use the wrong tube design it will be trouble including when you have it partially aired up and the tube will reorient inside the tire. Then the valve stem will be sucked into the abyss. At that point the only solution is an ice pick to deflate it and start over.

If you're patching tubes, a deflator is handy. Uses compressed air to create a venturi effect and suck the tube flat. I've seen it break tubeless beads but they have to be loose to start with.

http://www.tyreshopdirect.com/tube-deflator-aspirator-561-p.asp

I use a duck bill bead hammer and a short handled 8 lb sledge to break beads. The hi-lift option looks to me like to much risk of damaging the internal structure of the tire.

Wow! When I read this post I thought “this guy has knows his way around a truck tire”. Especially the part about the tube “sucking” into the tire and having to deflate it with an ice pick! Lol. You only make that mistake once. You then confirmed my thoughts a couple of posts later when speaking about your experience.

I spent the last three years of high school (mid 70's) repairing truck and school bus tires at the garage where I worked after school. That was back in the era when many/most 3/4 and 1 ton pickup trucks also used the tubed, lock rig type wheel assemblies.

Good thread!
 

NMC_EXP

Explorer
Wow! When I read this post I thought “this guy has knows his way around a truck tire”. Especially the part about the tube “sucking” into the tire and having to deflate it with an ice pick! Lol. You only make that mistake once. You then confirmed my thoughts a couple of posts later when speaking about your experience.

I spent the last three years of high school (mid 70's) repairing truck and school bus tires at the garage where I worked after school. That was back in the era when many/most 3/4 and 1 ton pickup trucks also used the tubed, lock rig type wheel assemblies.

Good thread!

All right! A fellow tire man who managed to survive the days of multi-piece (lock ring) tube type truck tires.

The only one that I ever blew up and was lucky to have survived was a tubeless. I was scared of the lock ring wheels and always aired them up in a cage. Was too dumb to worry about the tubeless tires on drop center wheels. Tubeless truck tires were just stating to come online when I was at the truck stop (72 to 77).

Guy was delivering a brand new low boy semi trailer. It had tandem axles and small diameter dual wheels - maybe 16 or 16.5". They were 12 ply bias tubeless tires so typical inflation pressure was 85 PSI. One tire was not just flat, one bead was clear off the wheel - should have been a red flag but being a tubeless rookie I assumed he had run it flat long enough that it half dismounted itself.

I pried the bead back on the wheel and with it flat on the floor and me squatted down on my haunches next to it I aired it up a ways and checked for leaks.....no leaks so I aired it up some more. Last time I checked it had 65 PSI, still no leaks.

The air chuck was in my right hand which was resting on the sidewall as I continued to put air into it. Then I felt the tire move and get taller.....uh-oh thought I. I let go of the air chuck and leaned back just as the bead on the bottom side blew off the wheel. Had at least 70 PSI by that time.

The tire and wheel went straight up. The shop had 9 foot ceiling which was the concrete deck of the 2nd floor. Ceiling had acoustic panels glued to it. Tire/wheel hit the ceiling, bounced off, and hit the floor. Lucky for me the blast wave had blown me about 6 feet backwards where I piled up against the Coates small tire machine.

I was out cold. When I woke up I could not see. Turned out the blast had got every speck of dust and dirt in the room airborne, that plus both my corneas were scratched. Could not hear either.......my ears rang for about a week.

The tire/wheel had hit the ceiling level and square. You could read the tire brand and size info where it was pressed into the acoustic tile.

I could write a book about my experiences at that place. Which by the way was the Dixie Truckers Home on US Hwy 66 then I-55 at McLean Il.
 
Last edited:

jgaz

Adventurer
Stump:
Nice job on the side wall repair.. IMO it's worth a few bucks and your time to salvage another weekend at the dunes.
Enjoy!
BTW: Remind me the next time we hike to check and see if I still have my deflator. I'm not home as I write this. I haven't thought about it in 30+ years!

NMC_EXP:
We had no cage for inflation when I started working there. (71 to 74) We aired up the lock ring tires flat on the floor with the arms of a hoist over top of the assembly to contain any flying parts. We used a lock on air chuck, with a regulator on the supply hose to inflate it.
I only had one ring come off and it happened slowly. The owner of the tire had attempted to repair the tube himself and apparently had sprung the lock ring so it didn't seat correctly on the rim. He brought it to us to reassemble. I didn't like how it went together, but what does a 16 year old kid know. Lol!
Good times!
 

FJOE

Regular Dude
All right! A fellow tire man who managed to survive the days of multi-piece (lock ring) tube type truck tires.

The only one that I ever blew up and was lucky to have survived was a tubeless...

Wow. That sounds intense. Glad you survived!
 

NMC_EXP

Explorer
NMC_EXP:
We had no cage for inflation when I started working there. (71 to 74) We aired up the lock ring tires flat on the floor with the arms of a hoist over top of the assembly to contain any flying parts. We used a lock on air chuck, with a regulator on the supply hose to inflate it.
I only had one ring come off and it happened slowly. The owner of the tire had attempted to repair the tube himself and apparently had sprung the lock ring so it didn't seat correctly on the rim. He brought it to us to reassemble. I didn't like how it went together, but what does a 16 year old kid know. Lol!
Good times!

There were maybe 3 or 4 that I repaired and found the lock ring was sprung or the ring groove in the wheel rusted away to the point I refused to air them up. Reassembled as best I could, bolted it back on the truck and handed the air line to the driver.

Even as an immortal 20 year old what got my attention and respect for lock rings was our inflation cage. It was made of heavy walled 3" tubing and several of the tubes were bent outwards as a result of lock ring blow offs. We used a clip on chuck with the cage.
 

Stumpalump

Expedition Leader
The shoo goo is failing. I need a better product if anybody has a suggestion. First day some peeled and i smeared on more but it’s cracked on both repairs today..
 

Stumpalump

Expedition Leader
[ATTACH=C
This is this morning. Pics of my car on top of another and twisted broken frames won’t post from the phone but will say the patch is taking a beating an 5/8 with only cracks in the shoo goo. I’m still running and I’ll just smear on more shoe goo
 

Attachments

  • 11C638E6-131B-4DC1-94CA-F8FBCEEEE24E.jpg
    11C638E6-131B-4DC1-94CA-F8FBCEEEE24E.jpg
    523 KB · Views: 27
  • 6B51DF50-A445-4467-8C48-C5DA56D2275A.jpg
    6B51DF50-A445-4467-8C48-C5DA56D2275A.jpg
    518.4 KB · Views: 25

Forum statistics

Threads
185,828
Messages
2,878,634
Members
225,393
Latest member
jgrillz94
Top