F 450 flatbed camper build

Capt Eddie

Adventurer
Where is the correct forum location for a flatbed, camper build on a F-450? I will wait until I get an official reply.
 

kcowyo

ExPo Original
Probably in the "Other Custom Expedition Camper" folder....

I'll move this thread over shortly.

- KC
 

Capt Eddie

Adventurer
F 450 flatbed camper build.

Please bear with me. I work better with saws and a welder then I do with a camera and a computer. I will take pictures as I go but I am not sure how long it will take to get them posted. The base truck for this build is a 2008 Ford F450 4x4 cab and chassis 200 inch WB with a crew cab. 6.4 diesel, 4:88 LS Lariet package. Dual tanks. I will be using the truck to haul a 30 ft gooseneck trailer for work and work out of aluminum tool boxes installed on top and under an aluminum flat bed. For trips I will have a Lance 835 hardside camper taking up 8 ft of the 11 ft flat bed. The extra 3 ft will be for storing a Newholland gas grill and ice chest. During hunting season I can put three dog kennels in the back. The flat bed is 8 ft wide and 11 ft long. I have three sheets of 3/16 bright plate aluminum coming Tues. I have 4 x 4 14ga squ tubing to raise the bed high enough for the camper to clear the cab. The last three ft of the bed will be 4 inches lower, it will be install straight on the bed rails. This will lower the work platform and entry way for the camper. The bed will have Factory made aluminum boxes install on top and underside. Two 24 inch x 14 inch x 16 inch boxes will be installed behind the rear wheels. ON the driver side One 60 inch x 18 x 18 will be under the bed and one 96 inch will be on top of the bed. On the passenger side I will build a 36 x 36 x18 aluminum box to hold the spare tire and jack. That will leave room for one 24 inch box underside and one 60 inch box on topside.
 

boblynch

Adventurer
Capt Eddie said:
Where is the correct forum location for a flatbed, camper build on a F-450? I will wait until I get an official reply.

Good build threads are like a field of dreams - build it and we will come.

The two closest threads Carlyle (F350 w/ flatbed Alaskan) and jayshapiro (F650 custom camper) are both located in the Domestic full size section. You'll also find useful info in many of the Expedition Camper sections.

Best of luck with the build.

Bob
 

Capt Eddie

Adventurer
I picked up the 4 x 4 squ tubing today for the base of the flat bed. At the tune of $100 each for 24 ft. I also looked into a gooseneck setup to go under the bed. I still do not know if I should weld or bolt the hitch to the frame. Any comments would help.I have a spare tire issue to deal with. I have the dual tanks and no where under the frame to hang the spare. It looks like I will have to build a box 36 x 36 x18 to match the rest of the boxes to put the spare in. Tomorrow after work I will start mounting the beams and maybe installing the aluminum plate if it comes as scheduled. I call warn winch about a mount for this truck. They only have the hidden winch mount for now. It puts the bumper out 5 inches,$470 plus $200 for plastic to cover the hole left between the bumper and frame. Any ideas on mounting a M12? I like the idea of a removeable to be able to mount on the rear as needed.
 

Capt Eddie

Adventurer
I was able to get a couple hours of work on the truck in tonight after work. I cut all the 4 x 4 s for the frame and welded tabs on them to attach them to the frame. The big question is if I should weld the tabs to the frame or try to drill and bolt the frame. All the places I went to loking for the gooseneck set up said to weld everything. All the truck dealers sent the truck over and get them welded. If it was going to void the warrenty the dealer would not do it. That was thier reasoning. What does the Expo World think of welding to the frame. The aluminum is going to be here tomorrow.
 

Capt Eddie

Adventurer
It rained most of the morning. This gave me time to go to a fabricator and have a bolt on gooseneck set up made for the F450. This set up has 1 inch x 16 inch flat as the base and 1/2 arms to bolt to the frame. Cost $150. I will do the priming , painting and install. The same design ot of 3/16 installed was $680. I was able to prime and paint all the 4 x 4s tonight in the shop. I will install everything tomorrow night after work. The aluminum plate never showed up. They said it should be here tomorrow. They only come to this side of the state on fridays. I called the Lance dealer this morning to get another female adapter to install in the bed of the new truck so I could keep the one in the Dodge so I can use the Dodge next week to go to Denver for my Grandfather funeral. I know I will not have the Ford ready by then. The dealer said that adapter is only availible thru Lance for $45. I think I will change all plugs to 7 way rv so I will only have one female for the camper and the gooseneck. Alot cheaper and easier to replace.
 

ntsqd

Heretic Car Camper
Sounds like maybe you've already solved it, but most frames these days are heat treated. Welding on them destroys the heat treat in the weld zone. Can't recall ever seeing a welded-on manufactured gooseneck hitch.

I would bolt it in the web only (fewer holes in the flanges the better) and use lots of bolt spread out over a large area. It can sit on the flanges, just don't bolt through them.
 

Capt Eddie

Adventurer
All the trailer dealers had weld on and bolt on. I did not like the idea of welding,but they say they dod it all the time. Even my friend that fabricated the bolt on said he welds his presonal one in. It is over now. Now if I can get the aluminum in today.
 

haven

Expedition Leader
Here are two ways the Mitsubishi Fuso Body-Builders guide says to attach a subframe to the truck chassis:

Mounting bracket welded to subframe, bolted to truck
fuso-body-mount-2.jpg


Two mounting brackets bolted together
Fuso-chassis-mount-2.jpg


The mounting bracket is never welded to the truck chassis, just bolted in place.

Note that the weight of the subframe rests on top of the truck frame. The mounting bolts don't bear the weight of the subframe, they just hold everything in place.

Chip Haven
 

Capt Eddie

Adventurer
I welded supports to the subframe and will bolt them to the chassis. Thealuminum came the morning as I was driving out the gate. I was able to paint all the subframes and gooseneck hitch tonight. Tomorrow I should be able to mount everything in place.
 

Capt Eddie

Adventurer
I mounted the gooseneck hitch tonight. I used a permenant lock tight on the bolts. I hope that helps. I figured out that the passenger side back 24 inch box can only be 10 inches high or it will hit the tailpipe. I will take it to a muffler shop and see if they can take it out the back or in front of the box. I can not go any further until I get some of the boxes. I did figure out that I will have to have a 36 x 36 x18 box build to keep the spare. The tire is extra haevy. I will back the box with1/4 steel plate.
 

dhackney

Expedition Leader
I would suggest the following, if there is still time to change the design:

1. Unless you have specific things you need to store in them, create two or more shorter boxes rather than one 96" long. It's better to expose as few contents as possible when accessing external storage boxes. Shop for storage containers now (Rubbermaid, etc.) and be sure you have viable containers for the size boxes you are creating.

2. Use as much high strength aluminum T6, etc., as possible, as soon as possible. Weight is the enemy. Your planned 1/4" steel plate for the spare is much better changed to a comparable piece of aluminum or two steel tubes or channel.

3. Limit material whenever possible. You don't need to enclose the spare box, just frame it and provide a locking door.


4. Install interior lights in each box. They are very handy and you will never regret having them.

5. Garage / shop floor liner blocks work great for lining the base of the storage boxes. We used the type that locks together.

6. Standard adhesive backed rubber weatherstrip works very well for sealing the box doors. Ours has been in for 18 months and is still going strong.

7. Provide for a way to clamp down the spare. We use ratchet straps and they can be a pain. Better to have an integrated clamp that clamps down on the center hub or stud hole.

8. If you are heading overseas, design and build for two spares.

9. If you are heading overseas, you are better off with a European truck hitch on both ends and a matching tow bar than the winch. Less weight, especially when you add in the weight of the 2 Ott or larger cable for the winch motor. If you stick with the winch you must allow for all the required gear to make it viable, e.g. line extensions, tree wraps, sand anchor, etc. We use an entire long storage box just for recovery gear, almost all of which is winch related. Also, bring a spare winch controller.

10. Don't forget to allow for tie down points for the camper.

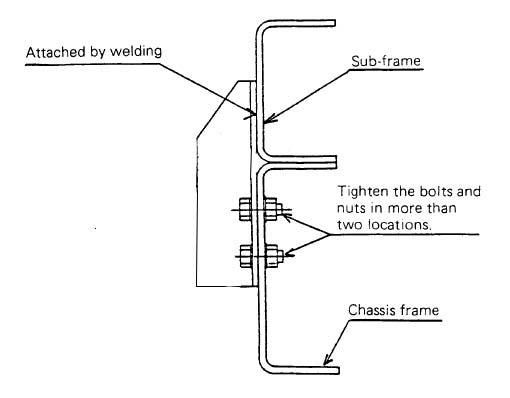
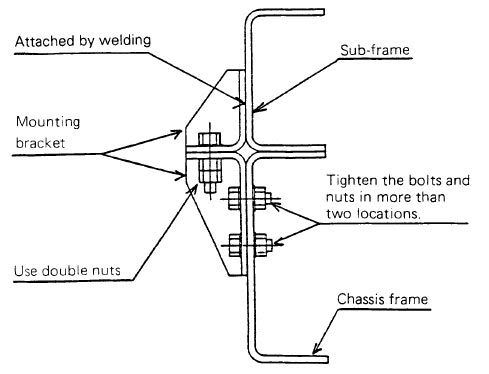
11. If your Ford flexes anywhere near as much as our Fuso, allow for some rubber blocks, 3 point pivot frame or something to isolate the camper from the frame flex.
 

Capt Eddie

Adventurer
DHackney All of your concerns have been address and changed or modified. Alot of this I thought of but did not realize the importants. Is a rear mounted winch worth the weight and cost? I have a 12000 I can put on the front or make it removeable. I think you have both,what do you think? I will not be trying to get stuck but I will like to go off the road. Plus we will be traveling is snow conditions on road.
 

Forum statistics

Threads
185,840
Messages
2,878,743
Members
225,393
Latest member
jgrillz94
Top