Unimog camper build

4x4 explorer

Observer
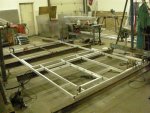
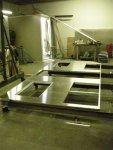
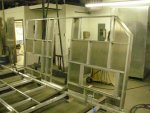
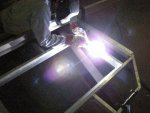
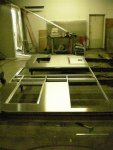
Here are some pictures of wall construction. I used 2"x2" and 1"x2" eighth inch wall structural aluminum for framing. The aluminum frame was taped with a two sided 3M product that is like contact cement. The skin was very carefully aligned on the frame and then riveted. The structural rivets have a solid core.
 

Attachments

  • unimog camper 012 (Small).jpg
    unimog camper 012 (Small).jpg
    66 KB · Views: 208
  • unimog camper 020 (Small).jpg
    unimog camper 020 (Small).jpg
    34.8 KB · Views: 175
  • unimog camper 022 (Small) (2).jpg
    unimog camper 022 (Small) (2).jpg
    58 KB · Views: 186
  • unimog camper 014 (Small).jpg
    unimog camper 014 (Small).jpg
    51.3 KB · Views: 145
  • unimog camper 016 (Small).jpg
    unimog camper 016 (Small).jpg
    35.5 KB · Views: 133
  • unimog camper 027 (Small).jpg
    unimog camper 027 (Small).jpg
    57.7 KB · Views: 184
Last edited:

Jeep

Supporting Sponsor: Overland Explorer Expedition V
Which 3M boding tape did you use, what did you think of the bonding charactertics?

Thanks,
Mark.
 

Mickldo

Adventurer
Keep posting pics of the build. If you don't want to hog the site then host the photos somewhere else like photobucket and link to them.

Show us some pics of the KTM 640Adv too.

We use the 3M tape on the racecar trailers we build at work. They don't like any distortions in the frame but I see you have that covered by clamping it to those big "I" beams, good idea.

Looks good so far.
 

4x4 explorer

Observer
This is a two sided tape I bought from Featherlite ( that's the company that builds race car trailers ). They use it for both side and roof panel assembly. I used it to connect the skin with the framing, but also to eliminate some of the impact of the aluminum to aluminum cold bridge. The advantage or disadvantage depending how you look at it, as it's like contact cement. Once you put the two pieces together it difficult to get them apart. I was working on a horizontal surface so it was easier to lay the sheet of aluminum skin on the framing very gently. By doing so it could be carefully lifted back up if it needed a slight readjustment. Once you put pressure on the skin, I believe the only way you'd get it apart is using something like piano wire to break the bond. That is why I built the framing and skinned it before I put it on the truck. Some build the framing on the truck and then skin it, I thought it would be easier to do it horizontal rather than vertical. It worked good. Another suggestion is do all the fitting, etc. and make sure of fit before you start taping. And, yes if you want straight walls clamp everything during the build.
 
Last edited:

Mickldo

Adventurer
4x4 explorer said:
This is a two sided tape I bought from Featherlite ( that's the company that builds race car trailers ). They use it for both side and roof panel assembly. I used it to connect the skin with the framing, but also to eliminate some of the impact of the aluminum to aluminum cold bridge. The advantage or disadvantage depending how you look at it, as it's like contact cement. Once you put the two pieces together it difficult to get them apart. I was working on a horizontal surface so it was easier to lay the sheet of aluminum skin on the framing very gently. By doing so it could be carefully lifted back up if it needed a slight readjustment. Once you put pressure on the skin, I believe the only way you'd get it apart is using something like piano wire to break the bond. That is why I built the framing and skinned it before I put it on the truck. Some build the framing on the truck and then skin it, I thought it would be easier to do it horizontal rather than vertical. It worked good. Another suggestion is do all the fitting, etc. and make sure of fit before you start taping. And, yes if you want straight walls clamp everything during the build.

We do ours by assembling the side frames on the ground first, then lift them onto the chassis, then attach the roof and end wall frames. We then fit out all of the wiring and plumbing before we sheet it all. We use Di-Bond instead of alloy sheet for lighter weight, better rigidity, and better insulation.


4x4 explorer

Observer
Very nice trailers you're building down under. I looked at a composite material, but felt more comfortable with .125 aluminum. In addition to the tape, the skin is also riveted with structural solid core aluminum rivets. Where two panels come together, I used a joint sealer just before putting the panels in place. I used the finished edge for butting panels, so I was able to get a very tight fit. I don't think I could have managed to do that putting the panels on after the structure was on the truck. The skin thickness is probably overkill, but it should take lots of offroad abuse. The roof will get skinned with a single piece of 8'x13' .040 aluminum. so there will be no roof seams. An escape/access hatch will allow me to get up on the roof. There will be a 4'x8' area next to the hatch that will have a layer of thicker material over the top skin to stand or walk on. I intend to run wiring and plumbing in internal chases that will have easy access rather than the walls, floor or ceiling. An example will be along the front of the cabinets, the kick board at the bottom will be hinged to open to a wiring chase. Although I've tried to think of everything, there are still a few parts still undecided on which way to go.
 

Mickldo

Adventurer
4x4 explorer said:
Very nice trailers you're building down under. I looked at a composite material, but felt more comfortable with .125 aluminum. In addition to the tape, the skin is also riveted with structural solid core aluminum rivets. Where two panels come together, I used a joint sealer just before putting the panels in place. I used the finished edge for butting panels, so I was able to get a very tight fit. I don't think I could have managed to do that putting the panels on after the structure was on the truck. The skin thickness is probably overkill, but it should take lots of offroad abuse. The roof will get skinned with a single piece of 8'x13' .040 aluminum. so there will be no roof seams. An escape/access hatch will allow me to get up on the roof. There will be a 4'x8' area next to the hatch that will have a layer of thicker material over the top skin to stand or walk on. I intend to run wiring and plumbing in internal chases that will have easy access rather than the walls, floor or ceiling. An example will be along the front of the cabinets, the kick board at the bottom will be hinged to open to a wiring chase. Although I've tried to think of everything, there are still a few parts still undecided on which way to go.

I reckon the .125" alloy will be more than adequate to withstand off road rigours. The Di-Bond we use is .125" too but is a fraction of the weight. The alloy will definitely be tougher though. We use the same size alloy on the wheelhouses of the boats we also build.

We use .080" for the roof on the wheelhouses. If you are only using .040" for the roof skin I wouldn't be climbing on the roof at all without lots of reinforcing underneath.

Your build looks really good so far. Looks like a lot of thought has gone into the design. Keep the photos coming.
 

4x4 explorer

Observer
The roof bows are hat shaped and placed on 9" centers and as I mentioned in the previous post, where I'll be walking there will be an added layer of 3/16" plate over but not penetrating the .040 roof skin. That should be more than adequate to lounge or walk on.
With winter set in here and unheated shop area where truck is located, most work now will be concentrated on collecting next phase parts and building things I can in the heated part of the building. Temperature here this morning was -1 F.
What part of Australia are you located in Mickldo?
 

Mickldo

Adventurer
4x4 explorer said:
The roof bows are hat shaped and placed on 9" centers and as I mentioned in the previous post, where I'll be walking there will be an added layer of 3/16" plate over but not penetrating the .040 roof skin. That should be more than adequate to lounge or walk on.
With winter set in here and unheated shop area where truck is located, most work now will be concentrated on collecting next phase parts and building things I can in the heated part of the building. Temperature here this morning was -1 F.
What part of Australia are you located in Mickldo?

I am in Queensland. It is stinking hot here at the moment (11:30pm Xmas eve).

I whinge whenever the temp gets below 20 C. I hate the cold. The coldest it ever gets here is maybe -5 C and that is only for a couple of days during the middle of winter.
 

4x4 explorer

Observer
I did a 9 day bike ride across NSW about ten years ago. Got married there on the Murray River. Great country and great people, if I were younger I'd move there in a heartbeat. To many whiners here, they don't want to take personal responsibility for their actions. Instead, they want to blame everyone else for their problems. Didn't find that in Australia. Hope you have a pleasant holiday. Good on ya.
 

Mickldo

Adventurer
4x4 explorer said:
I did a 9 day bike ride across NSW about ten years ago. Got married there on the Murray River. Great country and great people, if I were younger I'd move there in a heartbeat. To many whiners here, they don't want to take personal responsibility for their actions. Instead, they want to blame everyone else for their problems. Didn't find that in Australia. Hope you have a pleasant holiday. Good on ya.

There are still whiners here but in general Aussies are a pretty laid back bunch. Hope you had a good holiday too.
 

Forum statistics

Threads
185,914
Messages
2,879,576
Members
225,497
Latest member
WonaWarrior
Top