The Cactus Red mod thread.

crawler#976

Expedition Leader
The suction cups worked for the first week, but are already getting baked by the sun, and loosing their grip. I moved the antenna down to the bed rail behind the cab for the time being. I bought the cheap suction cups - dunno it there are better quality ones available that might hold up better.
 

crawler#976

Expedition Leader
The factory rails are rare as hens teeth. The manufacture quit production last year, and the deallers are out of stock. I got lucky and found a set in relatively new condition - they were beat up, but had the factory hardware intact.

There is an opportunity to get a set made for your truck.

http://www.dodgetalk.com/forums/showthread.php?p=3159477#post3159477

Speaking of rock rails, I was displeased with the Hammerite paint I used. It was wearing off the step area very quickly, and ended up grey instead of black. They were also very slick when wet. I sanded the steps w/ red scotch brite, and applied three coats of Rustoleum/Duplicolor spray can bed liner. Worked great - it left an even finish, black color, and a non-skid texture.

Mark
 

Cypher

Full Time Traveler
The suction cups worked for the first week, but are already getting baked by the sun, and loosing their grip. I moved the antenna down to the bed rail behind the cab for the time being. I bought the cheap suction cups - dunno it there are better quality ones available that might hold up better.

To be honest, I get mine from the cheapest metal shower hanger/racks that I find at Walmart. The rack costs me about $5 and the suction cups have lasted me over a year. I just recently replaced them as they also lost the ability to stay put. Nonetheless, 1.25 years in the AZ sun for $5 isn't too bad. The suction cups that I originally used from Ace Hardware were the same price and only lasted about 2 months before they were done. The ones that I get from Walmart are the double suction type cups, which have a smaller suction cup in the interior of the main cup.
 

crawler#976

Expedition Leader
The Purple Cranium front diff cover is on. A rear cover is next on the list.
 

Attachments

  • HPIM3586.JPG
    HPIM3586.JPG
    455.9 KB · Views: 497

crawler#976

Expedition Leader
couple of additions...and fixing a bent control arm.

1. Added a dashmat to protect the dash from AZ sun. Used a new fabric that is very close to the same pattern and the seats - looks great and should reduce the interior heat some sine it's much lighter in color than the stock dash plastic.

2. I upgraded the bulbs in the Hella 700's to Hella Optilux Xenon White XB Light Bulbs. Having used HID's on the Taco, I prefer the white light. These work great, are relatively inexpensive, and definately are much whiter than a standard 100W bulb.

http://www.summitracing.com/parts/HLA-H71070181/

3. DT Pro Fab will be working on replacement control arms for me. I bent the passenger side arm on a local trail, and need to upgrade to a much more robust lower arm. At the same time I'll be adding tire clearance by offsetting the arms a bit. The project starts next Friday - Updates to follow!

Mark
 

Attachments

  • 100_1733.JPG
    100_1733.JPG
    135.7 KB · Views: 461
  • 100_1734.JPG
    100_1734.JPG
    117.7 KB · Views: 399

crawler#976

Expedition Leader
Installed new control arms on Cactus Red!

Complete details on the install at:

http://www.dodgetalk.com/forums/showthread.php?t=270477

I bent the passenger side lower control arm, and decided to upgrade vs. buying one new arm. I'd have bent them again, so it was time to $$$ up. I also had tire rubbing problems, and the new arms cured that as well.

Thanks for looking.

Mark
 

Attachments

  • new arms installed.jpg
    new arms installed.jpg
    254.4 KB · Views: 475
  • kinked lower and clearanced upper arms.jpg
    kinked lower and clearanced upper arms.jpg
    164.3 KB · Views: 447
  • the reason I needed new arms.jpg
    the reason I needed new arms.jpg
    161 KB · Views: 493

crawler#976

Expedition Leader
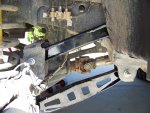
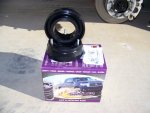
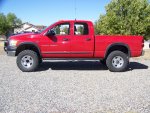
I decide to cure the nose down attitude of the Cactus Red Power Wagon. I hoped the spacer would cure some clearance problems after installing 1/2” longer control arms too. I decided to use the new Daystar 1” coil spacer. I purchased mine from 8lugtruckgear.com, and got great service. Here’s the info on the spacers:

http://www.8lugtruckgear.com/Suspens...-4WD-p423.html

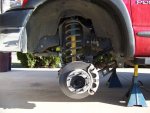
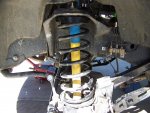
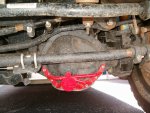
After reading the supplied instructions from Daystar, I started by jacking and supporting the truck on jack stands. After removing the tires, they were used as safety spacers under the frame. Remove the ABS and brake lines from the axle, followed by the sway bar links. This is also the time to disconnect the lower end of the track bar to allow the axle to not bind. Jack the axle up to remove the upper shock nut and mounts. Lower the axle and remove the lower shock bolts, remove the shocks, shock towers and coils. Remove the stock coil isolator. The coils are side specific according to the Daystar instructions, so keep them separated. I had some binding on the passenger side control arms that required coil compressors to reinstall the coils with the new spacers. I could have disconnected the drag link to alleviate the binding, but decided the compressors were easier. Reinstall all items removed in the reverse order – jacking the axle from side to side will be required to get the track bar and sway bar installed. Re-check all fasteners, install tires, torque lug nuts to 140 Ft/Lbs. If you have a place to do so, check clearances. Get an alignment ASAP – I had an appointment for the afternoon of the install already scheduled.

Problems encountered during install:

Due to some clearance issues with the longer arms, I had to use coil compressors to remove and install the passenger side coil. Since I had them out, I used them for both sides to make the install easier. Stock arms may not have this issue. I’ve been in contact with DT Pro Fab for a solution, be it a longer track bar or changing the design of the upper links.

The sway bar link uses an odd ball hex wrench. I ended up grinding an 8MM down to fit the socket. Ended up about 9/32 across the flats. I don't have a 9/32 in any set I own...

Problems solved by the spacer:

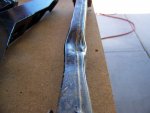
http://www.dodgetalk.com/forums/showthread.php?t=270898 has the details of the problems encountered after installing the new control arms. The new spacers have solved the contact problem with the front bumper! There is no contact with the bumper after install by a paper-thin margin. I didn't think the spacers would solve this, but they did.

Full photos of the install at:

http://www.dodgetalk.com/forums/showthread.php?t=272378

Thanks for looking!

Mark
 

Attachments

  • daystar spacer.JPG
    daystar spacer.JPG
    225.8 KB · Views: 335
  • stock.JPG
    stock.JPG
    203.6 KB · Views: 337
  • completed install.JPG
    completed install.JPG
    263.3 KB · Views: 435
  • after install.JPG
    after install.JPG
    364.6 KB · Views: 503

crawler#976

Expedition Leader
Thanks!

There's a photo in post #36 of the Purple Cranium cover - it's been tested on a trip from Lake Pleasent to Crown King and did it's job well.

Mark
 

jcbrandon

Explorer
Excellent. Thanks for the information and great pictures. Do you happen to have a photo of the truck with a significant load in the bed? Does it go nose-up with say, a half a ton back there?
 

Forum statistics

Threads
185,829
Messages
2,878,662
Members
225,393
Latest member
jgrillz94
Top