building the Bullet XV

sarconcepts

Adventurer
rear wall progress pics,
spare tire mount, fuel can holders, & spare tire pulley/ mountain bike mounting posts & detail & interior spare tire mounting post pic
(you can still see some of the UHAUL exterior colors on the interior)
 

Attachments

  • spare tire mount 002.jpg
    spare tire mount 002.jpg
    140.4 KB · Views: 472
  • spare tire mount 005.jpg
    spare tire mount 005.jpg
    142.4 KB · Views: 352
  • spare tire mount 001.jpg
    spare tire mount 001.jpg
    140.8 KB · Views: 505
Last edited:

dentedvw

Wire twister
Fully awesome! Great choice on the Uhaul bits, I was running this idea through my head a few months ago too. Good to see it going somewhere!
 

The Adam Blaster

Expedition Leader
Hi sarconcepts!

Great build, and I especially like how you started to document your progress in more detail than when you first began. Thanks!

I am interested to see your winching of the spare tire in action, up to it's little recessed mount, and back down to the ground. Will you take a little video for us? :D

I am curious why you chose to mount the jerry cans up so high on your rear wall? It seems like you've made it a bit harder to access the cans, was that the point? (To help prevent possible theft?)
 

sarconcepts

Adventurer
To answer your question about the fuel can holders, yes, I chose to mount them high to create less of an option to steal them (I tend to be a defensive designer). They will also be bolted in, with a locking lugnut. these really are meant to be emergency fuel, so they wont be accessed.. ..really.. ..ever. also, mounting them higher creates interior space down low for storage. there will be an access door on the drivers side in that back corner for taller things like chairs, etc. & below the middle one will be additional depth (or width) in the cabinets below the range top (this is where I'll store the table top). all this said, the bottom of the cans will be 5'-8" above the ground, so, my eye level, not too high to reach comfortably.
the bumper is being made as we speak, & I'm removing the walls to apply the skins, but after all these are done & permanently installed, & the winch is mounted & powered up, I might have grown smart enough to figure out how to post a video.
all in all, I'm hoping that's not the most impressive thing about this vehicle!
 

Carlyle

Explorer
I just read through your build up and have to say I'm impressed with your build. Keep the pictures coming!
 

thecarman

New member
Very cool build! I have thought of getting the same box and cutting it down for use on my 1-ton Chevy. But I'm worried about the weight of what I build vs. the GVWR of my truck.

Is that UHaul FRP/Plywood material 1/2-inch thick, or 3/4? (I was told that the 26-foot boxes were 3/4, so wondering if these smaller boxes are the same, or thinner)

And do you know how much it weighs per square foot? I could estimate weight that way.

Thanks!
 

sarconcepts

Adventurer
hey truckman
the FRP used on the 14' truck (which is 11' long + cabover) is 1/2" ply wood plus fiberglass equaling 9/16" or so
yes, the anal mathematician in me weighed every part beforehand & calculated the finish box weight after i cut down the parts.. ..ready!?

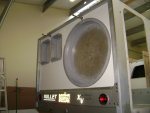
the FRP panels weigh 2.2 lbs per sf
the aluminum floor boards weigh 20 lbs each (10" wide, 14 total)
floor to wall connection parts weigh 2.14 lbs per lf
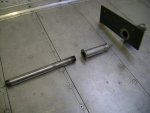
back posts weigh 30 lbs each
front posts weigh 10 lbs each
the cabover bottom weighs 15 lbs
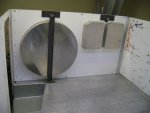
the whole roof system (perimeter + ribs + roof aluminum sheeting)weigh 196 lbs

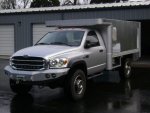
the whole box is 7'-10" wide, 6'-10" tall, 11'-10" long plus 30" cabover (original uhaul dimensions)

i calculated after cutting down the parts to my new dimensions, the overall box weight would be 910 lbs plus bolts & caulking = about 1000 lbs

my new box dimensions are 7' 2 3/4' wide, 4'-8" tall (plus pop up) & the same 11'-10" long

this weight of course does not include anything inside, your concrete counters & ironwood cabinets may tip the scales a bit
your length may be half of mine, so that helps a lot
technically, if you get rid of the back roll up door, you dont need the back posts, just an angle connection from sides to rear, as the rear wall will give you the lateral strength that the posts had to take. this saves 60 lbs
your level of finish inside could be minimal as i plan to glue rigid insulation to the inside of the walls then glue 1/4" ply, only putting ribs or supports where they're needed. this adds up to little more wall weight (no 'studs' required).
the ceiling only wants some insulation & some cloth of some sort, still not a lot of weight.
let's say your box weighs about 1000 lbs total wet, that's only 16 - 60lb bags of concrete (or four fat guys), not a lot of weight at all,
what concerns me more, as i felt this once on a friend's camper, is the tall center of gravity. the truck had a squishy suspension & would sway back & forth for about six blocks after taking a left hand turn! that's the problem with some of the 1 ton trucks, they're made to ride like a car with no weight in the back.
 

The Adam Blaster

Expedition Leader
The project is starting to look really sharp now!!!
Very shiny also, it's going to be hard to look at on a sunny day! lol

I'm interested to see what your interior build looks like as well.
 

thecarman

New member
yes, the anal mathematician in me weighed every part beforehand & calculated the finish box weight after i cut down the parts.. ..ready!?

Thanks very much for the detailed info - that's exactly what I was looking for!

this weight of course does not include anything inside, your concrete counters & ironwood cabinets may tip the scales a bit...

I plan to keep it pretty minimal inside. I'm just looking for more space than a slide-in (2 parents, 2 kids, 1 or 2 dogs), with less weight, and less cost.

what concerns me more, as i felt this once on a friend's camper, is the tall center of gravity. the truck had a squishy suspension & would sway back & forth for about six blocks after taking a left hand turn! that's the problem with some of the 1 ton trucks, they're made to ride like a car with no weight in the back.

My truck was made before car-like ride became a consideration. :) It's a 79 with huge "Camper Special" rear spring packs - the ride only becomes "acceptable" once you put a load on it. It may be fine as-is (I've had a 2200lb camper on it twice before), but if it sways, I'll add a rear sway bar.

I don't mean to hijack your thread - I'll start my own if I ever get the build started. Thanks again for the info!!!
 

Every Miles A Memory

Expedition Leader
Great looking truck, and I'm sure I'm way late on this, but I just found the thread.

On the battery question, if you were to use Lifeline AGM's, they're completely sealed and dont need to be in a special box. They dont off any gasses and can be mounted in any direction or upside down if you need to put them that way.

We've had our bank of 4 6-volts run in parallel and have yet to do one ounce of maintenance on them. For the money, they're expensive, they were one of the best investments we've made on our rig
 

sarconcepts

Adventurer
thanks for the battery info, that's exactly what i plan to do.
got the rear bumper & winch on, spare tire mount,windows in, & got the pieces for the wall cap. things are starting to look clean.
next up, the wall cap, lift system & roof
 

Attachments

  • windows 005.jpg
    windows 005.jpg
    90.7 KB · Views: 651

Forum statistics

Threads
185,423
Messages
2,874,280
Members
224,720
Latest member
Bad Taste
Top