Unimogadventures - Our build and travel thread

Iain_U1250

Explorer
HI John, floor will start next weekend - right now I'm sitting overlooking the beach at Woodgate. Floor will be an aluminium/foam/plywood composite. I have the plywood to start cutting out the templates, once I have worked out how the panels will fit together, then I will trim the aluminium and then send them up to a mate who will vacuum bag the lot together.

I've got a few bits of hardware, but I've got a list of parts I want to order, once I think I have the list complete - I'll try order everything at once.

Who makes your water tanks - I need a two weird shaped ones made. I will make a cardboard version first, then start looking for a place to make them. Whatis the best material - stainless steel or food grade plastic. At the moment I'm thinking of going with the plastic - I've heard too many stories about steel ones cracking.
 

Mickldo

Adventurer
Who makes your water tanks - I need a two weird shaped ones made. I will make a cardboard version first, then start looking for a place to make them. Whatis the best material - stainless steel or food grade plastic. At the moment I'm thinking of going with the plastic - I've heard too many stories about steel ones cracking.

Hi Iain

How "weird" shaped do you need the water tanks? If it is too weird you may not be able to get a plastic one and stainless may be your only option. We have a couple of different suppliers of plastic tanks we use on the trucks and trailers we build but for the boats we do we custom make our own stainless steel tanks. On one SS tank we did the breather got blocked and the pump sucked the tank flat. The thing looked like a squashed coke can but it never leaked. Not one weld cracked. The only reason we lifted the floor to check the tank was the owner was saying he could only squeeze about 40L into the 120L tank.
 

Iain_U1250

Explorer
Thanks for the comments - The tanks need to fit in the rear quarter panels of the truck to maximise the volume - hence the weird shape.

What grade stainless steel and thickness do you make your tanks out of - I can get all sorts of shapes bent up from a local sheet metal shop, and have a friend who is an expert TIG welder. What fittings do you use for the fill necks, drains, breathers etc. If you have any advice on the design and where to put the baffles I would appreciate it - I'm now thinking of making my own tanks, or at least getting it bent up and my friend to weld it.
 

Mickldo

Adventurer
Thanks for the comments - The tanks need to fit in the rear quarter panels of the truck to maximise the volume - hence the weird shape.

What grade stainless steel and thickness do you make your tanks out of - I can get all sorts of shapes bent up from a local sheet metal shop, and have a friend who is an expert TIG welder. What fittings do you use for the fill necks, drains, breathers etc. If you have any advice on the design and where to put the baffles I would appreciate it - I'm now thinking of making my own tanks, or at least getting it bent up and my friend to weld it.

I don't make the tanks myself (my welding is rubbish, I do all the mechanical and electrical work) but the sheeties we have at work are great at it. IIRC we use 1.6mm 316. I'll check tomorrow for you.

For the fittings we use 316 SS weld in sockets in BSP thread in whatever size we need. For the ones we do usually it is 3/4" BSP or 1/2" BSP. Depends on what filling method you use too.

When we do our racecar trailers we just have a breather and an outlet. To fill the tank we hook a garden hose onto the outlet tap and let the hose fill the tank until it comes out the breather and then we shut off the tap, job done.

On our boats we do a separate filler tube out of 38mm tube welded into the top of the tank.

I suppose on a proper camper like you are doing you will be wanting filters and the like, so backfilling from an external tap probably won't work too well. You could have a separate mains fill point like that though if you wanted, away from the outlet pipe and it's filters. You'd want a dedicated lockable filler point too so you can use jerry cans or buckets to fill it if you are away from mains water. Would you have an inlet filter of some sort to filter any dodgy water before it got to your tank or just filter it as you use it? Or would you be using a "clean" drinking water tank and another "dirty" other water tank? Are you having grey and black water tanks too? I'd use 316 for drinking water and maybe 304 or even alloy for the others if you aren't going to be drinking from them.

Anyway for all of the different tank fittings I'd be using say 3/4" BSP weld in sockets for everything (including a drain point) except for the filler and for it I'd either use 38mm straight pipe or an 1 1/2" BSP socket.

For your baffles it would depend on actual tank size and shape for the location of the baffles but with the design we make a full baffle and cut off the corners to allow the fluid past. We'd usually chop off approx 50mm on each corner. The baffles (and all other welded in sections of the tank, like end plates) get a 10 or 15mm fold to give extra strength on all edges. This allows us to have a lap joint on all joints rather than just a fused butt weld.

The other thing to keep in mind is the construction of the mounts. We usually use something like 50 x 50 x 3mm SS angle stitch welded all along the sides.

We pressure test all of our tanks before fitting too. We have a pressure gauge and a schrader valve that we plumb in to the tank and pressurize it to 3 or 4 psi and see that it holds pressure (don't want too much or it deforms the tank). We also spray soapy water over all welds and fittings to see if any bubbles form.
 

Iain_U1250

Explorer
Anyone got any details of the how you seal the edges - my fuel tanks have a pressed steel end cap - if I was bending the tank, how would I fold the edge so they don't leak, or do you just rely on the weld in the corners?

I would love to see some photos of the whole fabrication process.
 

Mickldo

Adventurer
Anyone got any details of the how you seal the edges - my fuel tanks have a pressed steel end cap - if I was bending the tank, how would I fold the edge so they don't leak, or do you just rely on the weld in the corners?

I would love to see some photos of the whole fabrication process.

Yes the weld is the bit that holds it all together but the folds give it extra strength over just straight welded corners. That's why we do lap joints instead of butts. Every time you can put a fold into sheet metal you make it stronger.

If the tank was just a conventional rectangular box we would make the main body into a hollow cylinder out of two halves and then weld end caps in. The halves of the main body can either be joined halfway along the sides, ie; 2x "U" shaped pieces, or along opposite edges, ie; 2x "L" shaped pieces. These bits would have a 10mm fold along the edges to give a lap joint instead of a butt joint. The "U" pieces for example would end up looking like a "C" section purloin in your shed. The "L" pieces would only have one folded edge because the join is on the edge.

Typically we would use the "U" method when using thicker materials like 4mm plate alloy fuel tanks for survey boats. For a SS water tank we use the "L" method.

All of the baffles would be made like a cake tray with the corners cut off. The end plates would be the same as the baffles except they don't have the corners cut off.

We would assemble the two "L" (in this case) pieces together to make a hollow cylinder. Then we would push in the baffles and weld them in. Last we would weld in the end plates. We normally weld in the fittings, fillers, pickups, sender units, etc before welding the ends on.

In your case with the "weird" shapes needed it would be a case of making the hollow cylinder main body the weird shape and then have all the baffles and end plates the same. You could make say a "L" and a "V" or whatever and join them together.

If the shape was really weird ie; tapered two different ways or cutouts to clear various components you would have to use different methods. Cutouts are relatively easy, just chop out the bit you need to get rid of and fill in the gap (trying to keep the joins lap joints). If it has different tapers or whatever it might be easier to split it up into smaller more symmetrical pieces and join them together. Then it would be a case of breaking out the cardboard and seeing what you can do by making trial model.

Sorry I don't have any photos of construction. We aren't making any right at the moment either. It might be weeks or months before we do the next one.

I hope I'm not baffling you (small tank manufacture pun) too much with my descriptions. If you can post up some pics of the weird spot you want them to fit in I might be able to help you a bit better. I might even be able to draw up a couple of designs for you.
 
Last edited:

Iain_U1250

Explorer
Thanks for all the advice everyone - both on the forum and via PM. I'll make up some cardboard mock up tanks this weekend, and then draw it up properly. I'll contact a plastic tank manufacturer for a price, and price up the stainless steel for the DIY ones.

From my research the main advantages of the plastic tank are:

More resistant to vibration,
Can be repaired in the field a lot easier.

Disadvantages are:
Potential "plastic taste" in the water - whether real or imagined
Can become brittle over time with exposure to chemicals like chlorine
Not so good in "high stress" area like the mounts - they may snap off over time if they are not designed properly.


Advantages of stainless tanks are:
No taste issues
Strong mechanically if designed right
DIY potentially

Disadvantages are:
Potential fatigue cracks if not designed and welded properly.
Welding needs to be "pickled and passivated" or they will rust
Difficult to field repair

I'll continue on to do a bit more research - if the price is right, then I'll go with the plastic tanks, but if I'm up for an arm and two legs pricing, I'll have a look at the DIY stainless a bit more.
 

63tlf8

Observer
Iain_U1250 said:
I'll continue on to do a bit more research - if the price is right, then I'll go with the plastic tanks, but if I'm up for an arm and two legs pricing, I'll have a look at the DIY stainless a bit more.

Iain,

Check Atlas Tanks, local to you. Got my tanks from them, great product and service. Mention off road and ask for the thicker walls, 10mm I think, no extra. They cast or weld, depending on requirements.

Tony
 

whatcharterboat

Supporting Sponsor, Overland Certified OC0018
Not so good in "high stress" area like the mounts - they may snap off over time if they are not designed properly.

Morning Iain. How wet is it?

Anyway, plastic tanks must be either strapped up or sit in a cradle (best). Forget tabs or mounts on the tank itself.

Can become brittle over time with exposure to chemicals like chlorine

Also we have some (of that type I mentioned in the PM ) in the field now for close to 10 years with no signs of trouble. I believe that plastic is extremely chemical resistant. UV is the thing that can kill most plastic and that should never be a problem under you truck anyway.

Hey Iain, you should check out this MAN we are doing a suspension upgrade on tomorrow. I'll send you some pics. It's from Switzerland. Another Round-The-World truck. Physically about the size of yours , I guess although it's only a 10 ton GVM chassis. All composite body. Has some very neat ideas though. Very different body mounting too > closer to our system than anything else I've seen on a big Euro truck before.

See ya mate.
 
Last edited:

Hilmar

New member
Iain,

Independent from the material your tanks will be build:
Have you thought about the advantages and disadvantages of one big water tank compared to several smaller ones?

Depends on the regions you intend to travel and the available provisioning possibilities. Although I have a water purification equipment, I I prefer several smaller tanks/canisters. As a result, it's possible to keep some hygienic clean and fill up your water supplies nonetheless.

Hilmar
 
Last edited:

Iain_U1250

Explorer
Hi Hilmar - My thoughts exactly. I'm planning on two "raw water" tanks, each around 130lt each, a 25lt hot water tank, all of which go through the primary pre-filters . Then a 50lt drinking water tank which will go through the whole filtration system.
 

Iain_U1250

Explorer
Time for an update on the Mog progress. I have borrowed a cab tilter from a a forum member - I have it until early in January, so I need to get everything done that needs the cab tilted. I will also take a few measurements on the lifting cylinder at various extensions to see how long to make a single ram cylinder.

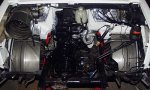
There is plenty of clearance for the turbo - I'll tilt the cab again and fit the heat shields and a bit more sound insulation. I will also fit up the accelerator pedal and the hand throttle linkages.

I also re-fitted the inner fenders - both refurbished with new home made rubber seals. I also fitted up the power steering reservoir and the steel lines. I have a new hose for the lower return line, but I need to get another two hoses for the upper return line, and the upper supply line. Then that should last for another 25 years.

It looks like there should be plenty of space for the inter cooler - there is 400mm of clear space between the turbo and the power steering reservoir, or if I put it up higher, I have around 700mm to the inlet manifold - I'm sure I can make something work there.

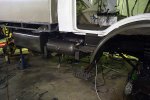
The air tanks also fit quite nicely - glad this time I managed to get all the measurement right. I have charged up the air system, and everything works. I also discovered a design error with the way I plumbed in the wet tank. When the tanks get to max pressure, the divertor valve opens and the compressor goes into free-wheel mode - which means that the wet tank would fully discharge out of the divertor valve - which is not a good idea as when the tanks get discharged, before the compressor would be recharging the main tanks, it would have to first have to charge up the wet tank. I found this out the hard way - when I adjusted my shop compressor to go about 8.3 bar ( I have two of them rigged up in parallel to speed up the process) when the divertor valve opened - it shot the little silencer off the bottom of the valve, and discharged the entire contents of both 50lt compressor tanks, the wet and and the purge tanks - made on hell of a racket doing so. Anyway, at least I know the divertor valve works.

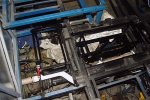
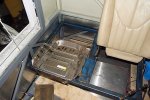
I have returned to fabricating the camper box again. First the battery box and the box for the diesel heater. I have fitted them both below the floor, and will have two hatches to access them. Another forum member will be making the composite floor - made from 2mm aluminium, 6mm of foam and 4mm of ply, all vacuum bagged together to make a strong composite floor. I have to make a template out of plywood for each section of the floor - being a civil engineer, tolerances of a centimetre or so are normally pretty good, but here I need to get with a few millimetres. The panels will be quite complicated, as I have to fit around all the bracing and have the joints all hidden. The final wall on part of the floor will most likely be teak.

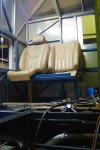
The main fabrication work this weekend was the two rear seats. It took a fair bit of fitting and engineering, but eventually I figured out how to make it all work. The back part of the seat still reclines using the original electric motors, and the lumbar support still works as well. The seat base is fixed to the frame, and that took a fair bit figuring out. It has to be fairly strong to be able to hold the seat belts.

The space behind the seat back is quite large - should be useful for storing some softer item that don't get used that often. The only way to access the storage will be to wind the seat back right forward. I'll test it out once I get everything sorted. I'll work on it over the next few evenings.

I finished the first seat, but ran out of steel for the second one. Since I've figured out the way to do it, the second one should take less time. Trish has tested the seat, and reckons it will work well - she could see out of the front window and the passenger side window quite easily, and the height was just right for her. I found that the angle in the first seat was a not right for me, I would get a sore neck, but the second seat works a lot better. Anyway, I would not be the one using those seats whilst driving - my seat is the one behind the steering wheel.
 

Attachments

  • DSC00248.jpg
    DSC00248.jpg
    68.8 KB · Views: 329
  • DSC00251.jpg
    DSC00251.jpg
    50.7 KB · Views: 303
  • DSC00258.jpg
    DSC00258.jpg
    48.2 KB · Views: 315
  • DSC00243.jpg
    DSC00243.jpg
    78.9 KB · Views: 329
  • DSC00255.jpg
    DSC00255.jpg
    44.5 KB · Views: 382
  • DSC00256.jpg
    DSC00256.jpg
    57.9 KB · Views: 361
Last edited:

Iain_U1250

Explorer
Unimog Hippo

I have hired a mobile truck weighing station and weighed my camper, and as it stands on the weigh pads today, the whole truck weights in at:

Front Axle - 2.74 tons
Rear Axle - 1.96 tons
Total - 4.70 tons.

I have quite loaded up most of the bits I have taken off, doors, bumper, seats, rear windows, radiator, battery, winch, AT-Vos sound insulation kit and anything else I have lying around.

I am on track to come in on target with:
Truck - 4700kg

Parts to go:

Front Winch - 50kg
Sprung Mattress - 50kg
Windows and glass - 50kg
Floor - 75kg
Spare wheel - 100kg
Furniture & Lining - 100kg
Fridges - 50kg
Solar Panels - 40kg
Toilet - 35kg
Stove, Calorifier, water pump etc, 50kg
Roof Rack & Bull Bar - 100kg
Insulation - 100kg
Batteries & Chargers - 250kg

Other stuff:

Fuel - 400lt
Water - 300lt
Food etc - 500kg
People - 4 x 75 = 300kg

Total 7250kg.

That gives me only 250kg up my sleeve, which is not that much but should just be enough.

If I can still keep it on a diet, then everything should be fine. Thanks to everyone who warned about keeping the weight down - you were right - things add up quickly.

The truck was previously registered as 8 ton - so I will try for that again, but the plate on the side says 7500kg. We will see what the authorities say when I go to register it.
 

Forum statistics

Threads
185,897
Messages
2,879,321
Members
225,497
Latest member
WonaWarrior
Top