roadtripcrazed
Observer
***FOR SALE!!!*** See Post #227 for details!
As a thank you to all of those EXPO members that have posted their ideas in the past - I give you the following in hopes that others will be able to gain as much from me.
...
My wife and I are heading to Alaska for three weeks this season. An incredible road-trip to say the least with some biking, paddling, climbing and some serious relaxing thrown in to keep it all interesting. We are both very experienced backcountry (hiking) travelers, but we wanted something faster and more convenient this time around. Hence, I turned to EXPO to see what you are all up to.
Wow! So many options. Drawers, fridge slides, showers, etc. What to do?
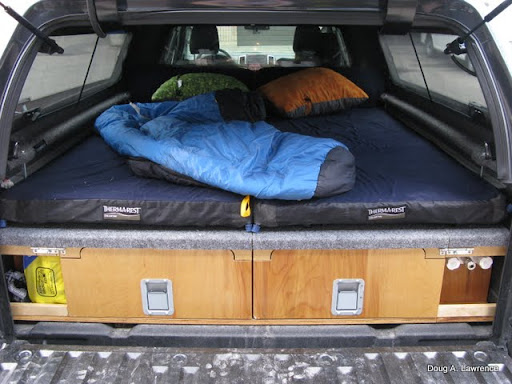
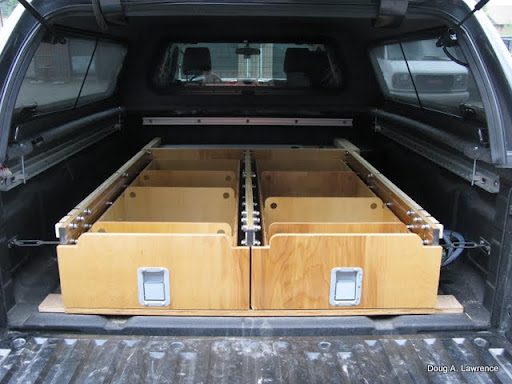
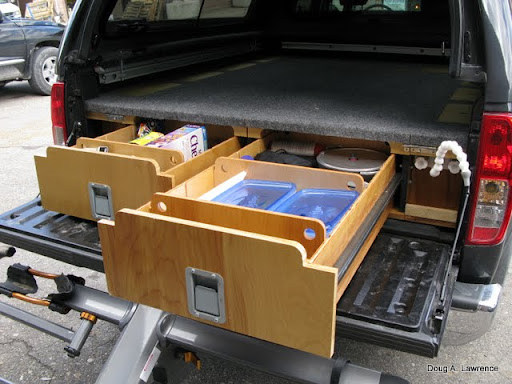
I spent MONTHS scouring websites and making notes. Drawing plans and erasing plans. When it all came together, I decided to design and build a fully custom truck drawer/sleeping platform system that would house two 4.5ft drawers, on-board fresh water (hot & cold), AND a canopy heater just for good measure!
Here are the results of my efforts - and your inspiration!
FINISHED PRODUCT
THE GUTS
The workings of the on-board fresh water tank and the accompanying pumps, heat exchangers, valves, etc. were all built into one unit behind the cab, bolted to the utili-trac for security. I managed to find an 18 gallon (72 litre) polyethylene tank that was a great contender. Everything was really built around that. All battery power and coolant lines from the engine are securely routed along the passenger-side of the chassis and enter the box through a grommet in the corner.
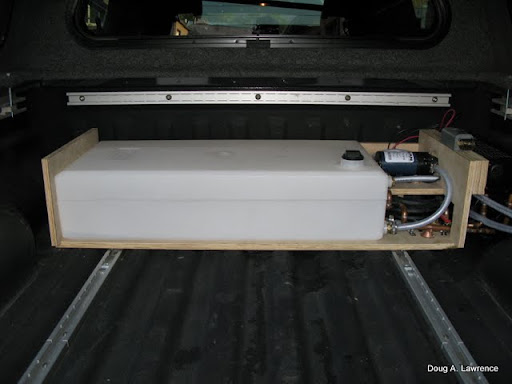
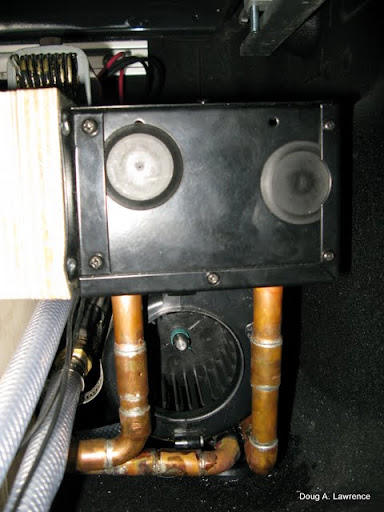
To give a better idea of what is happening, the engine coolant enters the box, goes through the canopy heater on the far right (controlled via the thermostat sitting at the top of the picture) then through the dual-helix heat exchanger to the left then returns to the engine. The water comes from the tank, pumped via the 12V pump and then splits - half to the heat exchanger to continue to the hot water faucet, the other half directly to to the cold water faucet. The red valve in this picture is the drain for the tank.

Tight quarters ... The braided hoses on the right are the supply lines to the faucets.
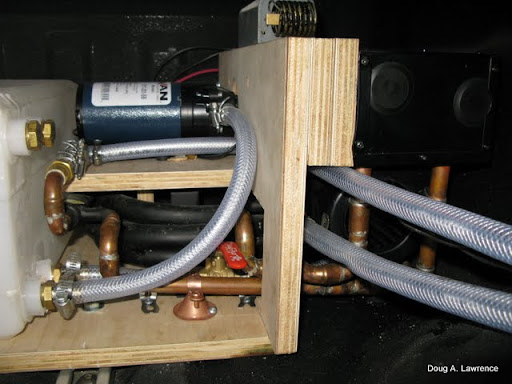
I did everything I could to keep everything space-efficient and neatly organized. All the electrical systems are fed from the terminal strip you see here. The water pump receives a constant (fused) 12V supply and the canopy heater only receives ACC power when the truck is running.
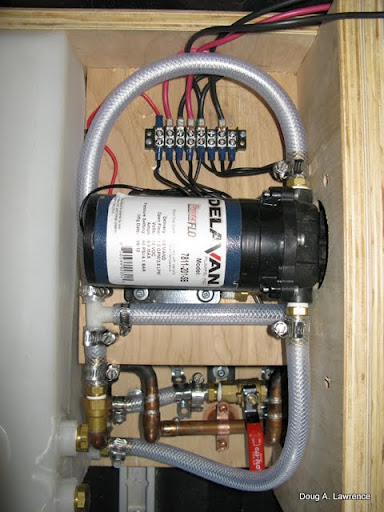
The heater itself is a 24,700btu unit which moves nearly 300 cubic feet of air per minute. This should be MORE than enough to keep the chill off this winter and keep our dog warm back there! In this shot you can see where the coolant lines enter the box of the truck. Standard heater hose is fed to and from the engine and all lines in the box are 1/2" copper.
THE DRAWERS
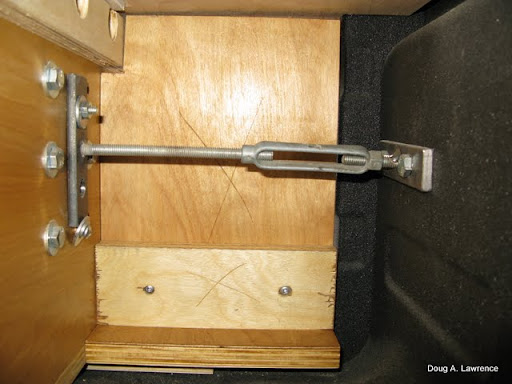
The structure of the drawers was built from 3/4" birch plywood and again bolted securely to the utili-trac system. I fabbed up a pair of turnbuckle braces to secure the side walls just in case. Turnbuckles allowed for micro-adjusting to ensure the walls were as square as possible.

Detail of turnbuckle system.
I decided to build roller-bearing slides instead of commercially available slides. This should provide years of solid use! 1" square tubing was bolted to the drawer sides to run between these bearings.

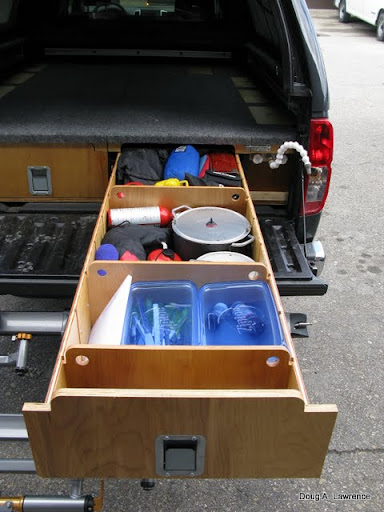
The drawers are made with 1/2" birch plywood with 3/4" fronts. Lever-action catches hold them securely in place and I built up some dividers which can be placed in grooves spaced every 6 inches.
Continued ...
Regards,
-=Doug
As a thank you to all of those EXPO members that have posted their ideas in the past - I give you the following in hopes that others will be able to gain as much from me.
...
My wife and I are heading to Alaska for three weeks this season. An incredible road-trip to say the least with some biking, paddling, climbing and some serious relaxing thrown in to keep it all interesting. We are both very experienced backcountry (hiking) travelers, but we wanted something faster and more convenient this time around. Hence, I turned to EXPO to see what you are all up to.
Wow! So many options. Drawers, fridge slides, showers, etc. What to do?
I spent MONTHS scouring websites and making notes. Drawing plans and erasing plans. When it all came together, I decided to design and build a fully custom truck drawer/sleeping platform system that would house two 4.5ft drawers, on-board fresh water (hot & cold), AND a canopy heater just for good measure!
Here are the results of my efforts - and your inspiration!
FINISHED PRODUCT
THE GUTS
The workings of the on-board fresh water tank and the accompanying pumps, heat exchangers, valves, etc. were all built into one unit behind the cab, bolted to the utili-trac for security. I managed to find an 18 gallon (72 litre) polyethylene tank that was a great contender. Everything was really built around that. All battery power and coolant lines from the engine are securely routed along the passenger-side of the chassis and enter the box through a grommet in the corner.
To give a better idea of what is happening, the engine coolant enters the box, goes through the canopy heater on the far right (controlled via the thermostat sitting at the top of the picture) then through the dual-helix heat exchanger to the left then returns to the engine. The water comes from the tank, pumped via the 12V pump and then splits - half to the heat exchanger to continue to the hot water faucet, the other half directly to to the cold water faucet. The red valve in this picture is the drain for the tank.
Tight quarters ... The braided hoses on the right are the supply lines to the faucets.
I did everything I could to keep everything space-efficient and neatly organized. All the electrical systems are fed from the terminal strip you see here. The water pump receives a constant (fused) 12V supply and the canopy heater only receives ACC power when the truck is running.
The heater itself is a 24,700btu unit which moves nearly 300 cubic feet of air per minute. This should be MORE than enough to keep the chill off this winter and keep our dog warm back there! In this shot you can see where the coolant lines enter the box of the truck. Standard heater hose is fed to and from the engine and all lines in the box are 1/2" copper.
THE DRAWERS
The structure of the drawers was built from 3/4" birch plywood and again bolted securely to the utili-trac system. I fabbed up a pair of turnbuckle braces to secure the side walls just in case. Turnbuckles allowed for micro-adjusting to ensure the walls were as square as possible.
Detail of turnbuckle system.
I decided to build roller-bearing slides instead of commercially available slides. This should provide years of solid use! 1" square tubing was bolted to the drawer sides to run between these bearings.
The drawers are made with 1/2" birch plywood with 3/4" fronts. Lever-action catches hold them securely in place and I built up some dividers which can be placed in grooves spaced every 6 inches.
Continued ...
Regards,
-=Doug
Last edited:
