(I will be updating this initial post with more/better detail as time allows and will try to honor picture requests. This may be disappointing to some but this is mostly a post-mortem account of the work performed rather than a step-by-step. The project was performed in a barn in MI in late November so it was cold and we were working within a constrained period of time. Plus my friend who had the facility sounds and moves like the Tasmanian Devil so there wasn't much time for pictures. It didn’t feel appropriate to stop work for photo opportunities while we were freezing.)
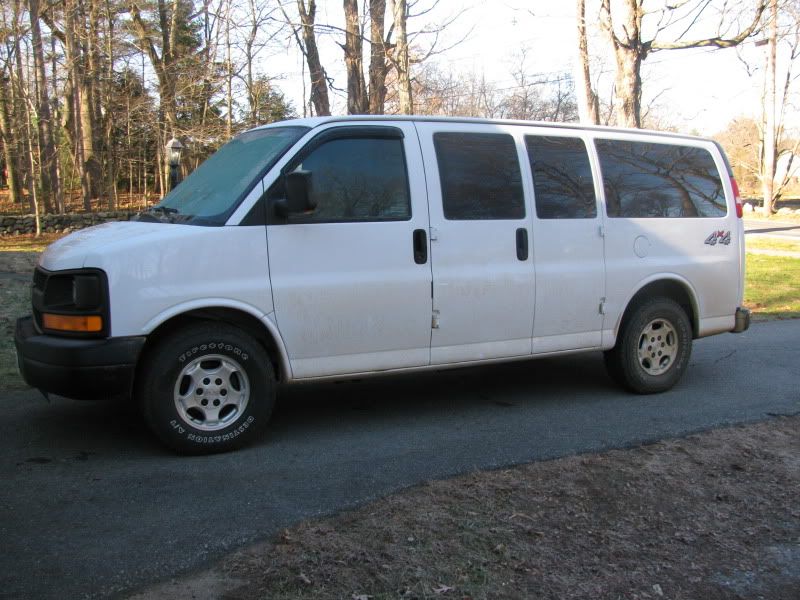
Chevrolet Express Van AWD to 4x4 conversion
(Disclaimer - I’m offering this write-up for informational/educational purposes only. It is up to each individual to assess their own level of skill with working on your van. Vehicle modification can be dangerous resulting in damage to the vehicle, injuries or death. Perform any work at your own risk...)
Intro
There has been a bit of speculation out there about the ability to convert a full-size all-wheel drive GM van to 4x4 with just swapping a few parts. After a couple months of research, reading, and discussions I can say that it is possible. I have drooled over 4x4 vans for some time now but do not have the financial means or the need for a full blown Sportsmobile 4x4 campervan at this time in my life. What I do have the use for is a light yet capable budget full-size campervan and seemed that the full-size AWD GM van was a good place to start. The description below should be accurate for vans around the model year 2005 H-chassis vans but check the components on your van first if you intend to perform this swap. This will be an evolving project and this may not be the only way to convert this van. I give a ton of thanks to my friend Tom, a Master mechanic, who offered his shop to perform the work. Constructive feedback and pointing out potential issues with any work performed is welcomed for the benefit of the community!
Transfer case
I spent a lot of time on Chevy truck and other forums gathering information. The van in this build is a 2005 Chevrolet Express AWD van using a Borg-Warner 4473 viscous coupled transfer case with the front output on the driver side (what is called “driver side drop”). This transfer case relies on differences in drive shaft speed to engage the front drive shaft, so there are no sensors to create compatibility issues. After hours of pouring over schematics, diagrams and laying on my back with a tape measure and camera, I decided that a Chevy NP241 transfer case (NP241c) from a 1988-1994 Chevrolet 4x4 truck would be my best choice and nearly a direct bolt-on. When buying associated parts, I used a 1993 Chevy Silverado K1500 ½ ton 4x4 truck with a 5.0L V8 as the vehicle to enter into the searches. These trucks came with a 700R4 auto transmission which is almost the same as the 4L60e transmission in the van (both have a 27 spline at the tranny and 32 spline to the rear drive shaft; the 4L60e is just a modern revision of the 700R4).
BW4473

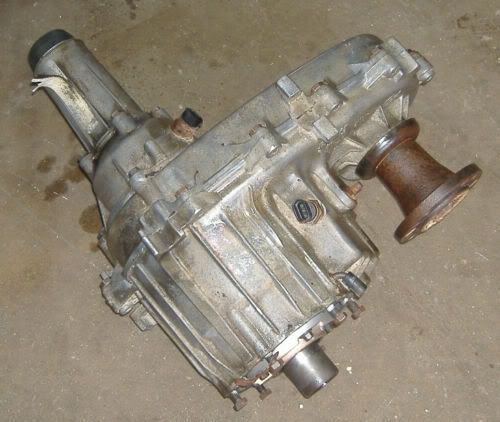
NP241c 1988-1994
NP241c 1995-1998
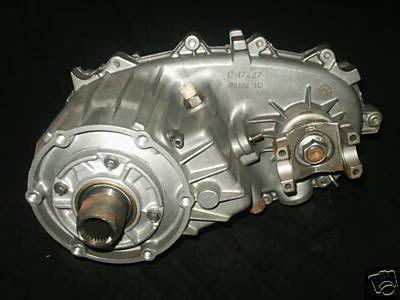
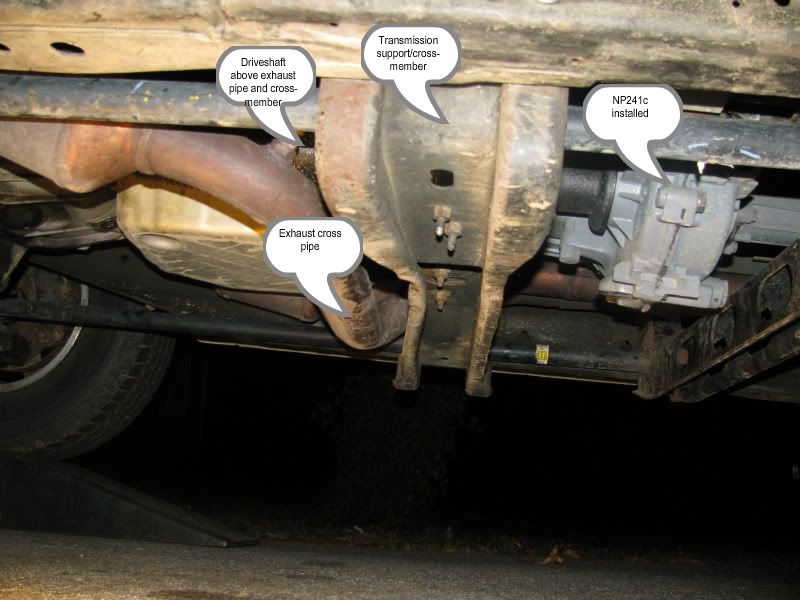
There are more recent models of the NP241 but I was concerned about a cross-member and the exhaust pipe that crosses under the front drive shaft. The newer NP241s use a short fixed front yoke rather than a flange which would change the drive shaft length and angle slightly. The older NP241s have a flange that extends away from the case by several inches maintaining a similar drive shaft length and angle and guaranteed there wouldn’t be any issues with the cross-member. The case was a direct bolt-on with no changes made to the rear drive shaft. A newer model NP241 may work and the VSS connector may be plug-n-play but I didn’t have one to compare. A NP261 transfer case may also be a possibility but I found little information about them and units in good shape command a $700-1000 price tag. Any weaknesses in the NP241 are pretty well documented (the shift fork pads wear out, shift forks can break, snap ring on the tail shaft can break, chains tend to stretch - nothing terribly expensive to fix). Budget $200-500 for the NP241c transfer case.

Front drive shaft
The Borg-Warner AWD case has a booted slip yoke at the front output. The NP241 has a fixed flange. The distance from the flange to the front differential is longer than that of an early 90s Silverado so a custom drive shaft is mandatory. Our mounted length was 34 ¾” and had the drive shaft made at a local 4x4/drag race driveline shop. Their prices were in line with places like Tom Wood’s and Denny’s Custom Driveshafts and it was done the same day we dropped it off. Once constructed, it was a bolt-in item. Budget ~$350 for the drive shaft.
Similar to my unit - the slip joint and flange connection are opposite on mine

Connection to front differential
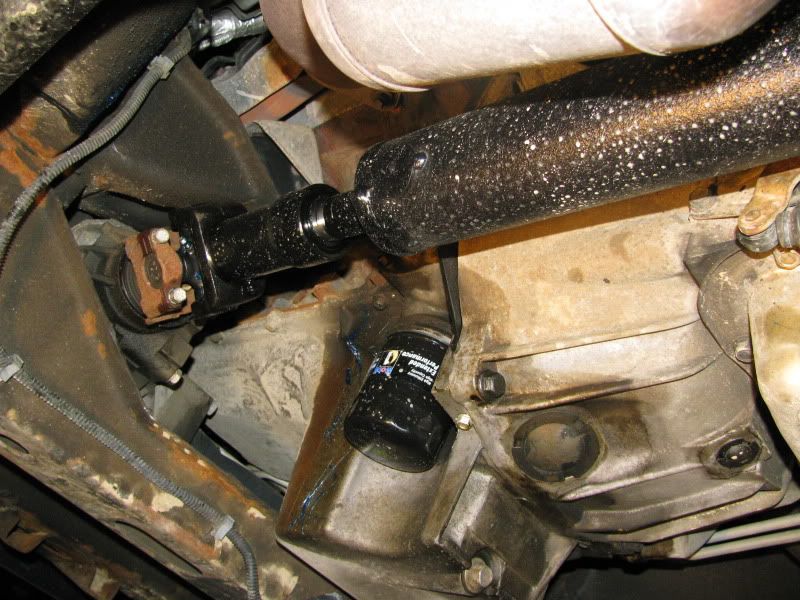
Connection to transfer case flange
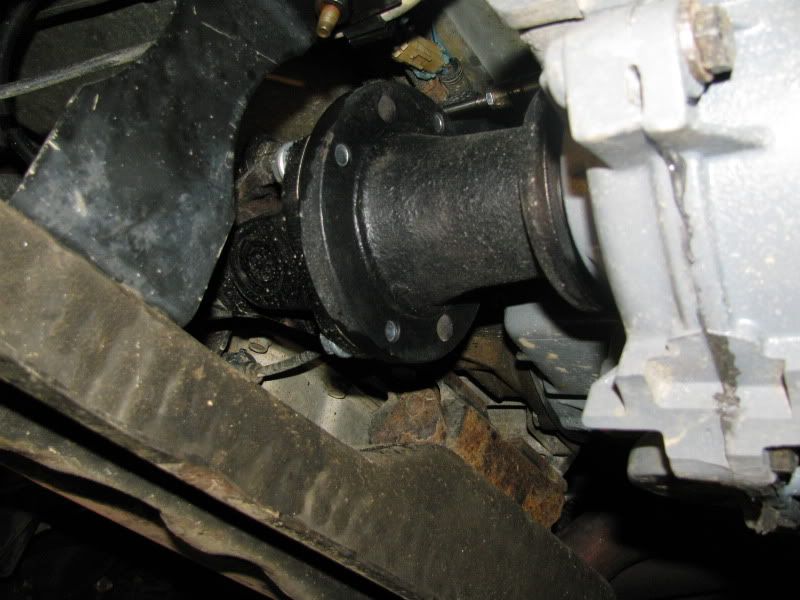
Front differential/axle
OEM unit. No modification was made to the front diff. or axles. The diff. on the Express is locked 100% of the time and the AWD unit had the ability to transfer 100% torque to the front wheels. Some have cautioned that the front axle may not be strong enough to handle true 4x4 use. I argue that as long as I’m not rock crawling or competing in the tractor pulls, the hardware was designed to handle a 100% load if the rear wheels slipped so it should be plenty strong for what I plan to do. Wear will increase and there will be some MPGs lost due to the extra drag of the axle being locked. Budget $0.
Rear axle
OEM unit. No modifications made. Budget $0.
Vehicle Speed Sensor (VSS)
The VSS on the 2 transfer cases are different but produce the same signal (since 1988) that the ECU needs to see. I purchased a new sensor (NAPA P/N - VSS224; $100) and pigtail connector (NAPA P/N - LS6533; $20) at NAPA. The old connector was cut off and the new one soldered on with shrink tubing. My used NP241 came with a sensor but the retaining tabs were broken off and I wanted to start with a sensor I knew worked and would hold the connector. Budget ~$120 total if you are replacing the sensor.
VSS224


LS6533 - VSS connector

Shifting
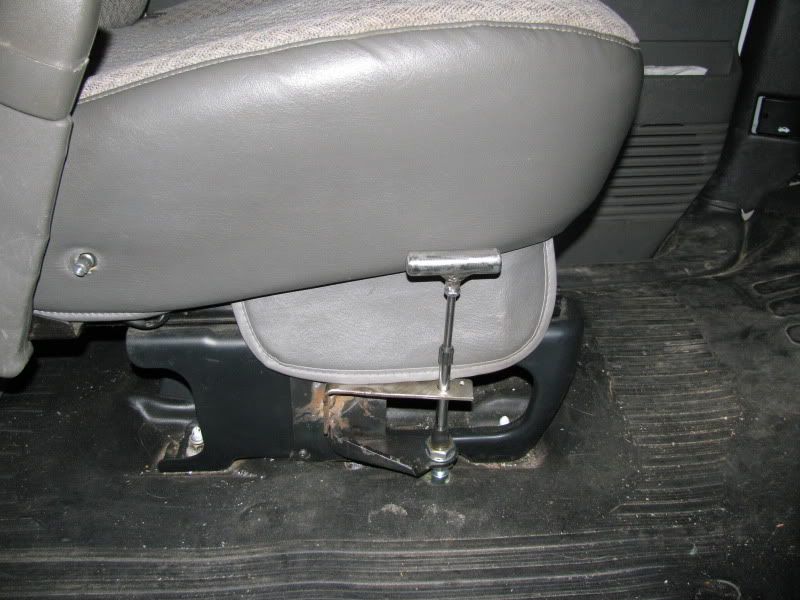
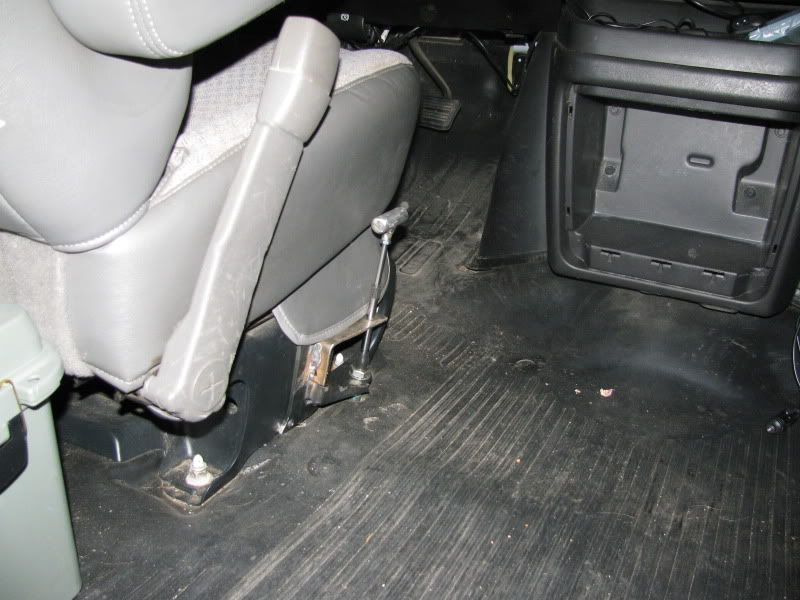
This is where we needed to put our thinking caps on. I searched high and low for a floor mounted shifting solution. I didn’t find anything that made me happy. I purchased a shifter out of a Jeep YJ but we were not convinced it would work and the penalty for being wrong was going to be a gaping hole in the van floor. I briefly considered a shifter out of a Jeep JK or Grand Cherokee but that had the same issues. I had already purchased a Novak Adapters cable shifter kit for a Jeep Rubicon that runs the NP241OR transfer case so we decided to simplify (SK3X-R kit). This kit comes with a morse cable, connectors and a brackets. The bracket under the van was a bolt-in with an extension arm for the bottom bolt. The bracket in the passenger cabin was heavily modified and bolted to the seat frame. One of the threaded end connectors was cut off and a steel pin was welded to the top to create a T-handle. A 1” hole was drilled in the floor and everything was fed through. The T-handle was threaded on and secured with a lock nut. Shifting the transfer case requires “strong finesse” with my ejection seat shifter! Pulling up shifts to 4HI and requires a stiff tug. Pushing down requires a stiff shoulder arm. Pushing down 1 stop drops me into 2HI. Down to the 3rd stop is Neutral and all the way at the bottom of the travel is 4LO. There are no safety tabs so there is nothing stopping me from pushing the shifter from 4HI all the way to 4LO. Fortunately, the detent spring is very strong and I probably exert 30-40 lbs. of force up or down to shift one gear so I don’t think that will be an issue for me. The only violations to the van body is a small 1” hole and 4 holes on the seat frame. The budget on this can vary wildly. The Novak kit cost me $160 will parts out of my friends drawer of odds-n-ends to make it work. If you can fabricate your own brackets, you can do it cheaper.
Cable routing under the van - focus on the black cable


Terminating end at the transfer case (above the black flange)
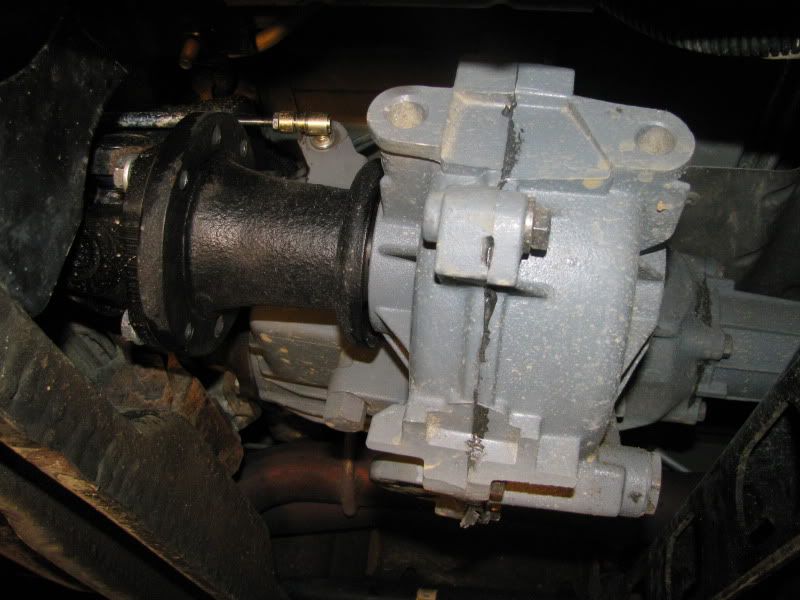
Shifter and bracket in the cabin


Transmission shifting in 4LO issues
As I understand it, the transmission uses the signal from the VSS (drive shaft speed) as part of the variables to determine when it’s time to shift. The 4L60e in the van was not programmed to deal with the 2.72:1 reduction that the NP241 now provides in 4LO. So you push on the accelerator and your RPMs climb quickly but it doesn’t shift out of 1st. You can get around this by letting off the gas at ~4000 RPMs where it will shift to the next gear. This was a known issue coming into the project and has two possible solutions:
1) Go to a dealership and ask them to flash a program for a Chevy 4x4 truck with the 4L60e auto transmission. I’m not sure if they will do this, what it will cost or if there will be any side effects I’m not considering.
2) Have a custom tuning shop reflash the ECU to deal with the gear reduction. Involves removing the ECU, shipping it and is probably pricey!
For now, I’m going to research this but I don’t see me ripping along at 30+ MPH in 4LO. Anytime I’ve been in 4LO I have been barely crawling. I don’t see me getting out of 1st gear and will use 4HI if I need wheel speed. Just know that your tranny will not shift properly in 4LO without further programming work on the ECU.
Things I would do differently
Transfer case - I would have bought a cheap, used NP241 from a local salvage yard and taken the time to rebuild it myself. The supposed “remanufactured” unit I bought off of eBay had chain stretch, a bushing on the shift lever was the original, the pins on the sensors were painted over, and the retainer tabs on the VSS were broken off. I would have been money ahead buying a $200 unit local along with a new chain and rebuild kit.
Shifting - The shifting setup is not perfect and will evolve. I have ideas for a seat mounted lever and the current cable is in-between sizes. I need to research it more but I may get a longer cable so I have smoother bends which may relieve some of the effort needed to shift. A safety stop to prevent from shifting too far would probably be smart. The kit from Novak did provide a good starting point with the brackets and connectors.
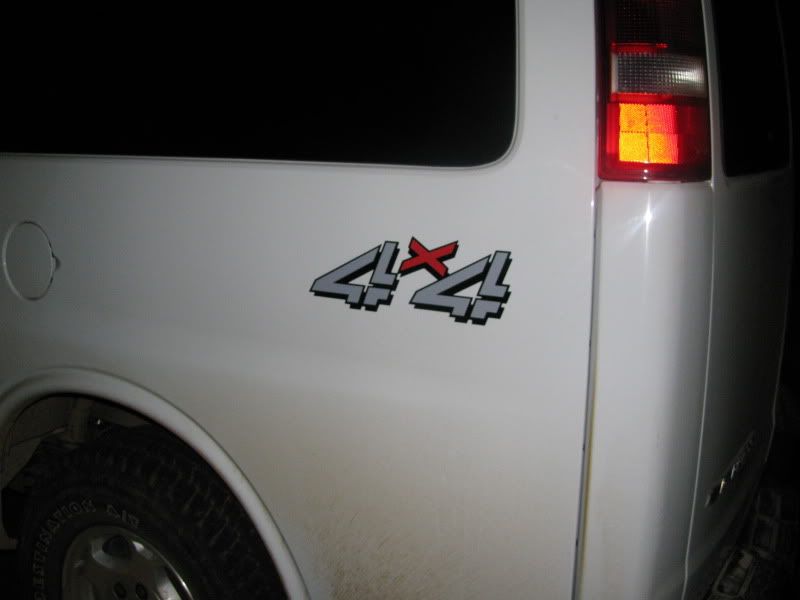
Period correct Chevy K1500 "4x4" bedside decals from Decal King
Tools used (not a complete list):
- 1 helper (much of this can’t be done solo)
- Floor jack
- 4 jack stands
- Decently comprehesive socket set of SAE and metric sockets
- Open wrenches
- Ratcheting box end wrenches
- Many socket extensions (all lengths up to 12”+)
- Drain pan
- Impact tools (helpful but not required)
- Blocks of wood
- Work lights
- Welder
- Pry bars
Performance
I was not able to go bombing through the empty cornfields like I envisioned on its maiden voyage as a 4x4 van. We did some testing on the gravel roads surrounding my friends farm and everything worked perfectly but the hardware has not been pressure tested. I then put 1200 miles on the system in 2HI driving it back to the east coast averaging 17-18 MPG the entire distance (this includes crossing the Appalachian Mtns.) with the cruise set at 60 MPH. This is no change compared to my trip out. I need to find some fire roads and 2-tracks near my home.
Flexibility of build
Unless someone can cite any reasons that you shouldn't drive a 4x4 vehicle in 2HI with the front drive shaft removed, installing the transfer case then waiting to deal with the shifting and front drive shaft could be possible. That was a fail safe plan for me; if we encountered any issues that stopped us dead, we knew that we could at least get the t-case in and I could still get home.
Other helpful resources
www.fullsizechevy.com
www.performancetrucks.net
Cost
Transfer case - $439
Front drive shaft (inc. serviceable u-joints ) - $313
Novak Adapters SK3X-R kit - $160
Vehicle speed sensor (VSS) - $100
VSS connector - $19
Dexron III compatible ATF fluid (2.5 qts. needed) - $12
Misc. fasteners - $10
4x4 decals - $20
Unused Jeep YJ shifter - $45
Shipping and Handling for all orders - $150
Total - ~$1268
Chevrolet Express Van AWD to 4x4 conversion
(Disclaimer - I’m offering this write-up for informational/educational purposes only. It is up to each individual to assess their own level of skill with working on your van. Vehicle modification can be dangerous resulting in damage to the vehicle, injuries or death. Perform any work at your own risk...)

Intro
There has been a bit of speculation out there about the ability to convert a full-size all-wheel drive GM van to 4x4 with just swapping a few parts. After a couple months of research, reading, and discussions I can say that it is possible. I have drooled over 4x4 vans for some time now but do not have the financial means or the need for a full blown Sportsmobile 4x4 campervan at this time in my life. What I do have the use for is a light yet capable budget full-size campervan and seemed that the full-size AWD GM van was a good place to start. The description below should be accurate for vans around the model year 2005 H-chassis vans but check the components on your van first if you intend to perform this swap. This will be an evolving project and this may not be the only way to convert this van. I give a ton of thanks to my friend Tom, a Master mechanic, who offered his shop to perform the work. Constructive feedback and pointing out potential issues with any work performed is welcomed for the benefit of the community!
Transfer case
I spent a lot of time on Chevy truck and other forums gathering information. The van in this build is a 2005 Chevrolet Express AWD van using a Borg-Warner 4473 viscous coupled transfer case with the front output on the driver side (what is called “driver side drop”). This transfer case relies on differences in drive shaft speed to engage the front drive shaft, so there are no sensors to create compatibility issues. After hours of pouring over schematics, diagrams and laying on my back with a tape measure and camera, I decided that a Chevy NP241 transfer case (NP241c) from a 1988-1994 Chevrolet 4x4 truck would be my best choice and nearly a direct bolt-on. When buying associated parts, I used a 1993 Chevy Silverado K1500 ½ ton 4x4 truck with a 5.0L V8 as the vehicle to enter into the searches. These trucks came with a 700R4 auto transmission which is almost the same as the 4L60e transmission in the van (both have a 27 spline at the tranny and 32 spline to the rear drive shaft; the 4L60e is just a modern revision of the 700R4).
BW4473

NP241c 1988-1994

NP241c 1995-1998

There are more recent models of the NP241 but I was concerned about a cross-member and the exhaust pipe that crosses under the front drive shaft. The newer NP241s use a short fixed front yoke rather than a flange which would change the drive shaft length and angle slightly. The older NP241s have a flange that extends away from the case by several inches maintaining a similar drive shaft length and angle and guaranteed there wouldn’t be any issues with the cross-member. The case was a direct bolt-on with no changes made to the rear drive shaft. A newer model NP241 may work and the VSS connector may be plug-n-play but I didn’t have one to compare. A NP261 transfer case may also be a possibility but I found little information about them and units in good shape command a $700-1000 price tag. Any weaknesses in the NP241 are pretty well documented (the shift fork pads wear out, shift forks can break, snap ring on the tail shaft can break, chains tend to stretch - nothing terribly expensive to fix). Budget $200-500 for the NP241c transfer case.


Front drive shaft
The Borg-Warner AWD case has a booted slip yoke at the front output. The NP241 has a fixed flange. The distance from the flange to the front differential is longer than that of an early 90s Silverado so a custom drive shaft is mandatory. Our mounted length was 34 ¾” and had the drive shaft made at a local 4x4/drag race driveline shop. Their prices were in line with places like Tom Wood’s and Denny’s Custom Driveshafts and it was done the same day we dropped it off. Once constructed, it was a bolt-in item. Budget ~$350 for the drive shaft.
Similar to my unit - the slip joint and flange connection are opposite on mine

Connection to front differential

Connection to transfer case flange

Front differential/axle
OEM unit. No modification was made to the front diff. or axles. The diff. on the Express is locked 100% of the time and the AWD unit had the ability to transfer 100% torque to the front wheels. Some have cautioned that the front axle may not be strong enough to handle true 4x4 use. I argue that as long as I’m not rock crawling or competing in the tractor pulls, the hardware was designed to handle a 100% load if the rear wheels slipped so it should be plenty strong for what I plan to do. Wear will increase and there will be some MPGs lost due to the extra drag of the axle being locked. Budget $0.
Rear axle
OEM unit. No modifications made. Budget $0.
Vehicle Speed Sensor (VSS)
The VSS on the 2 transfer cases are different but produce the same signal (since 1988) that the ECU needs to see. I purchased a new sensor (NAPA P/N - VSS224; $100) and pigtail connector (NAPA P/N - LS6533; $20) at NAPA. The old connector was cut off and the new one soldered on with shrink tubing. My used NP241 came with a sensor but the retaining tabs were broken off and I wanted to start with a sensor I knew worked and would hold the connector. Budget ~$120 total if you are replacing the sensor.
VSS224


LS6533 - VSS connector

Shifting
This is where we needed to put our thinking caps on. I searched high and low for a floor mounted shifting solution. I didn’t find anything that made me happy. I purchased a shifter out of a Jeep YJ but we were not convinced it would work and the penalty for being wrong was going to be a gaping hole in the van floor. I briefly considered a shifter out of a Jeep JK or Grand Cherokee but that had the same issues. I had already purchased a Novak Adapters cable shifter kit for a Jeep Rubicon that runs the NP241OR transfer case so we decided to simplify (SK3X-R kit). This kit comes with a morse cable, connectors and a brackets. The bracket under the van was a bolt-in with an extension arm for the bottom bolt. The bracket in the passenger cabin was heavily modified and bolted to the seat frame. One of the threaded end connectors was cut off and a steel pin was welded to the top to create a T-handle. A 1” hole was drilled in the floor and everything was fed through. The T-handle was threaded on and secured with a lock nut. Shifting the transfer case requires “strong finesse” with my ejection seat shifter! Pulling up shifts to 4HI and requires a stiff tug. Pushing down requires a stiff shoulder arm. Pushing down 1 stop drops me into 2HI. Down to the 3rd stop is Neutral and all the way at the bottom of the travel is 4LO. There are no safety tabs so there is nothing stopping me from pushing the shifter from 4HI all the way to 4LO. Fortunately, the detent spring is very strong and I probably exert 30-40 lbs. of force up or down to shift one gear so I don’t think that will be an issue for me. The only violations to the van body is a small 1” hole and 4 holes on the seat frame. The budget on this can vary wildly. The Novak kit cost me $160 will parts out of my friends drawer of odds-n-ends to make it work. If you can fabricate your own brackets, you can do it cheaper.
Cable routing under the van - focus on the black cable


Terminating end at the transfer case (above the black flange)

Shifter and bracket in the cabin


Transmission shifting in 4LO issues
As I understand it, the transmission uses the signal from the VSS (drive shaft speed) as part of the variables to determine when it’s time to shift. The 4L60e in the van was not programmed to deal with the 2.72:1 reduction that the NP241 now provides in 4LO. So you push on the accelerator and your RPMs climb quickly but it doesn’t shift out of 1st. You can get around this by letting off the gas at ~4000 RPMs where it will shift to the next gear. This was a known issue coming into the project and has two possible solutions:
1) Go to a dealership and ask them to flash a program for a Chevy 4x4 truck with the 4L60e auto transmission. I’m not sure if they will do this, what it will cost or if there will be any side effects I’m not considering.
2) Have a custom tuning shop reflash the ECU to deal with the gear reduction. Involves removing the ECU, shipping it and is probably pricey!
For now, I’m going to research this but I don’t see me ripping along at 30+ MPH in 4LO. Anytime I’ve been in 4LO I have been barely crawling. I don’t see me getting out of 1st gear and will use 4HI if I need wheel speed. Just know that your tranny will not shift properly in 4LO without further programming work on the ECU.
Things I would do differently
Transfer case - I would have bought a cheap, used NP241 from a local salvage yard and taken the time to rebuild it myself. The supposed “remanufactured” unit I bought off of eBay had chain stretch, a bushing on the shift lever was the original, the pins on the sensors were painted over, and the retainer tabs on the VSS were broken off. I would have been money ahead buying a $200 unit local along with a new chain and rebuild kit.
Shifting - The shifting setup is not perfect and will evolve. I have ideas for a seat mounted lever and the current cable is in-between sizes. I need to research it more but I may get a longer cable so I have smoother bends which may relieve some of the effort needed to shift. A safety stop to prevent from shifting too far would probably be smart. The kit from Novak did provide a good starting point with the brackets and connectors.
Period correct Chevy K1500 "4x4" bedside decals from Decal King

Tools used (not a complete list):
- 1 helper (much of this can’t be done solo)
- Floor jack
- 4 jack stands
- Decently comprehesive socket set of SAE and metric sockets
- Open wrenches
- Ratcheting box end wrenches
- Many socket extensions (all lengths up to 12”+)
- Drain pan
- Impact tools (helpful but not required)
- Blocks of wood
- Work lights
- Welder
- Pry bars
Performance
I was not able to go bombing through the empty cornfields like I envisioned on its maiden voyage as a 4x4 van. We did some testing on the gravel roads surrounding my friends farm and everything worked perfectly but the hardware has not been pressure tested. I then put 1200 miles on the system in 2HI driving it back to the east coast averaging 17-18 MPG the entire distance (this includes crossing the Appalachian Mtns.) with the cruise set at 60 MPH. This is no change compared to my trip out. I need to find some fire roads and 2-tracks near my home.
Flexibility of build
Unless someone can cite any reasons that you shouldn't drive a 4x4 vehicle in 2HI with the front drive shaft removed, installing the transfer case then waiting to deal with the shifting and front drive shaft could be possible. That was a fail safe plan for me; if we encountered any issues that stopped us dead, we knew that we could at least get the t-case in and I could still get home.
Other helpful resources
www.fullsizechevy.com
www.performancetrucks.net
Cost
Transfer case - $439
Front drive shaft (inc. serviceable u-joints ) - $313
Novak Adapters SK3X-R kit - $160
Vehicle speed sensor (VSS) - $100
VSS connector - $19
Dexron III compatible ATF fluid (2.5 qts. needed) - $12
Misc. fasteners - $10
4x4 decals - $20
Unused Jeep YJ shifter - $45
Shipping and Handling for all orders - $150
Total - ~$1268
Last edited:


