codertimt
Observer
I purchased my first four wheel drive this past year and quickly fell in love with the U.S. National Forest system. Closest to me is the Ozark National Forest and so one of the first things I did was to purchase a Forest Service Road map from the main office in Russelville, AR. I quickly found that although nice, there were actually many, many roads/trails it did not show. So I was left wondering if all of these side roads I’m seeing are legal to be on or not. Enter the MVUM.
Even before the map purchase I had been researching road and trails and also looking for a gps solution to keep me on legal paths. I had found information about these “new” multi-vehicle use maps, but assumed they mostly just applied to ATVs. I had downloaded the MVUM pdf, but it was just a black and white non-detailed map and at first glance didn’t seem very useful. Only after the forest service map purchase and comparing the two did I begin to see the usefulness. As mentioned, the MVUM shows a great deal more roads and it turns out most are legal to be on. In fact the great majority of them are technically only legal for highway legal vehicles.
More recently I’ve come to realize that these maps also vary from forest to forest, so for your particular area they might not be as useful or other available maps might be more useful. For the Ozarks the main issue I've found is that there are many roads simply labels "highway legal vehicles only". But those roads might be improved gravel or a level 3 trail, or even something so narrow you scratch your head and wonder what highway legal vehicle can fit down it as you attempt to turn around. But overlooking that fact, for the Ozark National Forest, this was beginning to look like the perfect solution for me. I just had to make use of my computer knowledge to get the information in that pdf into some piece of GPS enabled technology.
So let’s backtrack a bit and examine what I was actually looking to accomplish as your goals might be different from mine and there will be no reason for you to continue reading. So let’s just get the purpose out of the way somewhat close to the beginning. I’m not that familiar with the world of GPS and wanted to keep thing simple. I wanted a map with all the little forest service roads and I wanted realtime GPS tracking on that map while driving. Most gps road maps are obviously lacking in any kind of detail for offroad use and I wasn’t just wanting a topo map that I entered a track or waypoints onto. This is why the MVUM is looking like a good candidate. The Forest Service web site puts their disclaimer that they are just legal document and lack detail, but for what I’m wanting they have plenty of detail...I’m wanting roads and they have those in abundance. Every road that is legal for me to be on is on there, plus it show private property boundaries. That’s about all I need...now to GPS-inize it.
End long rambling intro. Here is the where the fun begins. So all we have is a pdf which we need to do the following to convert to some other format and apply coordinates to in order to use in some GPS software, preferably without spending too much money. After much trail and error I came upon the following solution.
Convert
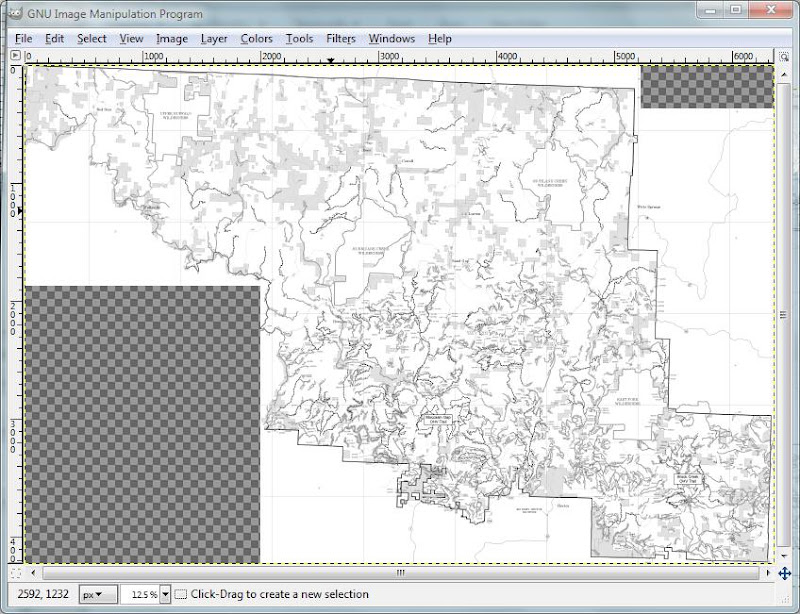
I find that I don’t have a need for a full blown copy of PhotoShop so I alway have a free and open source alternative, Gimp, installed. http://www.gimp.org/downloads/ Just open up the pdf and you will be presented with an import wizard. Each pdf/map will be a different size and you might have to play around a bit to find the perfect resolution to import as. The final device you will be using might play a role here too. I imported at like 9000x6000 and will cut a portion of it out.
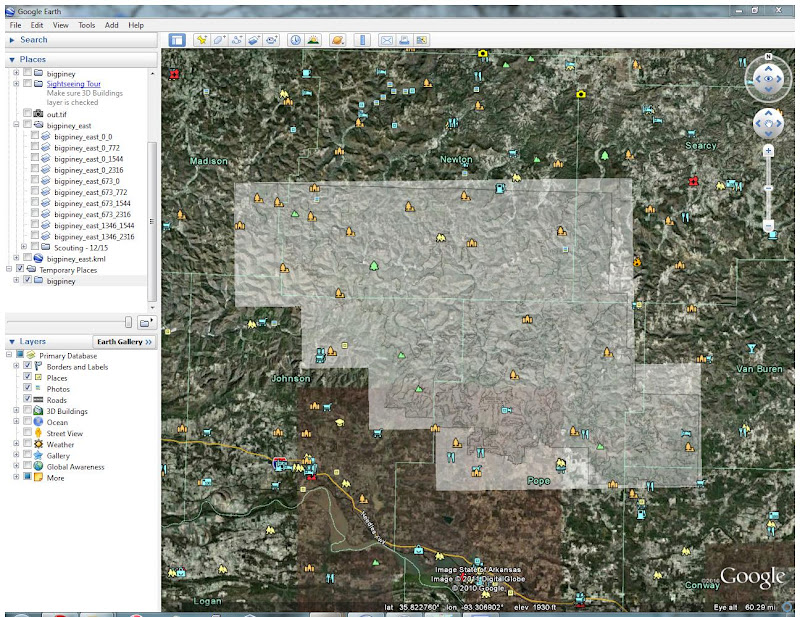
You end up with something like this. You could further cut out the uneeded portions, but there are some highways showing that might be useful, so I left them...
Apply Coordinates
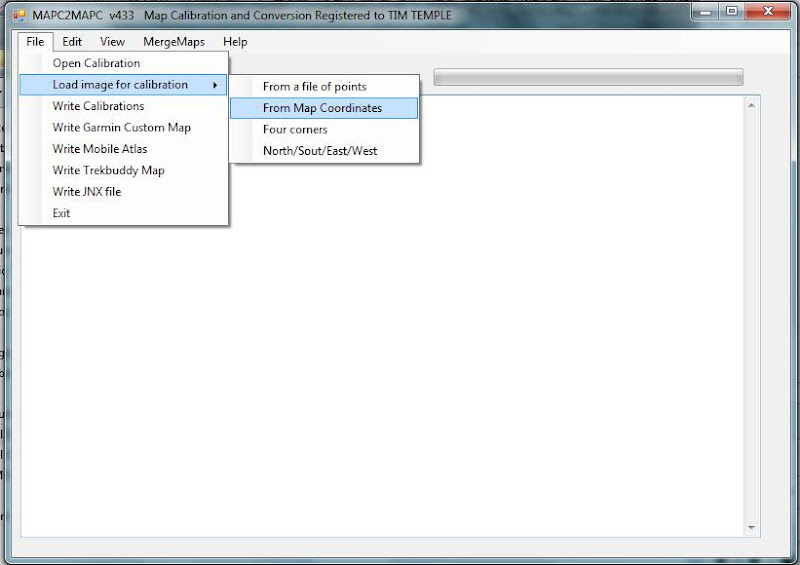
Enter MAPC2MAPC, the program that really does the heavy lifting for us. It’s available at http://www.the-thorns.org.uk/mapping/. There is an older version at the bottom of the download page that is completely free and will get the job done, but the new versions are much nicer to use and only cost ~$15 for the full version. The developer is super nice and added a few thing for me when I sent an email. Money well spent IMO.
Run MAPC2MAPC and load and image with File->Load Image for Calibration
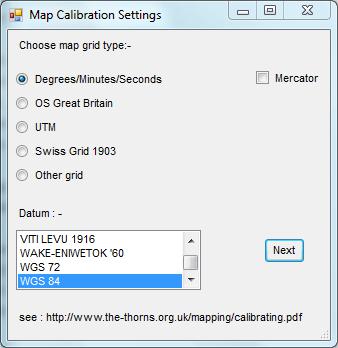
You are first presented with a dialog like below. Check that you will be using degree, minutes, seconds and leave the rest alone...
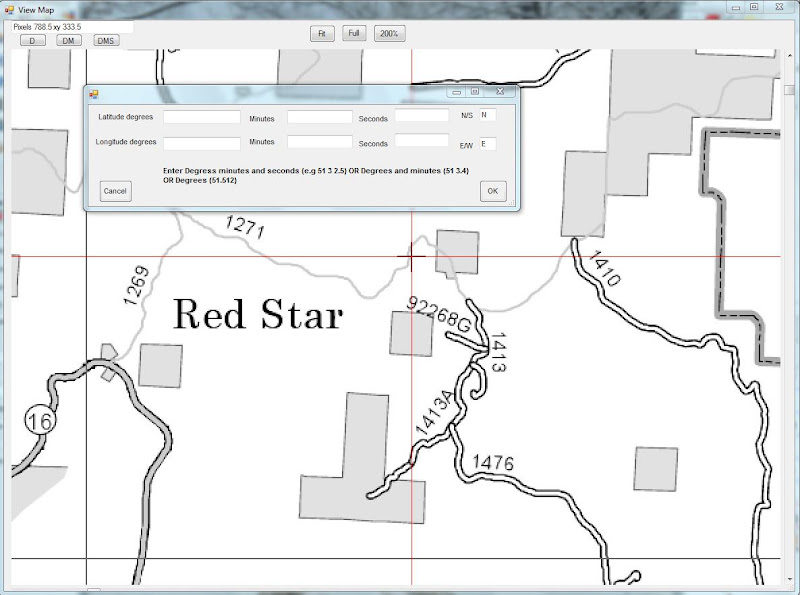
Then zoom in on the map and look for little crosshairs marking lat/long intersections and click on one to apply the coordinates. Do this for 4 or 5 coordinate intersections and then Click finish at the top of the windows.
You will then be presented with some output in the main window which tell you how to fine tune based on the coordinates provided. You Click “View” on the main windows title bar and it opens the map window back up. Right click on the points to fine tune them. There will be some error and maps that cover large areas might need to be further chopped up to get accurate coordinates for the entire map.
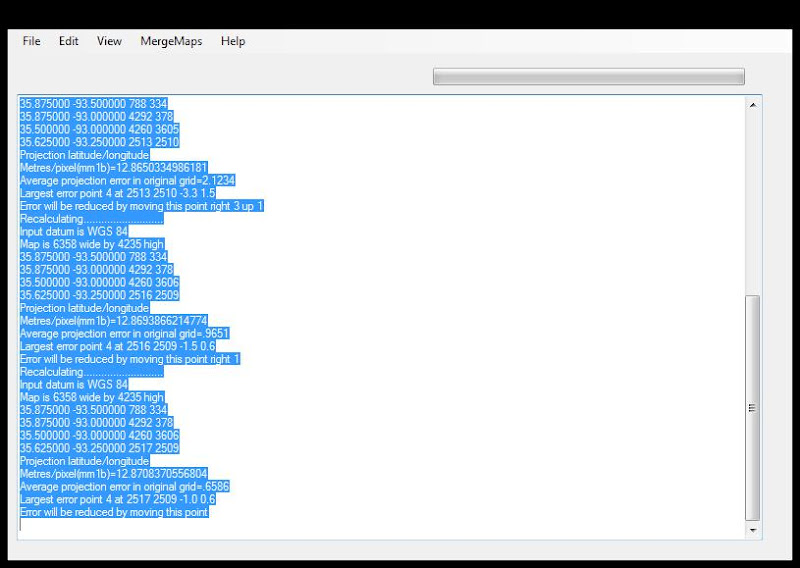
One you no longer get fine tuning instructions save the calibration wifh File->Write Calibration.
Make sure to do this before exporting especially on the older free version as it will close the project you are working on. The newer version does not and you could wait to save, but better safe than sorry.
Before exporting you might want to go to Edit->Preferences and enable “Advanced Garmin Tile Control”. This allows you to uncheck portions of the image that don’t actually contain parts of the map to not create tiles for so they won’t be in the way in Google Earth. Then File-Write Garmin Custom Map. You will end up with a kmz file in the same folder as your original image you can open in Google Earth.
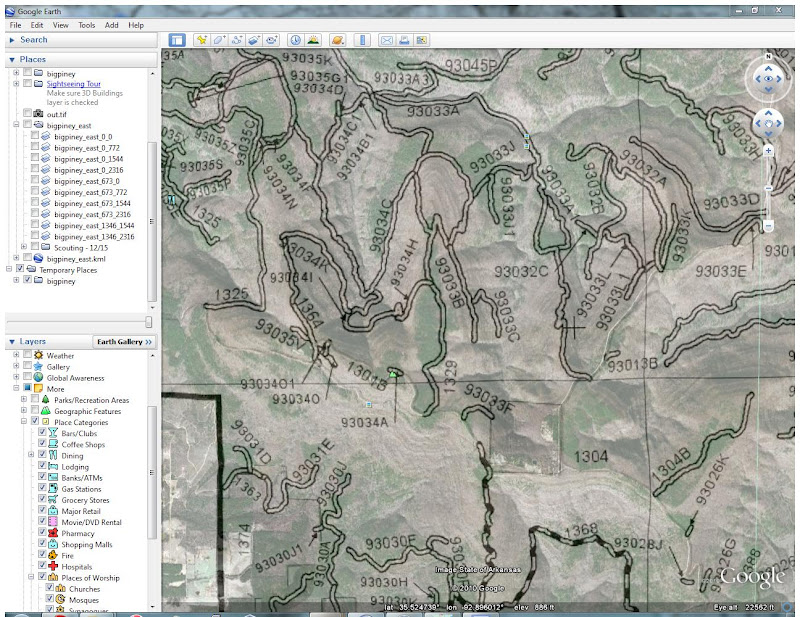
Zoomed in on the roads...
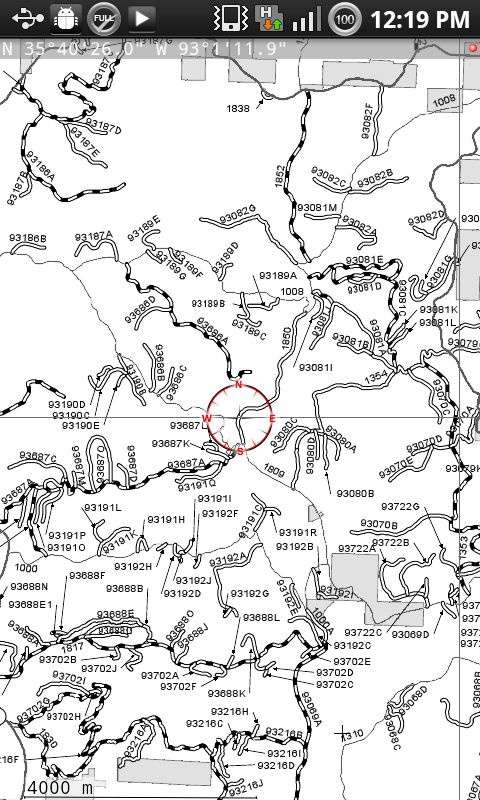
Only real issue is that the larger gravel roads are represented by a thin grey line that can be hard to see when used as a transparent overlay. You might can try some color selection and pasting in Gimp to try to alleviate some of this...
Putting it all together
The last thing we need is realtime tracking on our map. On windows this can be accomplished with Goops. http://goopstechnologies.com/. I’ll leave it as an exercise to get your GPS connected to your computer since that will be different for different units. But after you’ve done that you should be able to start up Goops and it will scan for your GPS and once found start tracking in Google Earth. If you want to save tracks you apparently have to purchase a “pro” version. Or I’m sure there are other tracking programs out there...
Alternative End Game
I used this solution successfully a couple of trips out. Unfortunately my work laptop is the only one I have with bluetooth(needed for my gps) and the screen locks after 15 minutes, so it became quite the pain to unlock it with a password all of the time. So I’ve now gone a slightly different route. I have an Android phone(Samsung Captivate) and have found a working solution for it also. Export as a Trekbuddy Map in MAPC2MAPC and then use the free Trekbuddy program on Android. And it just works. Only caveat is that there is no zoom and so you have create the map the size you want during the initial pdf import step and that takes a little trial and error. There is also the option of a Mobile Atlas with does have zoom steps. There are other android apps that can read that format I believe...I’ve just have come to like Trekbuddy.
I also use My Tracks from Google to record a track of where I go that I can export in various formats. Plus I use an app called GPS tracker that collects my position every few minutes caches them up and when my phone gets a data signal it blast them out to a service where people can keep track of me on http://www.instamapper.com/. Gives a little piece of mind to the wife... So my Android phone has taken over as my go to offroad GPS device.
Done
Hope someone finds this in some way helpful. Feel free to ask any questions and I’ll try to answer as best I can.
Even before the map purchase I had been researching road and trails and also looking for a gps solution to keep me on legal paths. I had found information about these “new” multi-vehicle use maps, but assumed they mostly just applied to ATVs. I had downloaded the MVUM pdf, but it was just a black and white non-detailed map and at first glance didn’t seem very useful. Only after the forest service map purchase and comparing the two did I begin to see the usefulness. As mentioned, the MVUM shows a great deal more roads and it turns out most are legal to be on. In fact the great majority of them are technically only legal for highway legal vehicles.
More recently I’ve come to realize that these maps also vary from forest to forest, so for your particular area they might not be as useful or other available maps might be more useful. For the Ozarks the main issue I've found is that there are many roads simply labels "highway legal vehicles only". But those roads might be improved gravel or a level 3 trail, or even something so narrow you scratch your head and wonder what highway legal vehicle can fit down it as you attempt to turn around. But overlooking that fact, for the Ozark National Forest, this was beginning to look like the perfect solution for me. I just had to make use of my computer knowledge to get the information in that pdf into some piece of GPS enabled technology.
So let’s backtrack a bit and examine what I was actually looking to accomplish as your goals might be different from mine and there will be no reason for you to continue reading. So let’s just get the purpose out of the way somewhat close to the beginning. I’m not that familiar with the world of GPS and wanted to keep thing simple. I wanted a map with all the little forest service roads and I wanted realtime GPS tracking on that map while driving. Most gps road maps are obviously lacking in any kind of detail for offroad use and I wasn’t just wanting a topo map that I entered a track or waypoints onto. This is why the MVUM is looking like a good candidate. The Forest Service web site puts their disclaimer that they are just legal document and lack detail, but for what I’m wanting they have plenty of detail...I’m wanting roads and they have those in abundance. Every road that is legal for me to be on is on there, plus it show private property boundaries. That’s about all I need...now to GPS-inize it.
End long rambling intro. Here is the where the fun begins. So all we have is a pdf which we need to do the following to convert to some other format and apply coordinates to in order to use in some GPS software, preferably without spending too much money. After much trail and error I came upon the following solution.
- Convert pdf to image. I use png which uses lossless compression and thus no detail is lost in this part of the process.
- Use MAPC2MAPC to apply coordinates to the image file.
- Export as “Gamin Custom Map”...a kml/kmz file that can be use in Google Earth
- Use Goops to enable realtime tracking Google Earth
- Profit...not monetarily, but I’m indeed reaping the benefits of the work.
Convert
I find that I don’t have a need for a full blown copy of PhotoShop so I alway have a free and open source alternative, Gimp, installed. http://www.gimp.org/downloads/ Just open up the pdf and you will be presented with an import wizard. Each pdf/map will be a different size and you might have to play around a bit to find the perfect resolution to import as. The final device you will be using might play a role here too. I imported at like 9000x6000 and will cut a portion of it out.
You end up with something like this. You could further cut out the uneeded portions, but there are some highways showing that might be useful, so I left them...
Apply Coordinates
Enter MAPC2MAPC, the program that really does the heavy lifting for us. It’s available at http://www.the-thorns.org.uk/mapping/. There is an older version at the bottom of the download page that is completely free and will get the job done, but the new versions are much nicer to use and only cost ~$15 for the full version. The developer is super nice and added a few thing for me when I sent an email. Money well spent IMO.
Run MAPC2MAPC and load and image with File->Load Image for Calibration
You are first presented with a dialog like below. Check that you will be using degree, minutes, seconds and leave the rest alone...
Then zoom in on the map and look for little crosshairs marking lat/long intersections and click on one to apply the coordinates. Do this for 4 or 5 coordinate intersections and then Click finish at the top of the windows.
You will then be presented with some output in the main window which tell you how to fine tune based on the coordinates provided. You Click “View” on the main windows title bar and it opens the map window back up. Right click on the points to fine tune them. There will be some error and maps that cover large areas might need to be further chopped up to get accurate coordinates for the entire map.
One you no longer get fine tuning instructions save the calibration wifh File->Write Calibration.
Make sure to do this before exporting especially on the older free version as it will close the project you are working on. The newer version does not and you could wait to save, but better safe than sorry.
Before exporting you might want to go to Edit->Preferences and enable “Advanced Garmin Tile Control”. This allows you to uncheck portions of the image that don’t actually contain parts of the map to not create tiles for so they won’t be in the way in Google Earth. Then File-Write Garmin Custom Map. You will end up with a kmz file in the same folder as your original image you can open in Google Earth.
Zoomed in on the roads...
Only real issue is that the larger gravel roads are represented by a thin grey line that can be hard to see when used as a transparent overlay. You might can try some color selection and pasting in Gimp to try to alleviate some of this...
Putting it all together
The last thing we need is realtime tracking on our map. On windows this can be accomplished with Goops. http://goopstechnologies.com/. I’ll leave it as an exercise to get your GPS connected to your computer since that will be different for different units. But after you’ve done that you should be able to start up Goops and it will scan for your GPS and once found start tracking in Google Earth. If you want to save tracks you apparently have to purchase a “pro” version. Or I’m sure there are other tracking programs out there...
Alternative End Game
I used this solution successfully a couple of trips out. Unfortunately my work laptop is the only one I have with bluetooth(needed for my gps) and the screen locks after 15 minutes, so it became quite the pain to unlock it with a password all of the time. So I’ve now gone a slightly different route. I have an Android phone(Samsung Captivate) and have found a working solution for it also. Export as a Trekbuddy Map in MAPC2MAPC and then use the free Trekbuddy program on Android. And it just works. Only caveat is that there is no zoom and so you have create the map the size you want during the initial pdf import step and that takes a little trial and error. There is also the option of a Mobile Atlas with does have zoom steps. There are other android apps that can read that format I believe...I’ve just have come to like Trekbuddy.
I also use My Tracks from Google to record a track of where I go that I can export in various formats. Plus I use an app called GPS tracker that collects my position every few minutes caches them up and when my phone gets a data signal it blast them out to a service where people can keep track of me on http://www.instamapper.com/. Gives a little piece of mind to the wife... So my Android phone has taken over as my go to offroad GPS device.
Done
Hope someone finds this in some way helpful. Feel free to ask any questions and I’ll try to answer as best I can.