You are using an out of date browser. It may not display this or other websites correctly.
You should upgrade or use an alternative browser.
You should upgrade or use an alternative browser.
New and Improved Camper Box Build - Ver 2.0
- Thread starter Heifer Boy
- Start date


Heifer Boy
Adventurer
HB, you've got your work cut out for you. Making the box for one, and doing writeups on a couple of sites.You are no doubt a busy boy. Well done for flying the Aussie flag. :sombrero:
All for the love of it...:bike_rider:
Heifer Boy
Adventurer
Electrical Questions
So I've been investigating the electrical situation for the camper box and found it is definitely not my strong point. But it's something I need to sort out before I glue too much more together or I'll just make it harder for myself to install further down the line. I already have a second battery connected and isolated from the stating battery so I'm good to there. My issue is the 'simple' process of wiring up outlets, the LED lights, the water pump and the fridge to this battery inside the camper.
Firstly, my camper is a slide on and is made of wood. So earthing each light etc to a chassis is not going to happen. Negatives will be returned to the battery (unless someone has a better idea).
Secondly, I will be having 3x LED lights, 3x internal outlets, 2x external outlets, water pump and fridge. For fusing I was thinking of grouping the lights together, splitting the outlets 3 ways with 2 outlets on each fuse (left, right and rear + water pump) and fusing the fridge separately Later I will add some lights to the tent too. We run a very low power, low consumption, low impact, low water use campsite so lights will be a foreign concept as is a water pump. It will be rare that more than the fridge is used 90% of the time.
Thirdly, I'm think I'm up to speed on wire sizes, fusing and calculating necessary cable sizes and fuses. Maths is easy.
So I bought a fuse block like this http://www.baintech.com.au/fuse-blo...e-block-lateral-connection-4-pole-8-terminals and then realised I have to have separate wires in to the fuse box from the battery and separate wires out with separate negatives returning to the battery?!? Messy!
I then read about 'buss bars' and this seems to make more sense. 1x power in, separate wires out to fuse box and on to lights etc. Negatives back to another buss bar with a single wire back to the battery. What does everyone think?
I've read comments questioning a negative buss but I think this is because earths can be sent elsewhere in the case of a camper trailer etc. Is there combinations of 'buss bar and blade fuse box in one'? I've only seen marine switch panels do this which I don't want/need. Also is it OK to group things together and just split the wires closer to the device (ie single wire from the fuse box split to inside outlet and outside outlet closer to them – in series of course).
I think I may be over thinking all this because it's an unknown to me. I'm guessing it's pretty simple but I just need o get the right hardware. There are so many different options and I want to keep it simple but safe.
Cheers,
HB
Here's my take on your electrical questions:
First off, running the negatives back to the battery is the proper way, going to chassis is a short cut method to save on wiring (the chassis is used as a conductor back to the battery). Do it right.
Combining items on fuses is fine assuming you're using the right components. The whole point of fuses is to protect the wiring connected to them. So if you want to run 2x the load on one fuse then you need a fuse & wiring rated for that. It is fairly common practice to group up low amp draw items like lights together and then provide individual fuses for higher amp draw items (houses in the US are wired similarly). The only down side on a combined fuse situation is you might not know what item down the line blew the fuse as easily if you have to trouble shoot something, but for the way your are doing it the split up sounds fine to me.
I'll have to check your fuse link later, but in general bus bars are a nice way to "clean up" the wiring layout in my mind.
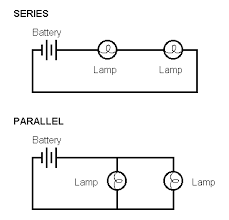
Yes running one line and then sending a branch to each item on the circuit is common place. One clarification, you need to be careful on your wording, you'll actually be wiring in parallel not series. I think you just wanted to use a different word other than "series" in your description of wiring one after another along the circuit. Actual series wiring is a different deal. I'll explain below:
Series wiring (you don't want this) divides the voltage up among each item on the circuit while holding the current the same (translation: voltage drops to low and current goes to high for each item on your 12V system). To wire in series you just have one line making a loop back to the battery with each user spliced in.
Parallel wiring (this is what you want) keeps the voltage the same through each branch, along the main line the current adds up but each branch only sees its current draw (translation: voltage and current are correct for your 12V item). Think of parallel wiring as a ladder, one side rail is the positive and the other is the negative. Each rung would be each user on your circuit, each rung see's the full voltage but only carries the load on it where as the side rails carry the cumulative load.
Make enough sense? I can sketch/scan it if you need me to (or there is likely a drawing on the internet).
Edit: See if this comes through from the net:
First off, running the negatives back to the battery is the proper way, going to chassis is a short cut method to save on wiring (the chassis is used as a conductor back to the battery). Do it right.
Combining items on fuses is fine assuming you're using the right components. The whole point of fuses is to protect the wiring connected to them. So if you want to run 2x the load on one fuse then you need a fuse & wiring rated for that. It is fairly common practice to group up low amp draw items like lights together and then provide individual fuses for higher amp draw items (houses in the US are wired similarly). The only down side on a combined fuse situation is you might not know what item down the line blew the fuse as easily if you have to trouble shoot something, but for the way your are doing it the split up sounds fine to me.
I'll have to check your fuse link later, but in general bus bars are a nice way to "clean up" the wiring layout in my mind.
Yes running one line and then sending a branch to each item on the circuit is common place. One clarification, you need to be careful on your wording, you'll actually be wiring in parallel not series. I think you just wanted to use a different word other than "series" in your description of wiring one after another along the circuit. Actual series wiring is a different deal. I'll explain below:
Series wiring (you don't want this) divides the voltage up among each item on the circuit while holding the current the same (translation: voltage drops to low and current goes to high for each item on your 12V system). To wire in series you just have one line making a loop back to the battery with each user spliced in.
Parallel wiring (this is what you want) keeps the voltage the same through each branch, along the main line the current adds up but each branch only sees its current draw (translation: voltage and current are correct for your 12V item). Think of parallel wiring as a ladder, one side rail is the positive and the other is the negative. Each rung would be each user on your circuit, each rung see's the full voltage but only carries the load on it where as the side rails carry the cumulative load.
Make enough sense? I can sketch/scan it if you need me to (or there is likely a drawing on the internet).
Edit: See if this comes through from the net:
Last edited:
compactcamping
Explorer
HB, was sorry to read about your door / hinge mishap. Love your DIY tenacity, I'll just cut it up and glue it back together :clapsmile
dwh
Tail-End Charlie
x2 on what pods8 said.
Bus bars are the best way - it's what is used in your house electrical panel. A positive bus bar with fuses or breakers hanging off of it is good. Also having a negative bus bar is even better.
(And it's bus, not buss - often confused - Buss is a very old brand name in the electrical biz. )
Sure you can split off the wiring to supply multiple loads such as two power ports on one fuse. Keep in the mind the fuse is to protect the wire, so when you split, don't go from a larger wire to a smaller - keep the same sized wire all the way through the circuit. You don't want section of 15a wire being protected by a 20a fuse.
Use stranded wire, not solid. Use crimped connectors, not soldered. Vibration tends to cause stranded wire to work back and forth, and eventually break at the point where it becomes solid (where the solder starts).
There are tons of fuse boxes/blocks for 12v use that have bus bars in them. What you need is probably something like this:

That's just a standard Buss ATC fuse block with a bus bar down the center that feeds the fuses. You should be able to find it easily at a local auto parts or car audio shop - they're common as dirt. You can see the end of the bus bar sticking out, so it should be obvious where the incoming hot wire connects.
Bus bars are the best way - it's what is used in your house electrical panel. A positive bus bar with fuses or breakers hanging off of it is good. Also having a negative bus bar is even better.
(And it's bus, not buss - often confused - Buss is a very old brand name in the electrical biz.
)Sure you can split off the wiring to supply multiple loads such as two power ports on one fuse. Keep in the mind the fuse is to protect the wire, so when you split, don't go from a larger wire to a smaller - keep the same sized wire all the way through the circuit. You don't want section of 15a wire being protected by a 20a fuse.
Use stranded wire, not solid. Use crimped connectors, not soldered. Vibration tends to cause stranded wire to work back and forth, and eventually break at the point where it becomes solid (where the solder starts).
There are tons of fuse boxes/blocks for 12v use that have bus bars in them. What you need is probably something like this:
That's just a standard Buss ATC fuse block with a bus bar down the center that feeds the fuses. You should be able to find it easily at a local auto parts or car audio shop - they're common as dirt. You can see the end of the bus bar sticking out, so it should be obvious where the incoming hot wire connects.
Last edited:
Keep in the mind the fuse is to protect the wire, so when you split, don't go from a larger wire to a smaller - keep the same sized wire all the way through the circuit. You don't want section of 15a wire being protected by a 20a fuse.
Yes, my statements up above weren't entirely clear on this and I see someone might assume they can use less wiring on the branches which is wrong. The whole circuit should be the same wiring. The statements about the branches not having to carry all the amperage means that your 12V item on that branch isn't seeing more amperage than is intended for it
Heifer Boy
Adventurer
Here's my take on your electrical questions:
Thanks for the detailed explanation pods8. It's how I was thinking but I hadn't seen it explained so well before. I thought it was pretty simple.
I have seen that series/parallel sketch before and had the parallel picture in my head but wrote series instead. My bad...
There are tons of fuse boxes/blocks for 12v use that have bus bars in them. What you need is probably somethin g like this:
Damn terminology got the better of me again. A quick search on fuse 'block' and I've found loads of what I was looking for. It's not a fuse 'box' at all :wings:
I also read a bunch of your replies in other threads and your information helped a lot in getting my mind around it all. Good common sense stuff you don't always think about. Thanks.
Yes, my statements up above weren't entirely clear on this and I see someone might assume they can use less wiring on the branches which is wrong. The whole circuit should be the same wiring. The statements about the branches not having to carry all the amperage means that your 12V item on that branch isn't seeing more amperage than is intended for it
I've got some 4mm/20A cable to use everywhere from the battery on. I'm was thinking of using two fuse blocks though. One up the front near the battery for the front outlets and lights and one down the back for the fridge, rear outlet, rear light and water pump. I think it would be easier to run the one pair of wires (+ and -) down the back rather than four pairs and split from there.
Sound OK?
HB, was sorry to read about your door / hinge mishap. Love your DIY tenacity, I'll just cut it up and glue it back together :clapsmile
Cheers Scott, all part of the learning process...
Heifer Boy
Adventurer
I've got some 4mm/20A cable to use everywhere from the battery on. I'm was thinking of using two fuse blocks though. One up the front near the battery for the front outlets and lights and one down the back for the fridge, rear outlet, rear light and water pump. I think it would be easier to run the one pair of wires (+ and -) down the back rather than four pairs and split from there.
Sound OK?
I've just realised that this will mean 4 fuse blocks needed - 2x positive and 2x negative. Not very practical. Then I found this 12 Gang Fuse Panel with Ground Bus http://www.slipstreamhover.com/PhotoDetails.asp?ShowDESC=N&ProductCode=PRT-ELT-12GangFusePanel
Am I right in thinking positive wire into the centre stud and out through the fuses, negative wires back into the bottom blade connectors with a single wire out from the bottom stud back to the battery?
dwh
Tail-End Charlie
Am I right in thinking positive wire into the centre stud and out through the fuses, negative wires back into the bottom blade connectors with a single wire out from the bottom stud back to the battery?
Yup.
Negatives don't get fused, only the positives. The fuse on the positive protects the entire circuit (dunno if you Aussies call it a "loop"
). That unit you linked to has a negative bus which is handy. From that bus, yes, the main negative wire goes back to the battery.Here's another view:

You also need to protect the positive wire feeding in to that fuse block. In my old (I mean - vintage!) camper, there was a 50a fuse to do that. I replaced it with a Bussman 12v breaker. I used Type 2 "modified reset" which requires you to remove power before it resets. I wanted that because if the big supply wire shorts out, then I DON'T want it coming back on until I've checked it out.
For smaller "branch circuits" I'll commonly use the Type 1 "auto reset".
http://www.wiringproducts.com/contents/en-us/d60.html
EDIT: The reason I replaced that 50a fuse with a breaker, was simply because the fuse holder was old and oxidized and making intermittent contact. Since I had to take it out anyway, I went ahead and just replaced it with a breaker. Fuses are fine and I would have left it if I hadn't been getting a dodgy connection out of it.
Last edited:
Kilroy
Adventurer
Great write up. I've had some experience fixing a wooden boat, your building techniques are just the thing for a camper build up. Really appreciate your testing of construction techniques and your detailed write up. Folks who haven't tried epoxy techniques don't understand what a great product it is. Looking forward to seeing the finished product. Thanks for posting.
Heifer Boy
Adventurer
Great write up. I've had some experience fixing a wooden boat, your building techniques are just the thing for a camper build up. Really appreciate your testing of construction techniques and your detailed write up. Folks who haven't tried epoxy techniques don't understand what a great product it is. Looking forward to seeing the finished product. Thanks for posting.
Thanks Kilroy. I don't know why more teardrops aren't built this way as they are the mostly wood. I guess unless it used offroad then they just don't need the strength and the extra cost. For the home builder like me it's a great way to build and perfect for light expedition trailers too.
Keep watching...
Heifer Boy
Adventurer
Stage Eleven – Epoxy The Inside
Just before I had to cut my creation in half last time, I was finalising the interior and about to do the first epoxy coat. It has all been filleted and I'd fitted the drawer slides and done about all I could while there were no floors to get in the way and it was easier to get to.
Time to start epoxying!!!
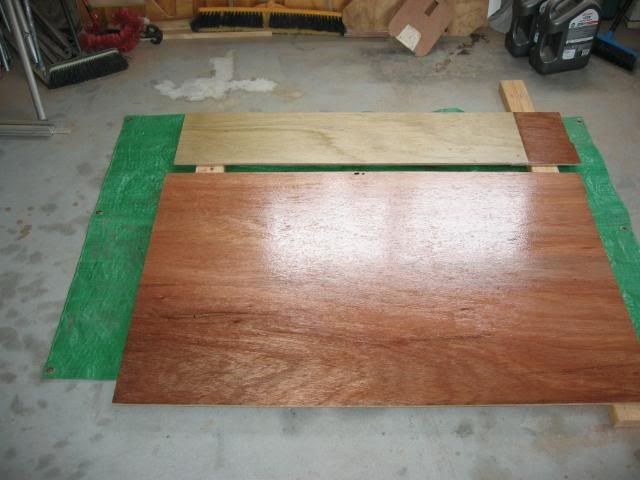
The first interior epoxy coat is mixed with BoteCote TRPDA which is their penetrating formula like CPES. Everything on the inside from the middle floors down got a coat of this stuff including the bottom of the floors yet to be fitted. This is so I don't have to lie on my back painting this stuff on while jammed in a small box later on!!! The rest of the interior will get a coat of this too and this is all I'm going to do for the majority of the inside as it's not going to be subject to weather.

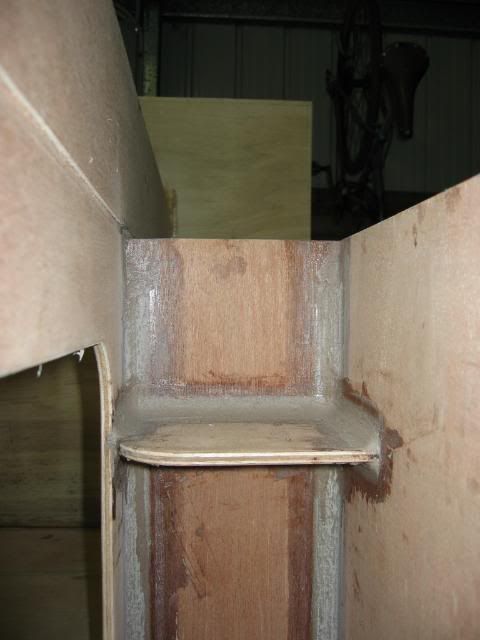
I did do a second coat of full strength epoxy on the floor though and about 100mm up the sides because my storage drawer and fridge drawer are going to slide on this hard surface. It also creates a a waterproof 'tub' in case of water spills and general knocking about. It is the floor after all.
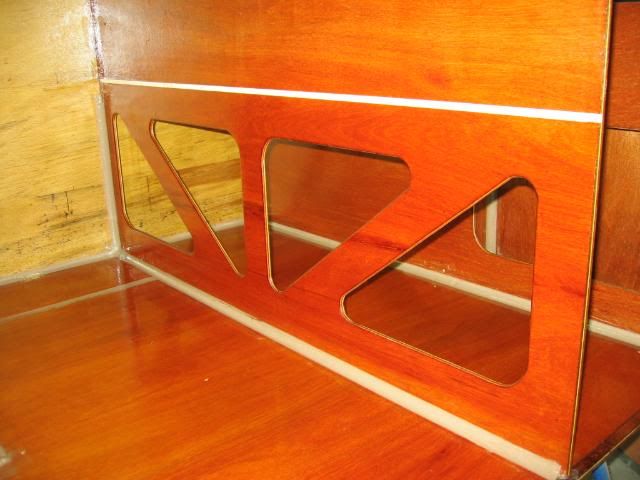
Before I did all of this I built a small shelf for the water pump I'm installing. This was just epoxied in place and gets the pump off the floor of the camper in a nice tidy hole I can still get too if necessary.
So now I have a nice, shiny, waterproof, rock hard interior finish. Yay!!!
Just before I had to cut my creation in half last time, I was finalising the interior and about to do the first epoxy coat. It has all been filleted and I'd fitted the drawer slides and done about all I could while there were no floors to get in the way and it was easier to get to.
Time to start epoxying!!!
The first interior epoxy coat is mixed with BoteCote TRPDA which is their penetrating formula like CPES. Everything on the inside from the middle floors down got a coat of this stuff including the bottom of the floors yet to be fitted. This is so I don't have to lie on my back painting this stuff on while jammed in a small box later on!!! The rest of the interior will get a coat of this too and this is all I'm going to do for the majority of the inside as it's not going to be subject to weather.
I did do a second coat of full strength epoxy on the floor though and about 100mm up the sides because my storage drawer and fridge drawer are going to slide on this hard surface. It also creates a a waterproof 'tub' in case of water spills and general knocking about. It is the floor after all.
Before I did all of this I built a small shelf for the water pump I'm installing. This was just epoxied in place and gets the pump off the floor of the camper in a nice tidy hole I can still get too if necessary.
So now I have a nice, shiny, waterproof, rock hard interior finish. Yay!!!