AdventureBuddies Aluminum Offroad Teardrop build

adventurebuddies

Adventurer
That makes sense. I think I'll disconnect the springs at one end and lower the frame to the right spot so I know where to put the bumpstops. Then I'll reattach the springs and lift the frame until the springs are at full drop and measure that distance.

Is there any science to what the angle of the shocks should be? Obviously the greater the angle, the more shock travel I get. But I assume shocks at a greater angle loose their dampening effectiveness.
 

DeMented Toys

Adventurer
Cool build. I'm trying to figure out shocks for my trailer too. I used Toyota rear leaf springs, mounted spring over. They do make shocks specifically for trailers. I have the same questions about mounting angle. For a trailer it seems like uptravel will be the key measurement. With only 2 wheels on a trailer instead of 4, it's not going to be able to reach full droop unless something is supporting the frame....
 

yeler

Observer
:coffeedrink:

I say load it like your going somewhere and park one tire on a floor jack and jack it up

figure our how much travel you have on the other side of the trailer from the jack

measure from the top of the axle to the bottom of the trailer

that should tell you how long the shock should be as far as up and down travel

IE, if i have 6" from top of axle to bottom of trailer then I need 12" shocks

well that how I think it should work :coffeedrink:
 

adventurebuddies

Adventurer
I did finally finish the trailer and have used it several times. The performance has been better than i thought possible. I will post pictures of the rest of the build for anyone who is interested in seeing them.
 

adventurebuddies

Adventurer
some updated photos of the systems

Here are some photos of the systems which are located in the rear under the kitchen counter. In the picture, I am holding up the counter top to revel the plumbing underneath. There is a huge AGM battery that powers the trailer. Also under the counter there is a water pump and the plumbing lines that draw from 4 separate 9 gallons tanks (total of 36 gallons) that are under the chassis. The tanks are protected by skid plates and the are separated into two "sections" so that you can draw from either the front tanks or rear tanks. It's a great way to only fill as much water as you need. I will also post some pics of the hot water heater which is awesome for hot showers.
 

Attachments

  • file1.jpg
    file1.jpg
    540.4 KB · Views: 25
  • file2.jpg
    file2.jpg
    537.7 KB · Views: 24
  • file8.jpg
    file8.jpg
    541.4 KB · Views: 24

adventurebuddies

Adventurer
One thing different about this design from most of the others is that I opted to leave the kitchen open to the inside of the bed area. While this sacrifices the storage of overhead cabinets, it means that you can access the sink while inside. During bad weather, it's pretty nice to be able to wash your face, brush teeth, etc without having to go outside. The sink has hot and cold water, though it is designed such that the rear hatch has to be open if you are using the water heater. There is a hatch under the end of the mattress that provides plenty of storage space for kitchen ware. We use a two burner camp stove on the kitchen counter left of the sink or we put it on a table to cook. There is a propane tank in the tongue box with a gas line to the back of the trailer which has a camp stove connection and also feeds the on demand water heater.
file1.jpg

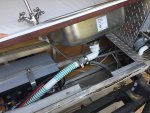
This picture shows a close up of the water heater. I cut a hole in the side of the trailer and installed a deck plate with a lid that easily unscrews to reveal the water heater controls. This is right next to the shower wand, so you can control the temperature of the water for a shower. We have one of those shower privy popup things so you can set it up next to the trailer for a hot shower. With 36 gallons of water capacity, two people can take hot showers daily over a weekend trip and still have plenty left over for rinsing dishes and other uses.
file-1.jpg

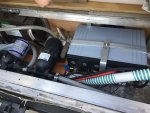
In my original design, the mattress was on the floor of the camper which means that the mattress had to be notched around the wheel wells. The camper fits a queen mattress, though it was more like the width of a full at the narrow point between the wheel wells. I designed the wheel wells into the camper so that the trailer's axle width could exactly match my Land Cruise 80 - a design element that proved to be incredibly convenient when towing over rough terrain or along a rutted trail because the trailer follows the vehicle path very closely. Eventually I decided to build a platform to raise the mattress above the height of the wheel wells. This caused a decrease in head room, though you can still sit up inside. The benefit of all of the storage under the mattress is great. This picture shows the space where I store an easy-up, chairs, the shower privy, a mojo griddle, etc. There is also space for more water tanks if you wanted to have the option to fill tanks that are insulated for winter use The current water tanks are exposed to the outside and would freeze in winter, but tanks under the mattress would solve that problem and could add even more water capacity if it even became necessary.
file2.jpg
 

Forum statistics

Threads
185,829
Messages
2,878,671
Members
225,393
Latest member
jgrillz94
Top