You are using an out of date browser. It may not display this or other websites correctly.
You should upgrade or use an alternative browser.
You should upgrade or use an alternative browser.
"Jackur" 2003 Ford E350 Diesel 4X4 Build.
- Thread starter shachagra
- Start date
The slides were a real hassle. I thought the pop-up side would be difficult and they were really easy- a simple slide was tough. Alignment problems. You see in the picture the metal rails attached to the bed, each side has 5 of the pictured patio door rollers bolted to the "coaming" the part that rises from the van roof. It slides easy now.


notmiller
Observer
The slides were a real hassle. I thought the pop-up side would be difficult and they were really easy- a simple slide was tough. Alignment problems. You see in the picture the metal rails attached to the bed, each side has 5 of the pictured patio door rollers bolted to the "coaming" the part that rises from the van roof. It slides easy now.
View attachment 117828 View attachment 117829
I've always found sliders to be a hassle. That's why I asked!! :sombrero: Good idea, though!
Not much has happened in the last week, it has rained 9 of 10 days since we started the project. I pulled the bed out to make work on the main roof easier. In this picture my son is fairing the coaming (part that sticks up from the van roof) into the roof and the opening main roof is propped up with temporary crutches, a bit higher than it will sit when done . The top is really stiff and light, I have no problems walking on it and I'm guessing it is about 70 pounds. The plan was to attach the rigid sides today, but alas they were not only too tall, but they weren't long enough. So much for my measuring skills. It isn't the end of the world, that is one of the blessings of working with wood and epoxy, it makes correcting mistakes fairly easy.
The postd holding the
There is one big challenge- not only does the rain make it hard to work in my driveway, but my homeowners Assn has asked me to attend a hearing about my work in the driveway. If I can't do the work here I shift to plan B and build the workshop I have been planning on some property we have south of here. It'll be a setback in time, but it might be for the best, and keep my neighbors happy.
Lost...Again
New member
Well, how did the HOA meeting go? Did you dazzle them or are you now persona non gratis?
I can keep the van in the driveway, but I have to get the cover off within two weeks. Turns out it was a mix-up of sorts. I had Shachagra parked in the driveway early in the summer and got a warning, when they checked to make sure that beast was moved they saw the van and thought it was the RV I had been sited for. I'll post some pic this weekend, the exterior should be about done. With this project there is a lot of fitting, refitting and altering. It is a luxury to have time to get it right, I work on the van a few hours everyday. So far so good. I'll check on that video- may be moot as I hope to post a video of the opening of the shell.
Finishing the top
I removed the top to glass it and make a few alterations after fitting it on the van roof. Biggest alteration was the addition of wood to screw the accordion sides into. I realized that the screws holding the top on were into nothing but the glassed 1/8 inch plywood and closed cell foam. That wasn't going to work so my son and I cut two channels into the top and epoxied laminated strips of poplar that was then glassed over. I then decided to add a bit of curve to the back so the top doesn't look so much like a box, then came the fiberglass. The top is the odd channeled shape to hold the two 220W solar panels that will be on the roof. I needed the width at the side to make the top a sturdy box beam, but didn't want to go two inches higher for the panels, so I did the same thing as on Shachagra, I inset the panels. The front fairing will come up over the panels, protecting them from branches etc. The top may someday be faired smooth, but I'm working to get it watertight right now. Should have the topper with windows done this weekend.
If you do much work with wood and epoxy it helps to buy in bulk. That glass cloth was $1200, but will last me a long time. I buy the epoxy in 30 gallon containers and best of all, I mill my own wood.
Last edited:
AeroNautiCal
Explorer
Beautiful workmanship, I love this build.
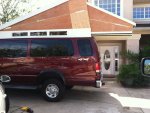
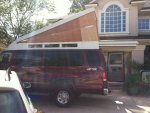
I had to rush a bit to get the tarp off the van (my neighborhood pretty police insist) and I have to admit that right now she is pretty ugly with just the rough shape and primer, but once faired and cleaned up she will look OK. I am thinking that black along the sides where the windows are, with black lexan windows will look better. The top raises the van roof by 16 inches, a bit more than I had planned (by 2 inches) 
I am leaving the sliding bed out while I work the interior (its tough moving it in and out by myself) but will post some pics once the entire top is together and open. It will be huge opened up.
I am happy with the weight of the top, not much more than a 4X8 sheet of plywood (80 lbs) and can be walked on with no flex.
I think this is the only thread on this particular forum that uses anything other than metal- I notice most are focused on 4X4 suspensions, this adds a bit of variety.
Last edited:
Lost...Again
New member
Looks great!
A few more photos. I had to change the size of the "accordion" sides after the first fit and this required fitting hardwood (ash) anchor points into the tops, that is the sequence of pictures. Routing out a space with a jig to glue in the ash. It fit great this time and opens well, but not easily. There will definitely need to be a mechanical assist with the top, probably pneumatic. I plan to fit the bed slide back in tomorrow and will see the whole top together finally. (about 2 months after I thought it would happen) I think it took so long to do because I dreaded the idea that it might not work- but that was an unfounded fear (vantophobia) Its pouring right now, and the top has proven to be watertight even before the installation of the rubber gaskets that will help to keep out wind when on the road.


Finally I get the entire top up and open, it is much easier to show than describe. It took a month longer than I thought to get to this point, but I've actually built the thing 3 times over already. I'm really happy with how accommodating she is and how easily she opens up (sounds like a good woman) I had to redo the bed slide one more time (that makes 3) to get it to slide easily and to keep sliding easily. Last time it worked great but dust would accumulate in the track making it stick. I'll post some pics of the final design. I also made a pneumatic roof raiser out of pvc- works great but is just an interim to see if this was a good way to go- it is.
Some photos
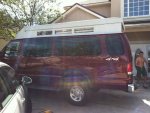
You can see the bed stored with the top down in the back two windows. You still have standing headroom (for short people like me) in the front of the van when folded. Will make for good stealth camping.
Some photos
You can see the bed stored with the top down in the back two windows. You still have standing headroom (for short people like me) in the front of the van when folded. Will make for good stealth camping.
Attachments
Last edited:
Forum statistics
Members online
- MrModica
- Parkrider
- Jpcarm
- Rovertrader
- Roaming Robertsons
- jnr4095
- CraigP92
- mschube
- Whitelotus369
- mark5280
- tkj23qe1387
- freedomproject
- Jkring
- phasenine
- SDDiver5
- Denis 19853001
- Brad Kilby
- JoeSeff27
- daddy_bimb
- Kevox
- Gabe357
- buffalomills
- Antwon412
- dirtnsmores
- torresmick
- osukj04
- adamalli
- SoCal_80
- Winterfell_JK
- aaldape
- Milehi explorer
- greg.potter
- waveslider
- Raul
- Imgoingonanadvencha
- ascdesigns
- Driftwood77
- ChrisCosta416
- thephysicist
- rruff
- Hegear
- bernardocolorado
- Peter_n_Margaret
- Cummins_expo
- asafk
- prgmaticoptimst
- Jupiter58
Total: 631 (members: 55, guests: 576)