Leather Interior
Leather Interior
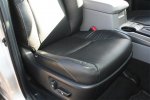
One of the conflicts I had when choosing a model of 4Runner I wanted to go with was the choice between capability and comfort. Capability wise, the Trail Edition is the way to go in my opinion. There are a lot of systems integrated to get you over just about whatever you put in its way. But in Toyota's infinite wisdom they dressed the interior with a weather resistant fabric, without the option of leather at all. None. The SR5 and Limited have that option, but not the Trail. I have mentioned it before, I like my creature comforts when traveling days on end to a destination. And my boss has a criteria list as well. Leather and seat heaters are a must. I looked at the options and from what I could figure, it was going to be a whole lot less expensive to add leather and heat to the Trail than to add the off road capabilities to the Limited or SR5. So that is the path we took.
It didn't take a lot of searching to figure out that Katzkin was the company to work with. OEM leather replacements for Ford, Chrysler, Jeep, and others available through the dealerships no less. Their reviews are stellar, and I have looked at their product at SEMA a couple times. I spoke to a couple friends and they all said "Katzkin". So Katzkin it was. I looked at their website (
www.katzkin.com) and went through their vehicle application process about a dozen times. There are a myriad of options available. Single or multi-color options, trim packages, embroidery, seat heaters, perforation, etc. They have suggested color options for most vehicles as well. I decided on a black leather solid color set with a Ice Grey Detail stitching, perforation in the center area, smooth finish, and a set of seat heater kits for the front. Katzkin does not offer their product directly, so I went through a company called Superior Auto Restyling (
www.ShopSAR.com). I ordered the set on their site, and an installation kit which had all sorts of goodies in it. A representative from SAR called me and went over the order clarifying a couple things and suggesting that I didn't need the whole install kit unless I was doing the door panels too. I hadn't planned on it, so we revised the installation kit down to just a pair of hog ring pliers, package of hog rings, and a leather conditioner. He saved me $50 right there. The entire kit came to around $1150 shipped. $300 of that was the two seat heaters, so if that isn't your bag you could save some there too.
I received the custom leather interior set within a week, just as promised. Everything was there, except instructions. They don't offer instructions as the majority of their customer base is OEM or aftermarket upholstery shops that they have pre-screened. Both of which should know what they are doing. Not some guy in Arizona digging into a brand new truck with not upholstery experience what so ever. Enter.... Me! I watched a couple of the install videos you can see on You Tube of auto shows installing the covers and I didn't see anything I couldn't manage. Again, one of my goals with this truck is to learn as much about it as I can. This is part of that learning process.
I started on the back seat covers, so just in case it was obvious I was over my head I could load up the whole bundle of goods and drive the truck to the local upholstery shop with my checkbook in hand. Once over the nervousness of tearing into a perfectly fine and brand new interior, the process wasn't that bad. I found the key is to not be in any hurry at all. Look it all over and undo stuff once, remembering each step as you have to reverse the process putting it all back together. I removed the entire back row of seats and moved them to a carpeted work space so I could roll them over without worry of damaging the seats. Understanding the various clips and fasteners involved was the trick. The first rear seat took twice as long as the second one. Each had their unique frame clips and around a dozen hog rings that needed to be clipped and removed. The rear set went pretty well, so I moved to the fronts.


I would consider the rear seats a college level 150 course. The fronts were an upper level course. You use all you learned in the first course and then apply a new set of techniques. They tore down pretty much the same, but installing the seat heaters was the kicker. The instruction set was all pictures. It took a while to understand all the nuances that each picture had. Variances for creases in the upholstery, cutting the heaters to size, carving out foam for the heater elements, cable channels, etc. Again, first one took twice as long as the second. I counted 7 points of blood letting on my hands and arms when it was all done, from pulling and tugging and wedging and pushing and stuffing the covers on and off of the steel frames. Not as much swearing as I expected though. The whole process of front and rear seat replacement took me approximately 15 hours. A pro shop could have had it done in a day. It isn't difficult, but it does require a level of patience and attention to detail to accomplish.


I am really happy about how the seats turned out. The leather is high quality and it fits the OEM seats frames like a glove. A couple areas will need a little time to adjust and smooth out, but that is expected. I still need to wire the seat heaters in. They come with a wiring harness requiring switched 12V to run. My plan is to adapt the harness to run off Toyota OEM seat heater switches that have existing holes in the center console. That is for another day. Right now I am enjoying the leather in my Trail.
Cheers,