Efficiently Stacking Slides for Dual Extension Counter Top & Drawers

Whaler

Adventurer
I'm working on a trunk storage system for my '97 Jeep XJ and I want to create a dual extension counter top and drawer system, but I'm loath to lose any storage volume by sandwiching extra layers of plywood between each pair of slides. I'm trying to figure out how to stack the slides more efficiently.

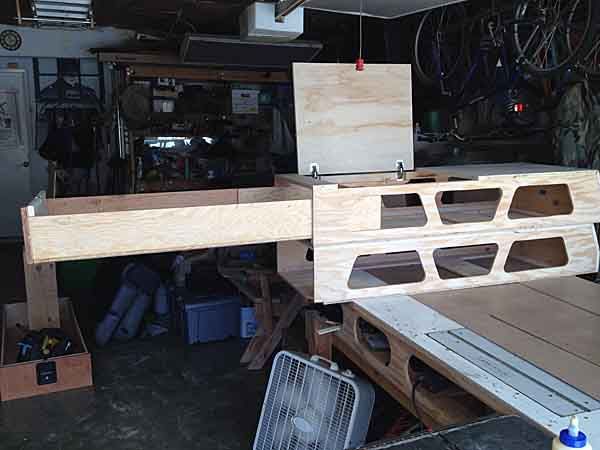
Big picture, my goal is to create a modular, removable system that facilitates easy cooking out of the trunk and could be used in any vehicle. I want to install two identical boxes, side-by-side, each with its own pull-out counter top for prep and cooking. Below that counter top surface, I'll install a single drawer that will telescope out further beyond the counter. I plan to use Accurride lock-in/lock-out slides.

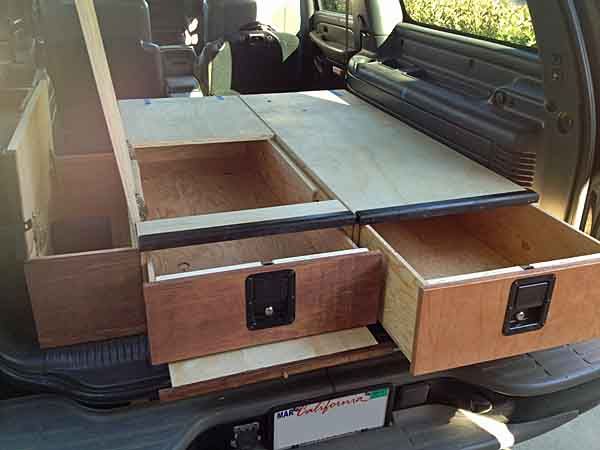
I've gleaned a ton of inspiration from ExPo and I'll be poaching more than a few good ideas; notably set-ups like uber's xj storage build, which is awesome. I hope he won't mind if I poach an image from his build as point of reference. As they say... imitation is the highest form of flattery!

Typically, dual extension systems are laid out like this:
dual slide drawer detail close.jpg

That set-up is slick and reliable, but the downside is that it takes up a lot of space because you need to allocate room for three layers of plywood and two layers of slides. I figured that if I could manage to stack the slides vertically, then I could save some space. In my particular case, the extra thickness of a 1/2" wide heavy duty slide plus a 1/2" "sandwich" layer of plywood adds an inch to the assembly's thickness. In the instance of my 20" deep drawer x 8" tall, that's 1.1 cubic feet of storage volume used up in the assembly that could potentially be reclaimed.

So I'm trying to design a way to stack the slides, keeping the assembly thinner. The only way I can figure to accomplish this is to attach the slides together directly and reverse the orientation of the inner drawer slide, so that I can "outside-mount" the side of that inner drawer box, to the outside of the lower slide.

Here's a cross section of the layer build-up:

XJ Dual Stack & Fold Storage Boxes.jpg

Hopefully that image can be zoomed so it's readable.

A few nuances:

The vertical "sandwich" layers that join everything will be made from 1/8" aluminum rather than plywood, to further reduce the assembly's thickness. I have a friend who can cut the plywood and aluminum on a CNC machine to make sure I keep exact tolerances so that the space between each layer can be kept pretty thin.

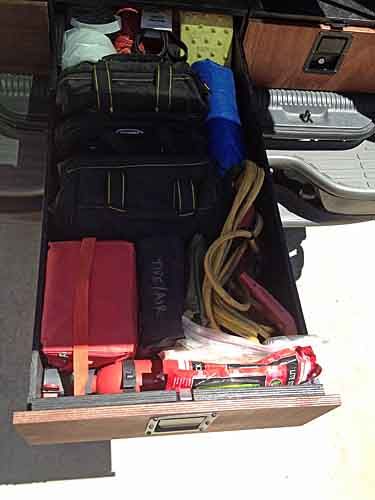
Because the inner drawer will be outside-mounted to the lower slide, the rear of the drawer box can't be very high because it would impact the lower slide, preventing the drawer from opening. This means the inner drawer box will be more like a tray than a true drawer box. To deal with the downside of not being able to stack items as high in a low profile tray, I plan to use insert boxes that can easily drop into the tray. The additional benefit will be the ability to quickly swap different gear sets in and out without repacking the drawers.

There's still refinement to do before I start cutting parts, so I thought that I'd reach out to see what insight and critical feedback the ExPo community may have; thoughts?
 

Attachments

  • XJ Dual Stack & Fold Storage Boxes.jpg
    XJ Dual Stack & Fold Storage Boxes.jpg
    273.9 KB · Views: 76

rayra

Expedition Leader
I think yours is a good engineering solution and likely as optimal as it gets, using sliders. Pics like your negative example are what led me to forego sliders altogether in my own build. Didn't want the loss of volume OR the expense of high capacity sliders. And had done enough woodworking to figure I could make it work. And so far I have.

storagebuild055_zps1emnmzje.jpg
storagebuild063_zpsbhd8jcgv.jpg
storagebuild092_zpsmbnob9qy.jpg


I can open that fully-laden drawer with two fingers on the paddle latch. Wood on wood. I may go with a nylon or teflon strip if the wearing wood becomes more difficult.


A double extension would be a tougher prospect without sliders, unless the second extension was just a flat table / working surface. If it's to be a laden drawer sticking far out, you'd have to really beef up the design / method whereby the second extension is trapped to the first. But that could be done with metal extrusions of some kind, with almost no loss of space.

Sliders have their place in many applications. I just don't think they have to be used everywhere. I'm proving that out now, with my build. I suggest you take another look at your design goals with 'no sliders' as a criteria. Can your goals be accomplished without them? Maybe even in part, if your overall structure can be made in a manner where you can have two extensions but only one set of sliders. But if you have to have one set, then your design idea makes it almost as easy to have two, anyway.
 

4x4junkie

Explorer
As long as I'm understanding it, it looks to me you have a good design there. The insert boxes are a good idea since without them what could happen is the contents of your drawer might fall over to the side as you open it and get lodged in front of the lower slide, making the drawer not close without you having to guide the contents back into place as you close it. Maybe with a little creativity you could also design the insert boxes so that they step outward (are wider) at the bottom to make useable some of the space below the slide assemblies that looks like would otherwise be wasted.

Nice work!
 

Whaler

Adventurer
Pics like your negative example are what led me to forego sliders altogether in my own build. Didn't want the loss of volume OR the expense of high capacity sliders.

...

A double extension would be a tougher prospect without sliders, unless the second extension was just a flat table / working surface. If it's to be a laden drawer sticking far out, you'd have to really beef up the design / method whereby the second extension is trapped to the first. But that could be done with metal extrusions of some kind, with almost no loss of space.

Thanks Rayra, I'm already familiar with your build and have looked at it very closely. It stands out as a fine example and caught my eye while I was scheming up my own plans. I especially appreciate the multiple access points and the weight reducing cut-outs. I also like that you didn't span the entire trunk width with a single unit. That same strategy will give me the option to leave one box in place and put a taller item like a bike or surfboard in the remaining open area of the trunk.

You're right about the second extension being problematic as a heavily laden drawer. I worry that a no slides version of my plan would lead to a sagging assembly because most of the weight is at the very end of my second stage pull-out. I could probably get away with a no slides drawer, but likely need the counter-top section to be kept rigidly in place by slides. At that point, if I have one, I might as well have two. The additional cost of the slides is a concern, but I'm willing to bear it to satisfy my inner nerd and try to pull this off.
 
Last edited:

Whaler

Adventurer
The insert boxes are a good idea...
Thanks! I'm considering different materials for the insert boxes. Lightest would be plastic and with the drawer/try supporting it from below, plastic should be sufficiently strong and take up little space.

That said, I have this notion that maybe the two adjacent modules can be attached with a set of break-apart hinges. This hinge would join the two boxes and also allow one box to flip over on to the top of the other box, like in the sketch below:

Flip Over Module with hinge.jpg

This would allow me to have a low base layer of storage modules (good sleeping platform height) but would also allow me to easily stack the modules to get them out of the way when I put larger items in the trunk, while still keeping them fastened to one another by way of the hinge. Here's the hinge:

Break Apart Hinge.jpg

Because my modules are small (20"x8"x16" approx), they wouldn't be too hard to flip over when empty and inserts would make them easier to empty. However, flipping the box over means that the inserts will need to fit into the inner draw/tray whether the box is right side up or upside down. That's a detail I'm working on right now which will likely require that I make my own custom insert boxes.

I do recognize that I could simply create a way to stack the boxes and that I'm probably trying to get a little too cute with this idea, but what fun would that be?
 

Whaler

Adventurer
Since I was taking photos of the hardware that I already have on hand, I took a shot of the draw latches that I plan to use to fasten these modules to the trunk floor. I got the latches from Southco and they are rated to hold 500 lbs each. This should allow me to install and remove the modules easily. Here they are:

Southco Draw Latches.jpg

For fastening points in the trunk bed, I can't use the OEM mounts because they aren't very strong. I do have a few climbing bolt hangers (also pictured above) that would support the entire XJ if I ever needed to hang it off a cliff, but they aren't low profile when the trunk is otherwise empty. Given that I'm trying to take a modular and flexible approach, I'm thinking I'll likely use a few regularly spaced airline seat tracks, running from front to back in the trunk bed.

The break apart hinges are made by Suncor and I bought them from Defender.com
 

NatersXJ6

Explorer
Any particular reason you wouldn't just make the whole deal out of sheet metal? 16 ga would probably work well and save you even more space
 

rayra

Expedition Leader
Oh I like the flip, that's clever. Stacking is a great idea too, but the flip sure is appealing. Even nicer if that drawer is slider-less and you can just pull the drawer out, flip the box and re-insert the drawer.
Too, as an easy and budget friendly attachment, you could use standard door hinges and use removable pins or right-sized bolts. One plate on the drawer box side, the other half attached to the floor. Drop the box into place and put home the pin / bolt. And you could have multiple hinge plates pre-installed for different configs. Just pull the pin, move it, re-insert the pin.
 

Whaler

Adventurer
Any particular reason you wouldn't just make the whole deal out of sheet metal? 16 ga would probably work well and save you even more space

NatersXJ6, sheet metal is a good call, at least in part; especially for the inserts, which could then be strong, low profile and still support a necessary mid-height ledge or lip (key to my hope of inserting them into the drawer/tray no matter which way the modules are oriented. I was really drawn in my alsmith's sheet metal Jeep Kitchen and nearly took the plunge to buy one of those set-ups.

I guess I wouldn't make the whole thing out of sheet metal for a few reasons, the first being that I have little metal working experience and fewer tools. At least with the aluminum I can cut it with woodworking tools. The second is noise; I worry that an all metal system would reverberate differently. Finally, I love wood. It's warm, durable, relatively soft (read: quiet), I know how to work with it and it's more likely to make these modules feel like a piece of furniture. My hope is that by combining a few different materials, I can get the best of both worlds: the outer boxes and the parts you touch will be warm and familiar wood, while the inner workings will be strong and efficient metal.
 

Whaler

Adventurer
Rayra, thanks! Awesome ideas. You've really got me there with the slider-less drawer being a design that is far more easily flipped... now my elaborate-slider-mechanism-confirmation-bias is showing cracks. I'm going to have to give that a good thought. I'm glad you like the flip idea.

The door hinge as interchangeable mounting points is pretty resourceful. Having started my early working days as a carpenter, I know that lining up door hinges with a heavy door slab can be a bit of a trick. If you were going to do it, I would use a file or grinder to round over the edges of the hinge tines, so that they would more easily mesh together, with each rounded edge of adjacent tines guiding their mate into alignment. My wheels are turning... thanks.
 
Last edited:

rayra

Expedition Leader
mwuhahaha. My work here is done.

yes good idea on beveling the hinge edges, I know exactly the hassle you are referring to. There's a couple ways to foster easy alignment in a custom build like this, depending on the layout. Some form or shape so the modules socket into each other when stacked, like plastic totes. Just some sort of alignment lip. Or even shifting the locations of the hinges plats so one side overlaps both modules slightly, basically forcing things to align as the top box comes down into contact. Then a little front-rear shift and it should drop in. But that's a problem when they aren't docked in the stacked config, with a hinge plate sticking our somewhere.

/random ideas. Something will spark.
 

TrekboxX

Supporting Sponsor - TrekboxX
You've got the right idea, but you don't need to flip the lower slide if you don't want to. You could bend your drop bracket between the slides and then down the outside of the lower slide to attach to the outboard side of it. That way the slide is outside the actual drawer vs. internal. Making it internal will cause other issues, like with the back of the drawer.. This is similar to the way I make my fridge slide/drawer combo. This, in addition to some other changes gained 3+ inches of drawer width on the driver side with no other losses elsewhere. You can see the basic idea in this photo:
Outdoorx4 (15 of 20)-1-1.2.jpg

Cheers,
David
 

Whaler

Adventurer
You've got the right idea, but you don't need to flip the lower slide if you don't want to. You could bend your drop bracket between the slides and then down the outside of the lower slide to attach to the outboard side of it. That way the slide is outside the actual drawer vs. internal. Making it internal will cause other issues, like with the back of the drawer..

Cheers,
David

David, Thanks for the insight. You're right about the back of the drawer conflicting with the slides in an outside-mount drawer application. For that reason my inner drawer was slated to work more like a tray that had a low back. I had planned to set insert boxes into the tray, ones that could be easily swapped out for others with different pre-packed sets of gear. Accomplishing that goal is tricky in a unit that could also be flipped upside down and still used the same way in a reverse orientation (yet another goal...).

I have come up with a workable solution, but it considerably increases the complexity of the assembly and Rayra's minimalism has me reevaluating the design for at least the flip-able unit. Even if I decide not to build-it, I'll post that solution when I get back to my other computer because it was still fun to sort it through to resolution.
 

rayra

Expedition Leader
... I had planned to set insert boxes into the tray, ones that could be easily swapped out for others with different pre-packed sets of gear. Accomplishing that goal is tricky in a unit that could also be flipped upside down and still used the same way in a reverse orientation (yet another goal...). ....

set the tray at the half-height level of the volume, so it works in either orientation. Put rims or stops, a la a chair rail moulding on the sides of the insert boxes, so the boxes don't care which way the tray is oriented.
 

Whaler

Adventurer
set the tray at the half-height level of the volume, so it works in either orientation. Put rims or stops, a la a chair rail moulding on the sides of the insert boxes, so the boxes don't care which way the tray is oriented.

You got it Rayra, that's exactly what I came up with too. I'll post the details tonight.
 

Forum statistics

Threads
189,064
Messages
2,912,564
Members
231,545
Latest member
JPT4648
Top