finally started my mods for my expedition truck

Bummer...it was looking good, too.

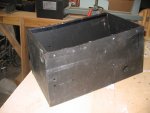
Gonna reuse the bed etc.? It looks like a nice piece. I like how since you made the bed yourself you were able to link the upper hinge for the carrier to the skeleton of the bed...it's much stronger than a single hinge or linking to the sheetmetal on a stock bed.
 

toyrunner95

Explorer
the bumper is actually independant frome the bed, the "towers" are connected to the bumper mounts on the frame. the bumper itslef is held on by 4 bolts, i dont have the pics on this laptop but if you look back i think you can see how it works.

i dont know if im going to use the old bed, its a good bed, fairly lightweight, but a normal bed might work better for a while, at least till i crumple the crap out of it. the bumper will probably be sold, it wont fit on another truck i dont think without some modification. espically with a stock bed, its rather narrow. HOWEVER i may take it apart and re use the hinges, they were rather expensive. we will see what happens.
 
Last edited:

toyrunner95

Explorer
well i resurected the old beast. turns out that the something something valve with the clutch went out so i stole one off a motor at my friends house and now shes back in the game.

ive been working on a bunch of little things since i got home. now that i am out of college and jobless i have some time to actually get some projects done that i didnt get a chance to finish over the past few years.

one thing is the rear drawer. i needed something to keep my recovery gear in that is secured. i had a box and some drawer sliders so i used my noggin and put the two together. its not perfect but it will work.

i also made a huge improvement and painted the truck. now its 2 colors instead of 4! yay.

next up is the light bar, centerconsole mounts, shifter boot, and a bunch of other stuff.


it wont post pics apparently. grrr.
 

toyrunner95

Explorer
After searching for a week I finally found someone that sells Jeep style fenders in my area. Hopefully this weekend I will be able to weld them on and give the truck a more finished look. Also this weekend I plan to get the center console mounted, the battery tray finished, and the inverter installed with a secondary outlet. If things go to plan. They usually don't so I keep having to change my plans. I will keep the few of you reading this posted!
 

toyrunner95

Explorer
I got alot done today. 4 things that had been bugging me to no end, I finally got done.

1. I got the fenders on and I think I did them right. I flexed out the axel and it didn't hit. So i think im good there. They don't look quite as good as i thought they would. But i think some paint and a little TLC will make it look that much better.

2. I got the center console brackets done and mounted, it looks really good in the cab now. Once i get the laptop mount in I think it will make things much more useable. The only problem is that the front of the console needs to be mounted better, it still moves a little bit. Also the stick hits it a bit, so i may have to bend the shifter a little bit.

3. I got a new shifter boot installed so I dont smell exhaust anymore, and i repainted the interior housing thing around it so it looks much better. The old leather thing was ratty and torn and it looked really bad.

4. I got the secondary battery tray fabricated and in, finally the battery is solidly mounted.

I will take pics tomorrow and save them for when I can post them. There will probably have a couple big poastings of pics.

Next on the list is the rear table for cooking, clean up the bed and bumper a bit. Add some paint. Make the rear cage. Get a RTT. Do alot of axel work. Etc etc. The list keeps growing.
 

toyrunner95

Explorer
Pics: I will take more this evening of the interior with the new shifter boot and center console. Today i also replaced the brake lights with LEDs i was afraid that there wasn't enough of a difference between the running lights and the brake lights. Hopefully this will work out better.
 
Last edited:

toyrunner95

Explorer
I got more done on the truck. I finished the swing out table. It works slick. I chose the strap instead of a chain or cable because A) I wanted to cut down the noise, and B) I had it in my garage.

I wish the manage attachment thread would worked. It's alot easier. Anyway; I also decided against the overhead rack on the truck bed mainly because I feel that the tent was too high and made the truck top heavy. I could use it as a back up plan if I need more space, but as it sits now i can fit a cooler (replaced by fridge later), my food box for dry goods (probably a zargs), and the chuck box on the back. So its comming along.

mauf009.jpg

mauf012.jpg

mauf013.jpg

mauf014.jpg
 
Last edited:

toyrunner95

Explorer
I am constantly on the look out for new ideas, I have compiled a list of things that i want to use on my truck. Some are just little ideas others are bigger more complicated ideas. Realistically I just look around on the internet for cool trucks.

here are a couple pics of my truck and some others that I like the ideas behind.
 

Attachments

  • 0303_4wd_02_z+rooftop_tent+front_view.jpg
    0303_4wd_02_z+rooftop_tent+front_view.jpg
    91.1 KB · Views: 117
  • maroc16.jpg
    maroc16.jpg
    61.5 KB · Views: 100
  • maroc60.jpg
    maroc60.jpg
    35.6 KB · Views: 91

toyrunner95

Explorer
No my truck is the tan one above, the red 85 4runner is 4wd and sportutility magazines, 300k project from a loooong time ago. i wish it was mine.
 

SixLug

Explorer
ya ok, thats what I thought...I was confused. You said here are some pics of my truck and others I like so I thought the red one might be yours. I followed that buildup of the red Yota very closely in the magazine...I LOVED it. There are plenty of good ideas in that truck alone...Keep up the good work. Love your truck.
 

toyrunner95

Explorer
I actually saved all the articles and made a notebook out of them. they are actually great refrence for a vehicle of that era.

I was going to post a pic of my truck, but the thing wouldent let me post again.
 

toyrunner95

Explorer
After reading the articles on Expedition Xtarras build (I think thats him, the guy with the ************ xterra and all the antennas) he used the center console out of a cop car for all his gadgets and gizmoes. Well I happen to know people and I picked up one for free. So after tinkering with it for a little while and spending 20 bucks on disks for my dremel i think i have a pretty good start to the interior of my truck.

My goals were to have something that is compleatly removable fairly quickly for a couple reasons. 1. So I can work on it and replace things in the garage instead of in the truck. 2. Be able to take the whole unit out and bolt it into another truck. If I'm going to do all this work and make it look nice I might as well keep it around for a while.

So after searching and searching on google and photobucket I came up with nothing useful. Alot of it looked like hack work or something that an amature mashed together. After thinking and thinking my dad happened to pull out a picture of his old work Jeep. It was a 96 cherokee and he made a cutom console for it. I looked at it and then it hit me. Fire Command Vehicles! I remember as a kid going on forest fire calls with my dad because he was an investigator. He had this awsome setup to hold all his gear and all his work stuff! I googled it and it brought up all sorts of nifty things! Rear cargo setups, center consoles with intigrated computers and miltiple radios. Major eletrical work that looked super snazzy! And my favorit thing of all, an antire workstation with satelite hook ups, printer, dual moniters, the works!

Anyway, the reason I am sharing this is because I thought it would give anothe point of view and search location for ideas! I will take some pics soon of the console work i have done and put them up.

Here is a link to a bunch of storage solutions.
http://images.google.com/imgres?img...&hl=en&safe=off&rlz=1T4GFRD_enUS311US290&sa=N
 
Last edited:

toyrunner95

Explorer
Here is the progress on the console. When i got it, it was pretty much blank. It had one plate that was just blank, and a bunch of glue like goober plastered all over it. So after a little cleaning and a few days with a dremel and a cut off wheel here is what I came up with. Its not finished yet. I still need to do the arm rests and the second mount for the 2m radio, as well as some more switch holes, but this is what its going to look like. Im stoked.
 

Attachments

  • console 004.jpg
    console 004.jpg
    205.7 KB · Views: 34
  • console 003.jpg
    console 003.jpg
    319.1 KB · Views: 32
  • console 001.jpg
    console 001.jpg
    213 KB · Views: 64
  • console 005.jpg
    console 005.jpg
    175.3 KB · Views: 31
  • console 008.jpg
    console 008.jpg
    285.3 KB · Views: 35
  • console 012.jpg
    console 012.jpg
    173.2 KB · Views: 40
  • console 014.jpg
    console 014.jpg
    248 KB · Views: 38
  • console 015.jpg
    console 015.jpg
    261.5 KB · Views: 64

Forum statistics

Threads
189,801
Messages
2,921,066
Members
232,931
Latest member
Northandfree
Top