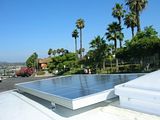
Just installed my solar panel on my van.

Basement Yeti

Explorer
I ordered from Solar Blvd. up in Norco CA. One guy was kind of a rude pain in the butt but this other fella helped immensely.

I decided for 40 more bucks to go with the 100W solar cynergy panel, and also got the Morning Star SSD-25 Dual battery controller, 30ft of cable, and the flush mount kit. I got the panel in first, the other mail is locked in the box and my sis has the key. Here is my panel installed! I also bought some 30A in line fuses for both batteries, and about 20ft of 10 gauge cable, both black and red. Tomorrow I get to do the wiring!
rotate0727111700.jpg


The panels top glass got one or two minor scuffs cause I had to carry it 1/8th of a mile to my van and I think I bumped against a tree, then the updraft from a big rig nearly threw me off my van, but all in all I am happy with the install thus so far.

I used some flimsy silicone caulk for now but I am going to pull the screws back out and fill the holes with good self leveling stuff.
 
Last edited:

Basement Yeti

Explorer
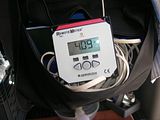
Thanks, and yeah, the meter was a must for me to see the charging status etc.

I'm going to use a bit of JB Weld in the screw heads, someone was telling me solar panel theft is on the rise and I want to protect my investment.

I also love how it fits perfectly in between those two vertical humps on my van and right between the vent and the third brake light.
 

Basement Yeti

Explorer
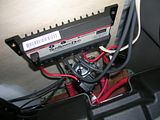
I have a stupid question. I am looking at my SSD-25 and there are screw terminals where you put the wire for the batteries/panels in.

Do you just strip off the wire casing 1/4" or whatever and stick it in there and screw it down?
 

dwh

Tail-End Charlie
Yup, just strip it and screw it. (Old electrician's joke.) Check the manual, I think the connections have to be made in a certain order.

Do yourself a favor and also get the remote temp sensor for the SSD.
 

Basement Yeti

Explorer
Yep. It says to wire the house battery first, then the panel then the starter battery. Presumably to power the controller so when the panel is hooked up it can begin regulating it without issue.

I can't decide if I want to punch a hole in my roof for the panel cables, or go through the lip on my roof vent.

I have 15' of wire, so I am fine whatever I decide.

Temp sensor is a must, I was reading about that. I also like how you can set battery priority.

Should be fairly easy to wire everything up tomorro.
 

Basement Yeti

Explorer
So, my panel is installed, and wired.

I was getting a reading of 4.75A from the meter just earlier when I left the van. An hour or so before it was 5.5A.

I am incredibly satisfied with what I have done. I have never undertaken such a large project myself. I started at about 12PM and just got done at about 4, so it took a while, but it as well worth it, I feel like a proud dad.

I also wired my new constant duty solenoid.

Some notes. I had to mount the panel right up close to the roof vent, as a consequence when I open my roof vent it casts a shadow on the solar panel. I noticed a drop of.75A when I opened the vent for some air, my van is facing North, this means I need to be sure to park with the nose of my van facing South if I want the vent to be opened. I also need some better caulk to seal some holes, all in all, it's done though.

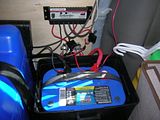
My Optima 34M is wrecked. It wouldn't even start my vent fan and read 12.5V on the meter. I set the controller to 90/10 so it would charge the blue top and only trickle the starter.

Lastly, I ordered/purchased way too much wire. I needed less than half for my wiring install.

Some questions.

Must I do anything when I drive my van? Will the constant duty solenoid flipping on and connecting the batteries overload any systems?

Thank you everyone for your help. I could not have made the purchases and done this without your tutelage.

Pictures.


Bonus picture. Just one of the many hawks that were circling my van while I installed stuff.
 
Last edited:

dwh

Tail-End Charlie
Looking good! Nice going!

The amperage is in the ballpark. Of course, you'll see more on a really cold bright day if the battery is low and naturally you won't see much if the battery is full.

Yea, any shade will drastically cut down a PV module's output. Has to do with the way they are made with cells wired in series and bypass diodes and whatnot.

No worries about driving the van - you are using the same battery type settings on both sides of the SSD (FLA/AGM), so the voltage set points are the same on both sides. The solenoid engaging won't make a difference other than that 90/10 setting won't really apply since it'll just end up with 100% going to the battery "bank" when the solenoid is engaged.


Did you actually find the SSD for 85 bucks with the meter? Or did you have to buy the meter separately? If you got both for that price do me a favor and post the link to where you got it.
 

dwh

Tail-End Charlie
Oh...a note about the SSD...

You can get an adapter and software to manage it from a computer. You can change the voltage set points and some other things, including downloading logs.

BUT, I know of at least one guy who has tested that extensively and reports that 3 different SSDs behaved incorrectly when the voltage set points were set via computer. No problems if he left the set points at defaults though.

YMMV.
 

Basement Yeti

Explorer
Cool, thanks.

Yeah, I got done reading the manual and saw you could make custom settings, I probably won't go that route.

I called the place I was going to order the SSD-25 from and it was just the controller even though it said it came with the meter. I ended up getting my controller/meter from Solar Blvd. for $144.00.

The batteries only got 2-2 1/2 hours of charging at 4-5.5Ah before the sun set over the ridge. The controller didn't run through a full cycle, just a surface charge methinks. So tomorrow they will get a nice full charging.

When I checked the voltages the Blue Top 34M was 12.60V and the Yellow Top 34/78 was 12.90V, just .30V shy of what they are rated for.

The meter is nice to have to monitor voltage, A, Ah, temp, etc.

One mistake I made is the fuse from my chassis battery, I put right next to the controller instead of less than 1 ft from the battery. I will have to change that soon.
 

ExpoMike

Well-known member
Good job for your first major project like this.

One thing I notice in one pic is how your battery is wired. I noticed that the top posts have the red and black covers over the lugs but I don't see any nut or wing nut tightening the wires to the post. If I remember what I have seen, these caps are for shipping only, to prevent a battery from shorting out if something falls across them during shipping. You should have some nuts/wing nuts that actually tighten the wire connections to the posts. If you are only using these plastic caps, that could be part of your charging problem as you don't have a tight connection, even though you might think you do.

If there are nuts under those caps, disregard this post.
 

Herbie

Rendezvous Conspirator
Wow, good catch Mike. I missed that when I looked at the photos. Yeah, that's absolutely going to be a factor in any charging problems.
 

Basement Yeti

Explorer
Yes, there are nuts holding down the wires/cables. I just replaced the caps, just in case. :) But thanks!

The jump posts on the blue top are still totally free. I am going to use those to hook up my modified sine inverter when I buy it. I think a 600W should be more than sufficient, I'll do that in a month or two once I recover from this.

I also have one 10ga that runs across my van that is hooked directly to my fantastic vent and secondary lights, I want to add a fuse to this even though the vent and lights are fused.

I might add a 12V fuse block even though I really can't think of anything else 12V I might ant to add to house load.

I used to be intimidated by wiring but now I actually kind of enjoy it.
 
Last edited:

Forum statistics

Threads
189,904
Messages
2,922,033
Members
233,083
Latest member
Off Road Vagabond
Top