You are using an out of date browser. It may not display this or other websites correctly.
You should upgrade or use an alternative browser.
You should upgrade or use an alternative browser.
My m416 being built
- Thread starter 100acrehuphalump
- Start date

100acrehuphalump
Explorer
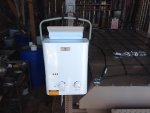
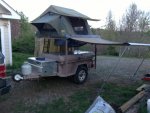
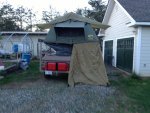
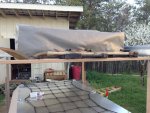
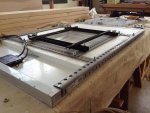
Soooo, I was able to get some more stuff done on the tortoise. I picked up a threaded rod and managed to bend it every which way to mount it through the holes in the bottom of the rim of the propane tank and also through part of the trailer frame, this way its in securely and no one can just walk by and lift it out.( hope i can find places to fill it with out removing it) I also used the original tail light mounts to install some trailer lights. I got the awning mounted. The RTT installed....the original owner had installed the mounting channels backwards, so I learned how to change them to the correct position. Ooh fun that was..after dinner I managed to get the annex up on it as well. probably something else...oh yeah, i found a "garage/closet hanger thingy" at Lowes to hang up the Eccotemp shower on. It will rise up with the RTT rack.... long day.
Attachments
100acrehuphalump
Explorer
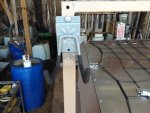
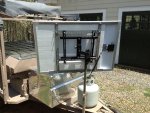
Also got water tank installed in bed and hooked up to the batteries and all the plumbing done. Tomorrow I'm focusing on the solar panel mounts.
I realize this is *** backwards but I think I'm gonna need to replace the leaf springs. They're starting to flatten out and they are nearly 50 years old. Better safe than on the side of the road...
I realize this is *** backwards but I think I'm gonna need to replace the leaf springs. They're starting to flatten out and they are nearly 50 years old. Better safe than on the side of the road...
Attachments
hansrober
Adventurer
Will those things pass the EPA proposed flatulent emissions requirements? Just saying, I read on the forum the other day about the ban on new wood burning stoves. If we all buy a Yakk now we could be grandfathered in!My next overland vehicle...since I'm a Yakker...
100acrehuphalump
Explorer
I was thinking about moving to Yaak Montana and starting a Yak milk farm. Mmmm yak milk!:cow:
100acrehuphalump
Explorer
I just ordered new leaf springs from http://www.vintagejeepparts.com/search.php?search_query=Leaf+springs&x=0&y=0
The total came out to $225 with free shipping for springs and bushings. I ordered CJ3 front springs with 10 leaves. They seemed to be the only people around with anything in stock. Nice folks down in Texas.
The total came out to $225 with free shipping for springs and bushings. I ordered CJ3 front springs with 10 leaves. They seemed to be the only people around with anything in stock. Nice folks down in Texas.
100acrehuphalump
Explorer
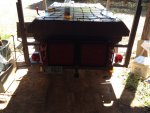
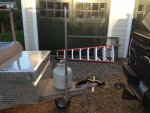
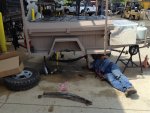
So I went out to my buddy's surplus store http://www.oldgrouch.com/ and picked up a military Hummer H1 Pioneer Tool Rack for $50 to hold my shovel, pick, and axe as well as these awesome new in the package ACU Tactical seat rear panels for $20.
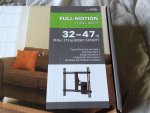
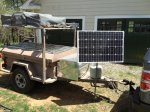
I'm gonna mount the tool rack on top of and in front of the RTT, where its out of the way and yet still accessible. I stopped at evil Wally World and bought a full motion tv wall mount to mount my 100 watt solar panel on which will in turn be mounted on a 1" square tube attached to the tongue of the trailer. The mount is made by Sanus Vuepoint model number F215b. It should give full range of motion or at least enough to be viable. I'm gonna have to do a bit of fabrication to fit the solar panel with some perforated 14 gauge steel strapping to get it to fit onto the tv mount...
I'm gonna mount the tool rack on top of and in front of the RTT, where its out of the way and yet still accessible. I stopped at evil Wally World and bought a full motion tv wall mount to mount my 100 watt solar panel on which will in turn be mounted on a 1" square tube attached to the tongue of the trailer. The mount is made by Sanus Vuepoint model number F215b. It should give full range of motion or at least enough to be viable. I'm gonna have to do a bit of fabrication to fit the solar panel with some perforated 14 gauge steel strapping to get it to fit onto the tv mount...
Attachments

Last edited:
100acrehuphalump
Explorer
I ended up taking the m416 to a place called Jim Campen Trailers, in south Asheville/Hendersonville, and they were very helpful and removed the old ones and installed the new springs for me. Myself not having air tools would have been quickly and easily frustrated in attempting to do the work myself. They did it in 2.25 hours and it only cost me $146.00. It would have taken me all day to do with my limited tools and knowledge? Now i know how to do it as I watched and helped their guy fix it.
BIG NOTE: On the right/passengers side rear lower shackle bolt, it loosens RIGHTY-LOOSEY.
On the left/drivers side the rear lower shackle bolt, it loosens LEFTY-LOOSEY.
I was able to utilize all the original parts minus the new brass bushings and of course new springs. On the right side on the inside of the shackle bolt there is a grease fitting (?) washer that was partially fried, but since they had nothing to replace it with we just put it back and I'll replace it later when I get the part. It's been running without much grease for god knows how long anyway and it's not like its a spinning piece that gets lots of friction. I'll address it soon though.
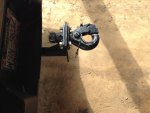
They also happened to have on hand a spinning pintle hitch for only $85!!! a total steal, which I then drilled a hole in my raised hitch mount after having removed the static one and bolted in the new one. Awesome!
BIG NOTE: On the right/passengers side rear lower shackle bolt, it loosens RIGHTY-LOOSEY.
On the left/drivers side the rear lower shackle bolt, it loosens LEFTY-LOOSEY.
I was able to utilize all the original parts minus the new brass bushings and of course new springs. On the right side on the inside of the shackle bolt there is a grease fitting (?) washer that was partially fried, but since they had nothing to replace it with we just put it back and I'll replace it later when I get the part. It's been running without much grease for god knows how long anyway and it's not like its a spinning piece that gets lots of friction. I'll address it soon though.
They also happened to have on hand a spinning pintle hitch for only $85!!! a total steal, which I then drilled a hole in my raised hitch mount after having removed the static one and bolted in the new one. Awesome!
Attachments
Last edited:
100acrehuphalump
Explorer
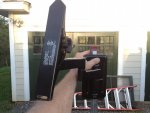
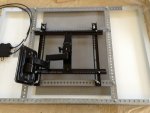
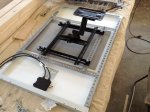
I posted earlier how I was gonna set my panels up on the trailer, but someone threw out the idea of using a tv wall mount, soo....this is what I'm doing. I picked up a wall mount from China WallMart. It's a full motion made by Sanus Vuepoint part # F215b. It wasn't cheap at $100. I picked up 2 six foot lengths of perforated steel strapping from Lowe's as well as some metric hardware and nylox nuts and wing nuts for quick release/ setup. I had one leftover piece of perforated angle strapping to use for the bottom.
Mounting nuts and bolts:
(8) - Hex Cap Screws M8-1.25x20
(8)- Insert Lock Nuts M8-1.25.( Nylox Nuts)
(4)- Hex Cap Screws. M8 -1.25x40. For use with tv mount supplied spacers
(4)- Wing Nuts M8-1.25
Note: Make sure to read each individual bag they come in as sometimes other sizes get mixed in with the correct bins.
Note when attaching everything to the panel, make sure to set something soft in between inner panel and mounting bracket. It would suck to drop a wrench and crack the panel. I used some 1/4 inch foam used in kayaking.
After everything was mounted I slid the styrofoam back in.
Waiting for painted pole to dry and I need some longer bolts and wing nuts to mount to pole will post that tomorrow.
Next I'm building a carrying case from Masonite, 2x6's, and the 1/4 in foam. To keep them safe in the truck while traveling. Be well!
Attachments
Very cool build and might I add, quite fast! I'm interested in your rtt rack and how it will be lifted. With the tent open in the pictures you've posted, is that the final height, the collapsed height, or is it going to be even taller? This is something that I've been thinking about for quite some time.
100acrehuphalump
Explorer
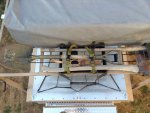
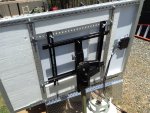
Well I would've liked to have had it a little shorter than it is for travel but, my welder buddy has no sense of vision. The corner posts are set that high and the rack is mounted on four perforated square tubes which can slide an additional 2.5 feet higher leaving 6" in the corner tubes. I wanted it shorter but his thoughts were in case I needed access to the tub of the trailer with out having to lift it. Otherwise I was going to attach (4) 50lb gas shocks to each corner to lift it. I can do all of this later upon my return. I'm just about to hit the road for 2-3 months and am close to leaving (8days). Yes this has been a very fast yet costly build. I'm looking forward to testing everything out. The few good things about leaving it this high is , I don't need to lift it much or I could leave it where it is and duck a little under the floor in the annex which is a changing/toilet room anyway. The annex's sides can be rolled up a little so as to not be on the ground or just leave it. Even with it being as high as it is, it is still shorter than my kayaks will be on the roof of my truck. I could also mount the yaks on the lid of the trailer for even better aerodynamics, although I'd have to remove them for access to the tub. I wish the trailer tongue was a bit longer too. The best is to have it nearly the same distance as the tow vehicles axel distance. My truck's is 12' the trailer is like 9.5'. It does track quite well but it may not work at 90* to the back of the truck for backing up in hair pin turns, which is why I added a front wheel in case I need to drop it and roll it around. Don't forget to get some wheel chocks too.
Last edited:
100acrehuphalump
Explorer
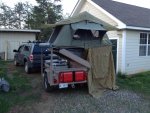
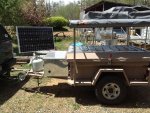
Ok I finally got the panel mounted on the trailer. At 1st the pole was just too tall for even me to lift it into position, so I hacked off 1.5 feet of it. It's lower now but I can raise the tube in its mount and tighten it down with the attached threaded bolt. The tv mount allows it a 360* rotation. I am keeping it from blowing around in the wind with a couple of small bungee cords.
Attachments
bonomonster
Adventurer
Great design... I love how you can swivel it to take advantage of optimal sum light.
Sent from my SCH-I535 using Tapatalk
Sent from my SCH-I535 using Tapatalk
100acrehuphalump
Explorer
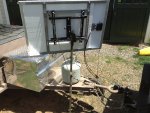
Just took the covers off the wheel hubs. I doubt if anyone in the past 10 years had done it. The bolts were nasty and the gaskets were about worn away, and there was barely much grease left. Filled them both with lots of military surplus aircraft grease. Saved the gaskets, because I don't know where to get more and although two of the bolts on one side were stripped a bit, they both managed to hold and there being six altogether I spaced them to have two on either side of the crappy ones. It'll hold until I can replace them. I may decide to just replace the axel upon my return from the trip. I just don't want to spend the extra money just yet.
Tomorrow I'll build the carrying case for the panels for the inside of the truck.
Tomorrow I'll build the carrying case for the panels for the inside of the truck.
Last edited: