started my 3rd gen 4Runner "Hide-A-Bed" build

Stick Figure

Observer
Figured I would share some progress pics of my 4Runner Hide-A-Bed.

First off the criteria for this:

Sleep two reasonable comfortably

Keep the fridge inside the vehicle (preferably with out moving it)

I wanted it in time to hopefully have a little bit more adventure possibility on our x-mas trip

Needed to be able to arrive at our destination and be able to use the rear seat again.

That being said:

Borrowing a photo of my truck from SantaCruzRunner over on the t4r.org forum ... the previous set up:

IMG_3478.jpg


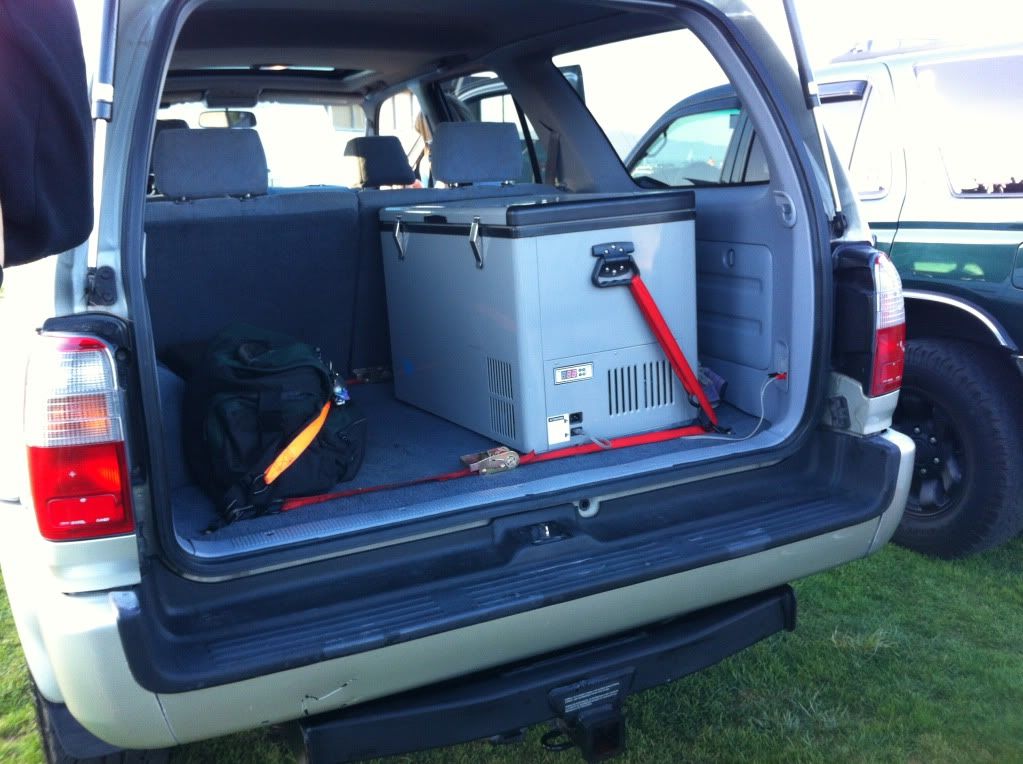
Tools and recovery gear on the drivers side, and the fridge on the right.


on to the new set up:


Fully closed up:
hide%20a%20bed0024.JPG


No fridge blocking the view:

hide%20a%20bed0025.JPG


Step one: unbolt and remove the rear seat bottoms. (Hey I only said they had to stay, not stay in place!) Place seat bottoms under rear storage.

Step two: Screw the 6 1" legs into place

hide%20a%20bed0023.JPG


Step three: flip platform out

hide%20a%20bed0020.JPG


Step four SHOULD be the same as 2, but I haven't gotten that far yet, so anything can change.

Step five: front seats need moved forward and flipped forward


Step six: flip final platform out.

hide%20a%20bed0019.JPG


Again I am planning on using more screw in dowel legs, as long as they work for that position too.

and a couple other angles.....

hide%20a%20bed0018.JPG


hide%20a%20bed0016.JPG


hide%20a%20bed0017.JPG


Wood is all MDF Other than the 1" dowels. Yes MDF is heavier than plywood. I still used it for a couple of reasons.

Easy to work with and shape.
Nicer finish on ends than plywood.
LOTS more experience working with it.
Can be strengthened by impregnating it with fiberglass resin.

Overall length of just the platform is right at 67" and width is at 48". I would have liked longer, but the fridge is too damn big and this is a 4Runner not a Land Cruiser.

Absolutely open to all questions and comments. This was a design as you build proposition so i'm sure there are some things I haven't thought of.

a few more pics http://www.mostdesigns.com/zgallery/Personal Vehicles/4Runner/Sleeping platform/build pics/
 

Mc Taco

American Adventurist
Pretty cool.

How long is set up time with securing the 12 legs?

Is the space next to fridge able to be used for extra leg room?

How well do the screws on the piano hinge hold in the edge of the MDF? I've never really worked with it that much.

Will the resin used to strengthen the MDF off-gas too much? Again, never really worked with it.
 

Stick Figure

Observer
There are actually 9 legs total and they really don't take long to screw in at all. Picture broom handle sized thread pitch, so a couple of twists and they're good.

Space next to the fridge is open as of right now, but I'm sure it will be packed full of stuff for a real trip. I installed the front three dowels tonight and actually gave it a try. I found that with the front seats angled like that your head can use that extra few inches of room. I'm right at 6' and fit on the fridge side with no problem. I also discovered that the map lights are going to be perfect to reach up and use if you need a reading light and the sunroof makes for a hell of a skylight and vent right above my head.

One of the biggest weak points with MDF is the screws threads in it. For the mock up including several tear down and build ups, and our "test lay" we only used 4-6 screws per hinge. These are starting to strip out at this point. I think with all of them in we would be home free, but I've also thought about using a "t" nut on the other side with machine thread screws. If the need arises.

I'm not positive I will use the resin, but I've (as well as a lot of others) used it in a LOT of subwoofer enclosures over the years. Generally with fiberglass if you lay it in the car the car holds the smell for a long while. if you do as much of the build as possible outside and then install it, the smell goes away pretty quickly.
 

Stick Figure

Observer
Got a bit more work done it over the holiday:

Finished the entire rear section (or so I thought) and got it prepped for stain.
Hide%20a%20bed9999.JPG


Hide%20a%20bed10002.JPG


Hide%20a%20bed10001.JPG


After getting the first coat of stain down I remembered I needed to drill some holes for actually mounting this thing to the truck:

Hide%20a%20bed10006.JPG


Insert going in

Hide%20a%20bed10008.JPG


Test fitting a screw. These are 1/4-20 holes, and will probably have something a bit nicer than these in the end. I figured with the insert I could install and remove this thing plent of times before I ever have problems with the threads.

Hide%20a%20bed10012.JPG


On all of the pegs I installed stops to make sure they screw in to the same spot every time. This also adds more stability to them if they get pushed side to side at all

Hide%20a%20bed10014.JPG


Then it was time to start staining and sealing it all up.

Hide%20a%20bed10015.JPG


Hide%20a%20bed10018.JPG


Hide%20a%20bed10017.JPG


The stain won't be the end finish on it, but it soaks into the wood well enough that when it gets scratched and beat up it stays black. Hopefully between that and the bed liner it will keep it sealed up and looking as little like wood as possible.
 

Stick Figure

Observer
I did not end up doing that in this project, I just knew going in that it would be possible if needed with the MDF. But basically if you need the MDF to be stronger like where my threaded holes are is my biggest worry, mix up some fiberglass resin and paint it on just like stain. The MDF is a super absorbent wood that will suck in a lot of resin and make the board just that much stronger. At this point it is too late for me since that state/poly coat is already soaked in. I've had great luck with this sealant/stain on an MDF work bench top that I did a couple years ago, so fingers are crossed that it works well on this project.
 

Desert Dan

Explorer
Nice work
Looks good but your refrigerator takes up a lot of room in length.
I think it would be worth taking the fridge out at night for sleeping to gain the space.

I like to have the drivers seat open in case I have to move the rig in a hurry etc.
 

Stick Figure

Observer
Nice work
Looks good but your refrigerator takes up a lot of room in length.
I think it would be worth taking the fridge out at night for sleeping to gain the space.

I like to have the drivers seat open in case I have to move the rig in a hurry etc.

agreed, I got carried away when i bought the fridge lol .. bigger was cheaper at the time, and bigger of course must be better right?

We are on the same page in that i wanted quicker set up and tear down. When i've been by myself its easy to have the fridge on one side with all the other "luggage" and sleep on the other side. When we had two people sleeping there, I had to put the fridge on the passengers seat. I wanted a set up where the fridge could stay in one place and this way if I needed to move quickly it wouldn't be hard to flip the front section back and move the seats back into place.

Luckily if it sucks or needs changed there are currently zero mods to the actual vehicle for this to work, and I think the only thing that will need done is a couple of captive nuts near the rear of the main portion to bracket too
 

Stick Figure

Observer
finally the FINAL update for this project. :wings:


To finish off the double hinge I grabbed a 1/4" thick piece of aluminum

Hide%20a%20bed%201000000001.JPG


Marked it with the 24 matching holes and got to drilling

Hide%20a%20bed%201000000002.JPG


Final step was to tap them all which I have zero pics of, but they are are all 1/4-20 threaded holes now. and yes it was about as fun as it looks.


For mounting I made some brackets that attached to the front cargo tie down points.

4runner%20bed10007.JPG


For the rear I had to actually add some holes.

Hide%20a%20bed%201000000004.JPG


I know exciting stuff here, so we'll skip ahead to the captive nut installed...

Hide%20a%20bed%201000000006.JPG


If you haven't seen a thread setter or captive nut installation tool, highly recommended if you are installing a lot of accessories. Much stronger and cleaner than any sheet metal screws, and the bolts can be installed and removed several times with out issue.

Hide%20a%20bed%201000000005.JPG


the finished product ... I borrowed the front seat headrests for pillows for our test. We used some yoga mats for added comfort, but are still looking for a permanent solution.

4runner%20bed9999.JPG


4runner%20bed10000.JPG


4runner%20bed10001.JPG


Still working on some fridge mounting ideas, but I wanted a full test run, so back to the ratchet straps through the handles.

ready to put it away...

4runner%20bed10003.JPG


first fold

4runner%20bed10004.JPG


bought a cheapy HF bag to hold the pegs when its folded up.

4runner%20bed10005.JPG


Yes I burned #'s into all of the pegs to keep them in the same locations to make sure we don't run into any issues with height.


second fold
4runner%20bed10006.JPG


and start stacking it full of gear...

4runner%20bed10008.JPG


overall I am super happy with the results and can't wait to actually put it to use. Of course I've already started planning for phase 2 when I remove the back seat 100% and build an insert that uses the middle section as a lid and gives me a ton of storage when we don't need any rear seat at all for the planned trip.
 

Forum statistics

Threads
189,777
Messages
2,920,749
Members
232,914
Latest member
Linesman1776
Top