notdeankane
New member
My first trailer build ")
First of all, Kudos to JScherb and Dinoot.com for developing the modifications to a Harbor Freight Trailer so that weekend amateurs like myself can enter the world of adventure trailers! JScherb's posts are here and several other forums, and are very detailed and inspirational! :bowdown::bowdown:
The mod takes the 4'x8' HF 1720# trailer and sizes it down to 40"x72". The extra parts are used to create a backbone.


The narrowing of the frame plus the addition of wheel spacers allowed me to fit the same wheels/tires as my '07 Wrangler JKU (255/75/R18):


Although the trailer is sized for the fiberglass tub Mr. Scherb designed, I don't have the mad money yet for one, so built my own cargo box....since I don't have the welding skills that many talented folks here have shown, I stuck with what I know...Lowe's lumber department.
I started from base up...it is designed so that six bolts attach it to the trailer cross members; when unbolted the whole crate can be lifted off and will sit on the garage floor like a pallet


I purchased the biggest single tire fenders from Northern Tool, but the geometry wasn't quite right, so I broke out my angle grinder and trimmed them back a bit:


The box is 24" deep, and the design of the frame adds a receiver to the tail of the trailer for accessories like cargo baskets or bike racks, so to be able to easily load and unload it, I decided to have it open gull wing style along the entire side:


Three weeks after starting, only putting in a couple nights per week, I was ready to roll for Labor Day weekend...albeit unpainted...we towed it 400 mile round trip to the Gulf of Mexico at Nokomis, FL.

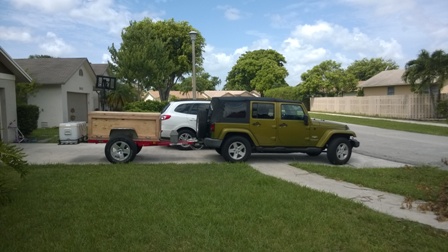
I built some home-made tent poles out of 1/2" EMT slid into 3/4" with a couple holes drilled in for adjustment, plus a cheapo 10'x 15' HF Tarp. It really saved us cause when we got to the campsite, it poured for a good forty-five minutes....but my girls had a good time playing in the box until we could finish setting up camp


It all worked out great! Although it probably won't see anything more challenging than a forestry road, it certainly was nice adding an extra 40 cubic feet of cargo space to my JKU!
Now on to paint and the never ending bucket list of stuff to add
First of all, Kudos to JScherb and Dinoot.com for developing the modifications to a Harbor Freight Trailer so that weekend amateurs like myself can enter the world of adventure trailers! JScherb's posts are here and several other forums, and are very detailed and inspirational! :bowdown::bowdown:
The mod takes the 4'x8' HF 1720# trailer and sizes it down to 40"x72". The extra parts are used to create a backbone.
The narrowing of the frame plus the addition of wheel spacers allowed me to fit the same wheels/tires as my '07 Wrangler JKU (255/75/R18):
Although the trailer is sized for the fiberglass tub Mr. Scherb designed, I don't have the mad money yet for one, so built my own cargo box....since I don't have the welding skills that many talented folks here have shown, I stuck with what I know...Lowe's lumber department
.I started from base up...it is designed so that six bolts attach it to the trailer cross members; when unbolted the whole crate can be lifted off and will sit on the garage floor like a pallet
I purchased the biggest single tire fenders from Northern Tool, but the geometry wasn't quite right, so I broke out my angle grinder and trimmed them back a bit:
The box is 24" deep, and the design of the frame adds a receiver to the tail of the trailer for accessories like cargo baskets or bike racks, so to be able to easily load and unload it, I decided to have it open gull wing style along the entire side:
Three weeks after starting, only putting in a couple nights per week, I was ready to roll for Labor Day weekend...albeit unpainted...we towed it 400 mile round trip to the Gulf of Mexico at Nokomis, FL.
I built some home-made tent poles out of 1/2" EMT slid into 3/4" with a couple holes drilled in for adjustment, plus a cheapo 10'x 15' HF Tarp. It really saved us cause when we got to the campsite, it poured for a good forty-five minutes....but my girls had a good time playing in the box until we could finish setting up camp
It all worked out great! Although it probably won't see anything more challenging than a forestry road, it certainly was nice adding an extra 40 cubic feet of cargo space to my JKU!
Now on to paint and the never ending bucket list of stuff to add