You are using an out of date browser. It may not display this or other websites correctly.
You should upgrade or use an alternative browser.
You should upgrade or use an alternative browser.
TJ OME lift and 255/85R16s? bumpstops?
- Thread starter woodwose
- Start date

jscusmcvet
Explorer
I'm running the 2.5 OME lift with a 1.25 body lift on 33.10.50's, occasionally I'll stuff the front, but not often.

That looks about right... nice jeep.
1stDeuce
Explorer
I have 2-1/2" of lift and 285's on my TJ on rubicon size wheels, and I have stock length (same as OME) shocks with no jounce bumper spacers. The rear is not a problem, but I could get the front tires to rub hard on the lip where the metal fender meets the flare underneath. I bent it pretty good a few times. Adding a 5/8" body lift has eliminated the contact. I should add that the only time it really made contact was COMPLETELY crossed up in Moab with the sway bar disconnected. Never had a problem wheeling in Canada and Michigan.
If you want to wheel hard with 255's, you'll either need to limit 1" of up-travel, or add a 1" body lift. I'd recommend 1" jounce spacers, and some 1/2" or so spacers at the bottom of the shocks to get a little more droop travel. Same for the rear, shocks, but at the top. That's my next mod...
Of course, it is also possible that OME shocks are actually coming to a slightly longer length now, but then the kit would need to include jounce spacers, as the stock length shocks are completely compressed when you're into the stock position jounce bumper all the way...
Good luck!!
Chris
Last edited:
leelikesbikes
Adventurer
i ran 35's with ome and adjustable upper and lower control arms, did some trimming, nice low COG
You'll probably want 1.75" worth of bump stop spacers up front and probably around 1.5 - 1.75" out back. Might need a little more than that. I know I did and I'm running almost the same size tire.
I have almost the same set up as you: 2.5" lift springs, OME 2" lift shocks (N66 and N67s's), and 33x10.50's on my stock Canyon rims with the Spidertrax wheel spacers. With the wheel spacers I get 4.25" of back spacing. I also have a 1" body lift installed. Even with the BL I still needed that much bump stop spacing to keep the tires completely off the fenders.
You might think this is a ridiculous amount of spacing but I can tell you that after doing this I am (metaphorically) beating my head against the wall for not having done it before. No more ugly, gut wrenching "POP! POP! POP! Bbpbpbpbbpbp!!" sound from my tires shreading themselves and the fenders. But most importantly, the Jeep rides so much better on the trails.
Without the bump stops it turns out my shocks were bottoming out and acting as the bump stop. So when I'd reach the limit of up travel I'd get a hard bump if my tires didn't hit the fenders first. With the bump stops I don't feel that hard jolt any more and the Jeep feels much smoother when the trail gets really rough and the suspension is flexing out like mad.
If you wish to verify how much bump stop spacing you'll need it'll take maybe an hour+ of your time. And another 1-2 hrs + shopping time for the bumpstops. The procedure looks like this:
Step 1 - Removing Stuff
Get your rig ready for measuring by jacking up the front and removing any springs or other items that put load on the suspension. Jack up your Jeep and remove the tires, disconnect the lower swaybar end link, and remove the spring. Also, be sure to removed the foam bump stops themselves. These will compress all the way and shouldn't be factored in to any bump stop spacer calculations. You'll be measure from steel tot steel contact points. It may be helpful to remove the shock but you'll want to have the shock connected as you'll want to keep the shock from bottoming out in addition to keeping the tire from rubbing your fenders.
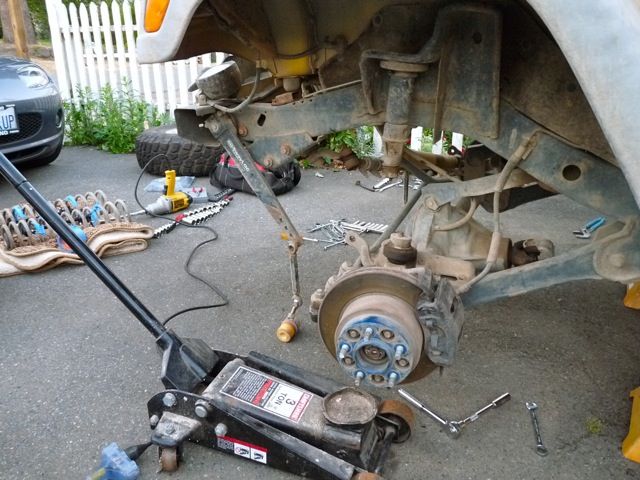
Prepping Jeep for bump stop measuring.
Step 2 - Flex it Out
Next, put the tires back on and start flexing out the suspension with your floor jack. Remember, the springs are out and the sway bar is disconnected so the axle will freely move. Be sure to turn the steering wheel back and forth with the tire stuffed to make sure it clears. Give yourself about an extra 1/2" between the tire and fender.

Flex out the suspension with the tires reinstalled.
When properly bumpstopped, the tire can turn through
it's entire steering travel fully stuffed without rubbing
anything. So, does it look like I'm really loosing that
much up travel with so much bump stoppage?
Step 3 - Measure
With the tire "fully stuffed" plus 1/2" for clearance it's time to measure the distance between the bump stop retention cup and the steel contact plate on the axle that the bumpstop hits. This is how much bumpstop you will need. Double check to make sure your shock does not bottom out before you reach the upper limit of travel. This helps to protect and preserve the shocks.
I was shocked (pardon the pun) to learn just how much bump stop spacing I would need on my rig. At first I was a little frustrated and thought "so much for my 2 1/2" lift." But then I realized I wasn't losing any uptravel since the tire would have hit the fender anyways. This way, I don't really lose any practical up travel and I protect everything: shocks, tire tread, and fenders.

Yes, you'll need a lot of bump stop. 1.75" for me in this case.
Measure from steel-to-steel as the foam bumpstop will FULLY
compress under load.
Step 4 - The Bump Stops
At this point you can either fab up your own bump stops or buy something commercially available. Being cheap, I opted to fab up my own. First, I got some counter sunk allen bolts the exact length I needed in the largest size I could get. In my case: 3/8" dia x 1.75" long. Next I picked up a scrap of 2" schd. 40 conduit from the plumbing / electrical supplier. The guys at the shop were nice enough to cut it to length for me for free on their machines. This saved a lot of time and got everything squared off. Then I drilled a hole in a piece of scrap 1/4" plate steel and counter sunk that. This is to be the top of the bump stop and the plate needed to be large enough to fit the conduit. The schd. 40 sections were dressed up a bit and the galvanizing ground off in preparation for welding. Next the plate was centered over the conduit and the two welded together, then painted when cooled off. On the axle I welded a nut to the axle bump stop contact plates. It was easier than drilling and threading a hole.
That's it.
When you go to re-install the spring you'll need to slip the bumpstop and the new bumpstop spacer in side the spring coils. Push the bump stop back into the retaining up. And slip in an allen wrench and bolt the spacer down to the axle.

The parts needed for fabbing up your own bumpstop.

Bumpstops ready for painting.

The nut welded to the axle plate.

The whole thing reassembled with the new bump stop spacer.
I have almost the same set up as you: 2.5" lift springs, OME 2" lift shocks (N66 and N67s's), and 33x10.50's on my stock Canyon rims with the Spidertrax wheel spacers. With the wheel spacers I get 4.25" of back spacing. I also have a 1" body lift installed. Even with the BL I still needed that much bump stop spacing to keep the tires completely off the fenders.
You might think this is a ridiculous amount of spacing but I can tell you that after doing this I am (metaphorically) beating my head against the wall for not having done it before. No more ugly, gut wrenching "POP! POP! POP! Bbpbpbpbbpbp!!" sound from my tires shreading themselves and the fenders. But most importantly, the Jeep rides so much better on the trails.
Without the bump stops it turns out my shocks were bottoming out and acting as the bump stop. So when I'd reach the limit of up travel I'd get a hard bump if my tires didn't hit the fenders first. With the bump stops I don't feel that hard jolt any more and the Jeep feels much smoother when the trail gets really rough and the suspension is flexing out like mad.
If you wish to verify how much bump stop spacing you'll need it'll take maybe an hour+ of your time. And another 1-2 hrs + shopping time for the bumpstops. The procedure looks like this:
Step 1 - Removing Stuff
Get your rig ready for measuring by jacking up the front and removing any springs or other items that put load on the suspension. Jack up your Jeep and remove the tires, disconnect the lower swaybar end link, and remove the spring. Also, be sure to removed the foam bump stops themselves. These will compress all the way and shouldn't be factored in to any bump stop spacer calculations. You'll be measure from steel tot steel contact points. It may be helpful to remove the shock but you'll want to have the shock connected as you'll want to keep the shock from bottoming out in addition to keeping the tire from rubbing your fenders.
Prepping Jeep for bump stop measuring.
Step 2 - Flex it Out
Next, put the tires back on and start flexing out the suspension with your floor jack. Remember, the springs are out and the sway bar is disconnected so the axle will freely move. Be sure to turn the steering wheel back and forth with the tire stuffed to make sure it clears. Give yourself about an extra 1/2" between the tire and fender.
Flex out the suspension with the tires reinstalled.
When properly bumpstopped, the tire can turn through
it's entire steering travel fully stuffed without rubbing
anything. So, does it look like I'm really loosing that
much up travel with so much bump stoppage?
Step 3 - Measure
With the tire "fully stuffed" plus 1/2" for clearance it's time to measure the distance between the bump stop retention cup and the steel contact plate on the axle that the bumpstop hits. This is how much bumpstop you will need. Double check to make sure your shock does not bottom out before you reach the upper limit of travel. This helps to protect and preserve the shocks.
I was shocked (pardon the pun) to learn just how much bump stop spacing I would need on my rig. At first I was a little frustrated and thought "so much for my 2 1/2" lift." But then I realized I wasn't losing any uptravel since the tire would have hit the fender anyways. This way, I don't really lose any practical up travel and I protect everything: shocks, tire tread, and fenders.
Yes, you'll need a lot of bump stop. 1.75" for me in this case.
Measure from steel-to-steel as the foam bumpstop will FULLY
compress under load.
Step 4 - The Bump Stops
At this point you can either fab up your own bump stops or buy something commercially available. Being cheap, I opted to fab up my own. First, I got some counter sunk allen bolts the exact length I needed in the largest size I could get. In my case: 3/8" dia x 1.75" long. Next I picked up a scrap of 2" schd. 40 conduit from the plumbing / electrical supplier. The guys at the shop were nice enough to cut it to length for me for free on their machines. This saved a lot of time and got everything squared off. Then I drilled a hole in a piece of scrap 1/4" plate steel and counter sunk that. This is to be the top of the bump stop and the plate needed to be large enough to fit the conduit. The schd. 40 sections were dressed up a bit and the galvanizing ground off in preparation for welding. Next the plate was centered over the conduit and the two welded together, then painted when cooled off. On the axle I welded a nut to the axle bump stop contact plates. It was easier than drilling and threading a hole.
That's it.
When you go to re-install the spring you'll need to slip the bumpstop and the new bumpstop spacer in side the spring coils. Push the bump stop back into the retaining up. And slip in an allen wrench and bolt the spacer down to the axle.
The parts needed for fabbing up your own bumpstop.
Bumpstops ready for painting.
The nut welded to the axle plate.
The whole thing reassembled with the new bump stop spacer.
Last edited:
Oh, and I know you said you didn't want to add a body lift but they are handy things.
Not only would you need more bump stop spacing with out the BL. But WITH the BL you can also do a gas tank tuck for 1" extra departure clearance. It's easy enough to do and it's free if you have 2-3 hours worth of time.
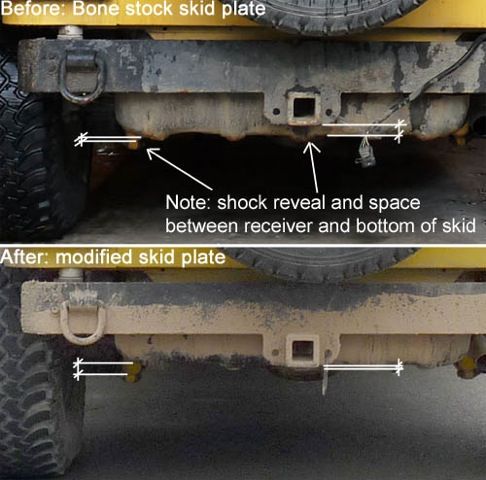
AND it makes it easier to do a low profile skid plate conversion if you are so inclined. With a belly-up skid plate you can pick up an extra 3" of ground clearance with out really raising your COG.
Click the gallery to see how to do the gas tank tuck. It's reasonably self explanatory.
.
Not only would you need more bump stop spacing with out the BL. But WITH the BL you can also do a gas tank tuck for 1" extra departure clearance. It's easy enough to do and it's free if you have 2-3 hours worth of time.
AND it makes it easier to do a low profile skid plate conversion if you are so inclined. With a belly-up skid plate you can pick up an extra 3" of ground clearance with out really raising your COG.
Click the gallery to see how to do the gas tank tuck. It's reasonably self explanatory.
.