TC-3 Bantam Build - Need some advice

Uglyduck

Adventurer
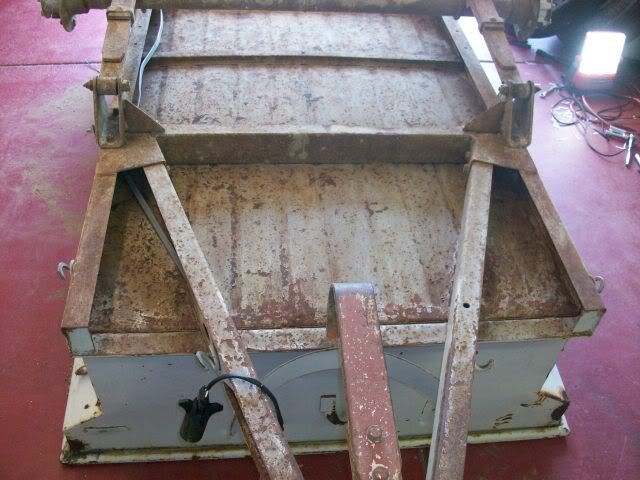
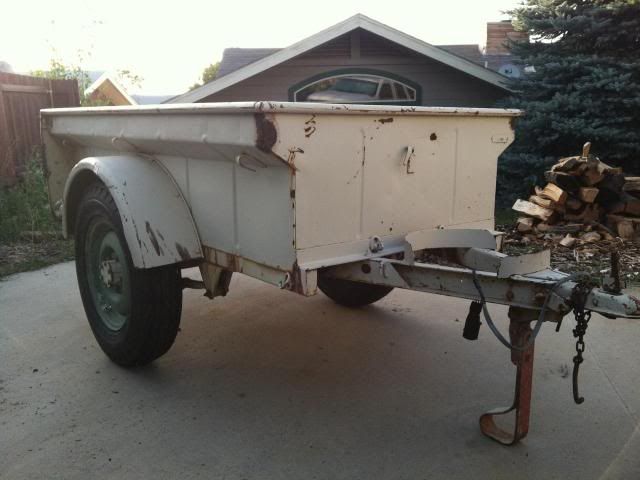
Like many, I've been searching for a trailer for a while now and picked this up yesterday. I feel I over paid a little even though these trailers are increasingly hard to find. I couldn't help but wonder what I got myself into once I took a hard look at it when I got home. I've never done body or resto work...guess I'll learn a new skill by the end of this adventure.
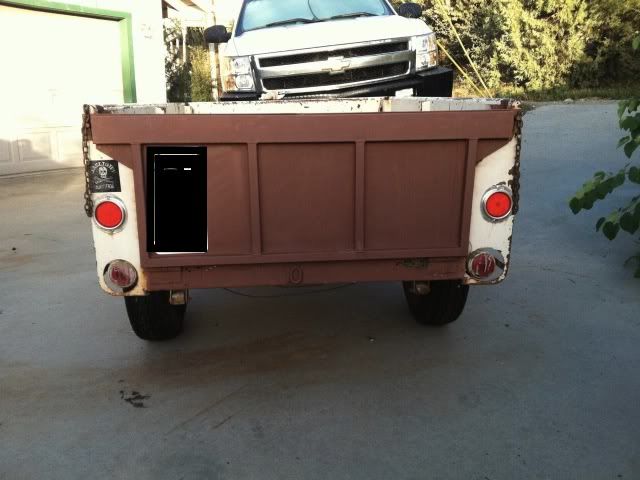
It was used to haul manure at a kids summer camp and as a consequence of that and age the bed has a wave in it over the rear crossmember and the tub is rusted through in a couple of spots. I'm hopeful that it can be patched without having to replace the floor or sides. The frame appears to be in good shape but I'll know more once its blasted. The tailgate isn't original, which is fine with me, but it'll need to be redone to seal up better with the tub.

My wife is as excited as I am and its becoming a family project. I welcome the help and am pleased she's taking so much interest. We plan on tearing it down and getting it media blasted asap.
I know the tub is welded on and that doing a frame off resto would involve grinding. Is it necessary to remove the tub for a thorough restoration? What have others on EXPO done?

Another concern is that the passenger side front corner appears to be higher than the rest of the trailer. Tweaked frame? Easy to fix? Common? I'm not sure if its even a major problem.

is there anything else I should inspect?
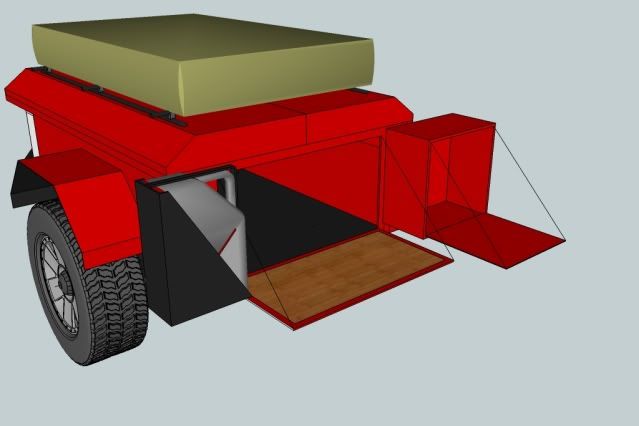
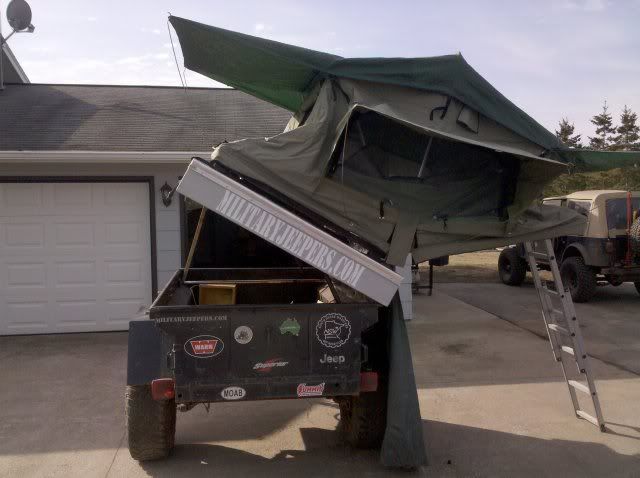
IMG950144.jpg


IMG951887.jpg


IMG958963.jpg


0817111328b.jpg


Plans:
Lid with our RTT on it
Slide out kitchen (still unsure) idea from Dieselcruiserhead build
Cooler and water on the tongue
Fuel in rotopax on the rear
Slide out in the tub for easy access to cargo from the tail while the lid is secured

Thanks for the input and suggestions as well as checking out our build thread!
 

Hill Bill E.

Oath Keeper
Nice trailer Mitch!

Mine didn't have a tailgate, and I didn't want to cut the tub.

To solve the access issue, I mounted the RTT to open on the hinge side of the lid.

I can open the lid with the tent open or closed. Of course, I can't do it if someone is sleeping in the tent:snorkel:

The trailers are small enough, that you can reach just about everything from the side.

trailerCJ009.jpg


Mr. Leary started a great thread for trailer builds. Lots of great info.

http://www.expeditionportal.com/forum/threads/52549-Collection-of-Trailer-Builds
 

atavuss

Adventurer
nice find! what is the serial #? I would check, clean, repack the wheel bearings and replace the grease seals and also try greasing the fittings on the spring shackles. doesn't look like it has the original fulton ball hitch on it. if you are planning on doing any off roading the ball hitch is not the best type to have on there. I changed mine out to a multi-axis type hitch and it will go anywhere.
pahitch.jpg
 

Uglyduck

Adventurer
I'm at work so I don't have the trailer near by but if I recall the serial is 18689.

Thanks for the tip on the leafs! The PO did the bearings but I'll still check and repack.

The ball isn't staying on long. Swag Offroad may be making a DIY multi axis coupler that I'm looking into, I'm a DIY kinda guy...mainly because I'm cheap.
Seen here (Post #30)
If it doesn't work out I'll snag one from Sierra 4x4.

Is that an extendable tongue on yours?
 

TacoDell

Adventurer
if one corner sits higher then the others...
it's quite possible the frame is cracked or broken...

'was the case with my M100
tho' in reality... was actually the opposing corner sitting lower.

look near the rivets securing the shock mounts to the frame.
 

Uglyduck

Adventurer
No shock mounts (well, no shocks at least) but I'm going to look over the frame with a fine tooth comb when I get home. Before I came to work I glanced at the frame and what portions I looked at appeared to be in pretty good shape, no visible cracks or rusted through. I'll be sure to inspect the sections you mentioned.

Did you replace the frame on your M100 or was it repairable?
 

atavuss

Adventurer
the tongue is not extendable, It is a mount I fabbed up out of a 12" piece of 2" reciever blank. one thing you will find out about these short wheelbase trailers is they can be a pain to back up. I use my Bantam to trailer a Hobie Pro Angler kayak and I do a lot of backing up with it.
another thing I would check is to make sure the springs are not broken.
you can easily add shocks to your trailer, just snag the upper mounts off a military trailer and install them. Your trailer should already have the lower shock mounts.
I could not find any Bantam safety chains so I am using a set of NOS chains from a M416 which are slightly longer than stock, they work perfectly for my application.
 
Last edited:

Uglyduck

Adventurer
Update

We're almost done disassembling the various components, all thats left is to remove the tailgate. I'd leave it except there's a large gap at the bottom of the tailgate created because of they way the hinges are welded to the tailgate, which isn't original.

I'm aware of these trailers service history but its the unique stories behind each one that interests me. I've been lurking at G503.com and Bantamt3c.com trying to soak in all the terms and information. Its here that I learned how to track each trailers origin through various numbers and stamps. This started my search for the ACM number which is under the left front spring mount. After an hour of wet sanding the draw bar bracket was polished and no number was visibly stamped :eek:rngartis. There are other ways of ID'ing it and I'm determined to follow through. Using Bantamtc3's database I placed the number stamped on the data plate between two others and I think this was built in the late 40's. I'm going to contact a G503.com member who can hopefully help give me a better idea.

Anyway, the point of that winded paragraph was to illustrate my desire to restore and maintain originality while creating a trail ready trailer. There's so much history behind these little trailers that it would be a shame not to restore and use it.

before - draw bars and springs still attached
100_2046.jpg


after - everything removed and the tub is almost ready for blasting. i learned that the tubs on the T3's are spot welded to the frame, not bolted on like the the M-100/M416's...so much for a frame off resto.
100_2060.jpg


While removing crusty rusted bolts I had a chance to look at the frame closer and didn't locate any cracks or rusted through areas. Bolt removal required a cheater bar and some Dubya D-40. It proved to be an entertaining family affair. On the tongue is what I assume to be a tire carrier that was spot welded to the frame rail, don't think they came from the factory that way. The weld needed to be removed before I could take the draw bars off. I want to strip the trailer down to the smallest components to be thorough so the draw bars need to come off to expose the bottom of the tub.

Original red paint behind the reflector. This trailer had at least one other color painted over it, possibly more. We're planning on repainting it red since it's an original factory color and matches the tow vehicle.
100_2052.jpg


There are some parts that aren't original but I'm ok with it since I plan on updating it for our use. The hitch, springs (4 leaf instead of 8 or 10, no wonder it rides a little low), taillights and tailgate are almost certainly not original. It does however have the complete "3-hole" landing leg assembly, which I hear is difficult to find.

I plan on repairing this and keeping it as original as possible to maintain value while making it trail ready and durable. Any components that I don't use will be stored away and kept with the trailer. I'm thankful to have found this project, it gets my creative juices flowing and keeps me learning.


TacoDell - while searching G503 I came across your build thread. It seems we're following similar paths with our builds. I really like the "floating lid" idea you mentioned in it because it doesn't impinge on the tub. I'm thinking of a way to incorporate it. It'll be challenging due to the rear tub braces and tailgate on the T3-C vs. your M-100. I can't create a bottom lip rail that will travel the circumference of the tub as yours does. Any ideas you have are welcome.
 

Mark Harley

Expedition Leader
Looks like a nice trailer.
I like RED too!
keep us posted and more pictures.
Mark Harley
 

Attachments

  • trailer done.JPG
    trailer done.JPG
    89.5 KB · Views: 11

TacoDell

Adventurer
TacoDell - while searching G503 I came across your build thread. It seems we're following similar paths with our builds. I really like the "floating lid" idea you mentioned in it because it doesn't impinge on the tub. I'm thinking of a way to incorporate it. It'll be challenging due to the rear tub braces and tailgate on the T3-C vs. your M-100. I can't create a bottom lip rail that will travel the circumference of the tub as yours does. Any ideas you have are welcome.[
I think U can...

U don't need to do all four sides...
the stock at both the forward and rearward ends of my M100...
does little to nothing short of giving a somewhat finished look...
aside from that... they simply offer an area that I can weld things to...
if need be.

You could use a similar approach...
but omit the front and rear stock (or just the rear)...
and simply utilize the stock on the driver and passenger sides to be in support of the lid.
'course you would still need to drill holes, thru the sheet metal, to mount the stock to the panel(s).
and I recommend adding backing plate(s) to keep the sheet metal/holes from fatiguing
 

Uglyduck

Adventurer
Taco - Its becoming more apparent that in order to do the lid right I'll need to either drill holes in the side walls or weld the hinges to the top rail of the tub. I think it'll be better to drill and attach the rails like you suggested than to weld the lid. In the event that I decide to remove the lid it'll be easier to repair holes than grind on welds. Thanks for your input, its great to hear from someone thats already done it.

Mark - I actually bookmarked the website you linked to a while ago, he's done an excellent job of chronicolling his build. Thanks for reminding me to check it out again!
 
Last edited:

Uglyduck

Adventurer
Ideas have been swimming around my head for days so I decided to put them in Sketchup so I can sleep at night. I used a model for an AT Chaser as the base and changed the paint, relocated the jerry cans, added a cooler on the tongue, a swing away kitchen box and Frontrunner water can on the rear. I think the spout on the Frontrunner is a great idea and wanted to incorporate it into the "kitchen" for easy access. I'm thinking this arrangement will allow me to utilize the tailgate as a table when the kitchen and H2O are swung out and will help balance the weight on the tongue from the Yeti Cooler.

TRLRConceptFL.jpg


TRLRConceptRL.jpg


TrailerConceptSwingawayopen.jpg


I realize I'm getting ahead of myself but I haven't lost sight of all the work that needs to be done to get to this point. I'm thinking of trying my hand at sandblasting so if you've done it before any tips are welcome.
 
Last edited:

Mark Harley

Expedition Leader
Concept looks good.
Sandblasting is simple but messy if you don't have an enclosed area.
Here is a picture of a similar build.
 

Attachments

  • 1001933lc2.jpg
    1001933lc2.jpg
    88.1 KB · Views: 37

Forum statistics

Threads
189,867
Messages
2,921,728
Members
233,084
Latest member
Off Road Vagabond
Top