F-550/ Okanagan 117DBL Build Thread

n0arp

Member
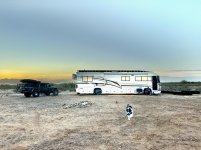
I had an Arctic Fox 1140WB a few years ago, that I had on a stock 2019 Ram 3500, then a flatbed, then a 5500. I ended up selling that and buying a 2000 Country Coach Magna motorhome. I've posted about both here, but the Magna especially isn't really in the scope of what people are here for. I have a new project, a budget truck camper build based on a used 2015 F-550 and 2007 Okanagan 117DBL. First, photos of the Arctic Fox and the Country Coach...

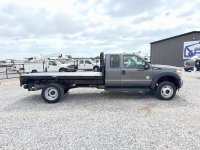
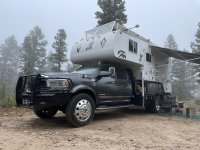
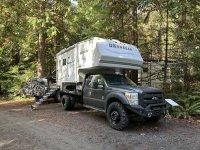
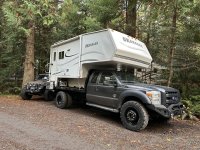
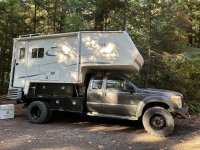
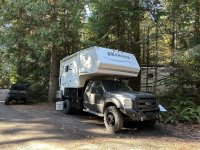
I learned a lot through trial and error and am building this rig a little differently. The 2015 F-550 I found has 154K on it and a Knapheide flatbed. It's a base model with vinyl seats and extended cab. I chose the extended cab for the shorter overall length and easier access to the rear without a B pillar between the doors, and 4.88 gears because I plan on going to 37s. That'll give me an effective 4.17 final drive.

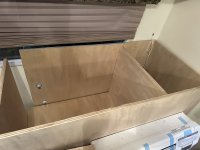
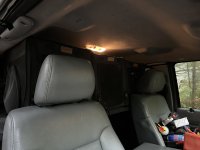
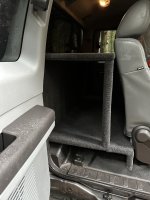
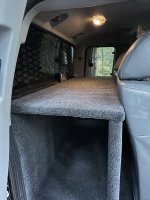
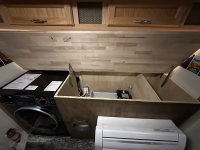
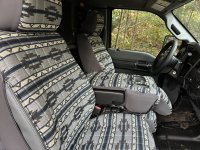
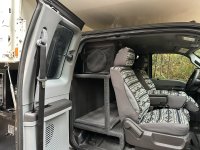
First thing I did was grab a cheap Android auto head unit with wireless Carplay and swap it in. I didn't grab a photo but it was a massive improvement for $130 and integrates extremely well - steering wheel controls work, audio/nav obviously does, and even things like door open alerts. I removed the rear seats, which will be replaced with two large shelves. The bottom shelf will be for dogs to ride on, and the top shelf for my cats in crates. I'll be building those this weekend and wrapping them in speaker box carpet so they don't look too homebrew.

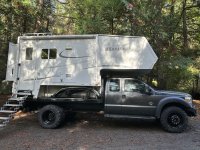
The truck came with a factory bumper and what I think is a snow plow attachment. I removed all that and put a cheap Hooke Off Road bumper and X-Bull 13K winch on. I had to cut off the tow hooks because they're integrated to the frame horns on the F-550 and separate the winch controller because it wouldn't clear.

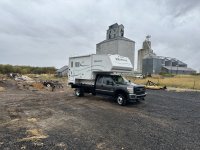
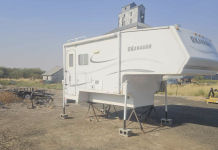
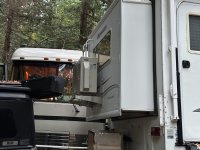
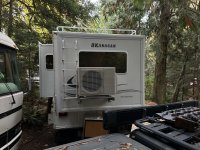
I found the camper six hours across the state, and left out at 8am one morning to pick it up. It was pouring rain all day, and then I had to prep the truck-bed on-site to fit the camper on. It was raining the entire time there, and the entire way back. It was a very long day... got back after ten. I didn't check it out too much, because I got it for a steal. Unless it had major rot, I wasn't going to walk away at that price point.

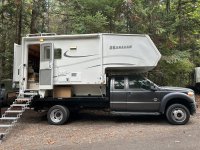
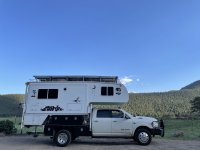
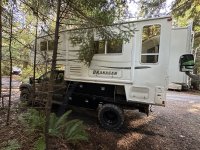
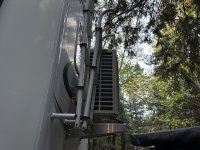
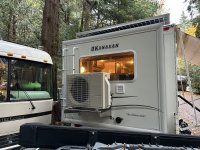
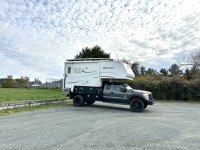
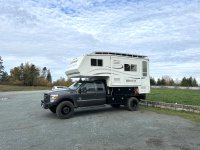
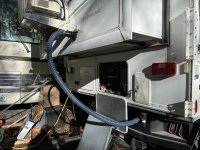
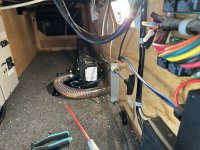
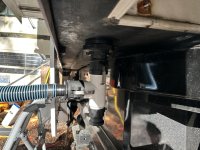
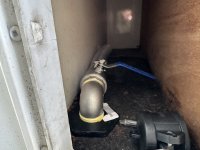
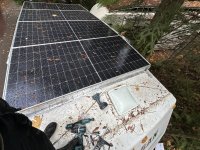
I wanted to get the entire thing on the truck, so I trimmed the side fascia at the rear and cut off the septic pipe. It doesn't have an on-board generator or air conditioning, which is fine for my purposes. I bolted 8' lengths of 2x2 angle 51" apart on the bed as rails, put 3/4" stall mat between them, and sat the camper on top. I used HappiJac tie downs that I just cut to size.

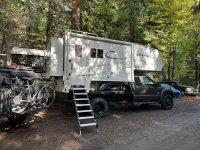
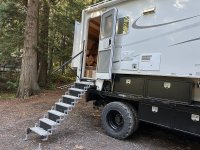
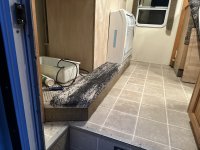
Since the door threshold will be 60" off the ground once I have the new tires, I picked of Torklift Glowstep Stow'N'Go 6 steps with an add-a-step. I also have a MORryde Safe-T-Rail on the way to mount next to the door. I ordered the extended All-Terrain Landing Gear and the SafeSteps to make entry easier for our dogs, but those haven't arrived yet.

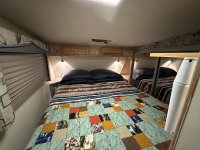
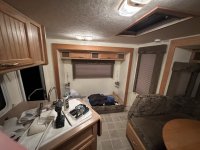
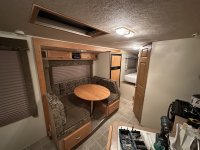
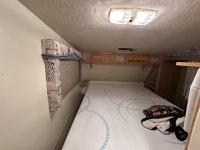
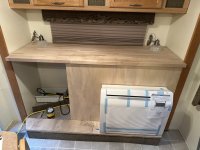
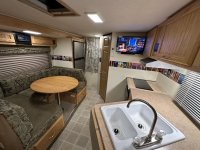
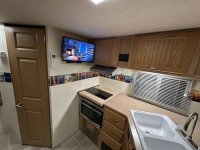
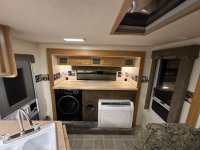
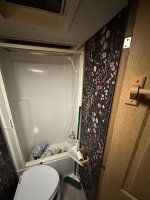
My wife wanted to break up all the brown inside. I picked up some Kilz oil-based primer and she picked out Glidden "Mesa White". Panted the walls yesterday.
 

Attachments

  • IMG_0625.jpeg
    IMG_0625.jpeg
    2.6 MB · Views: 161
  • IMG_1643.jpeg
    IMG_1643.jpeg
    1.8 MB · Views: 130
  • IMG_1644.jpeg
    IMG_1644.jpeg
    1.6 MB · Views: 129
  • IMG_1633.jpeg
    IMG_1633.jpeg
    5.1 MB · Views: 128
  • IMG_1581.jpeg
    IMG_1581.jpeg
    3.9 MB · Views: 128
  • Screenshot 2025-10-17 at 09.14.13.png
    Screenshot 2025-10-17 at 09.14.13.png
    1.9 MB · Views: 127
  • ZDKPAX24FSOXD1.JPEG
    ZDKPAX24FSOXD1.JPEG
    605.9 KB · Views: 140
  • IMG_1640 2.jpeg
    IMG_1640 2.jpeg
    3.7 MB · Views: 125
  • IMG_1855.jpeg
    IMG_1855.jpeg
    1.1 MB · Views: 166
  • IMG_4181 2.jpeg
    IMG_4181 2.jpeg
    3.4 MB · Views: 171
Last edited:

n0arp

Member
Hit the single post attachment limit. Here are a couple more photos. I'll be building a custom console/ laundry center, and mounting a floor-mount mini-split IDU on the rear slide instead of putting the factory sofa back in.

The Tru-Dually wheels with Continental 275/80R20 MPT91s came in while I was writing this. So I just threw them on... I'll have to do some trimming behind the front tires, and use FORScan to adjust the tire size. Otherwise they work as-is.
 

Attachments

  • IMG_1655.jpg
    IMG_1655.jpg
    7.2 MB · Views: 108
  • IMG_1653.jpg
    IMG_1653.jpg
    6.4 MB · Views: 106
  • IMG_1654.jpg
    IMG_1654.jpg
    5.4 MB · Views: 107
  • IMG_1641.jpeg
    IMG_1641.jpeg
    2.2 MB · Views: 105
  • IMG_1642.jpeg
    IMG_1642.jpeg
    2 MB · Views: 105
Last edited:

n0arp

Member
As I said, this one is a budget build. No Victron, SimpliPhi, Truma, Cinderella stuff like my last few rigs. These are the larger items ordered for the build. I'll give a general review/comparison as I receive and install them...

4x 36x18x18" Vigorighter boxes (72" runs above deck) (I've always used Buyer's... these are clones)
4x 30x18x18" Vigorighter boxes (60" runs below deck)
1x Double jerry can holder (above deck, forward of boxes) w/ cans
4x Mission MSI10-550HT4T 550W solar panels
1x LiTime 48V 3500W 120V inverter/charger
1x PowMr 48V 6200W 240V inverter/charger (same OE as LiTime)
3x LiTime 48V 100AH RS485 LiFePO4 batteries [Edit: increased QTY to 3]
1x Victron Orion-Tr 48/12-20 DC-DC converter
1x EcoWorthy 12V 100AH LiFePO4 battery
1x Nature's Head composting toilet
1x Haier HA10TG21SS 9.8cf refrigerator
1x RecPro 1.0cf Microwave/ Convection/ Air Fryer Combo
1x Noxton 240V double induction cooktop
1x Hillhub Pro tankless water heater
1x Rheem ROSH15AFFJ 15K 240V ODU
1x Rheem RIFH15AVFJ 15K 240V IDU
1x Pulsar PGD40ISCO 4kW inverter generator
1x Extended run kit w/ 6gal marine fuel tank
1x Sani-Con Turbo 500S
... lots of misc electrical and plumbing parts...
... aluminum framing for the roof rack...

So I'll have 2200W solar on the roof, 1600W ground deploy (existing Renogy 400W panels I have), a 15360Wh 48V house bank, and a 4kW inverter generator with a 6 gal extended run tank. The 240V inverter should be in search/idle unless the A/C or stove is running and keeps cooktop/AC loads off the primary inverter. We'll be replacing all the appliances except for the furnace. With no roof AC, the roof rack will be kept just high enough to open the Fantastic fans (7" high).
 
Last edited:

n0arp

Member
Delam on the cabover inspected and stopped. Preemptively did the same on the driver's side of the cabover, and bottom edge of the back wall. I didn't really see any delam when we bought it, but did note the seam at the bottom of this wall wasn't sealed, and it did start delaminating on the way home which was a six hour drive in the rain. Dried it out and made sure it wasn't moldy or rotten before sealing it up and clamping it down. Photos pick up shadows and differences where I touched and/or cleaned it, so look a bit worse than it does in person. It's a lot less obvious to my eyes than through a camera, and I'm hoping that once I clean up the entire camper that'll translate to photos as well.
 

Attachments

  • IMG_1668.jpg
    IMG_1668.jpg
    6.7 MB · Views: 70
Last edited:

n0arp

Member
Full reseal and added a MORryde Safe-T-Rail for the steps since they're so high off the ground. Also mounted the truck boxes They seem slightly thinner than my real Buyer's boxes -- maybe 16ga instead of 14ga, though I didn't measure -- but are plenty stout.
 

Attachments

  • IMG_1675.jpeg
    IMG_1675.jpeg
    5 MB · Views: 43
  • IMG_1673.jpeg
    IMG_1673.jpeg
    5.3 MB · Views: 44
  • IMG_1672.jpeg
    IMG_1672.jpeg
    6.4 MB · Views: 44
  • IMG_1676.jpeg
    IMG_1676.jpeg
    4.3 MB · Views: 43
Last edited:

n0arp

Member
Mounted up the 15K ODU yesterday. Used the same off-the-shelf Turbo mount that has served me well on the motorhome, but trimmed down the legs a bit. Tried to make it as close to the camper as possible, while still allowing room to breathe, and ended up with it sticking out about the same as the ladder.

Still fairly upset about the delam, but it's stopped/dried out and won't be getting any worse. All the trim is on, but I'm going to have to get a heat gun and work over the top corners of the door which were fine yesterday, but peeled off by the time I went for photos this morning.

The mini-split bolts through the wall (six 1/2-13 bolts with fender washers and nylocks), through double 3/4" plywood, that is part of a cabinet. The cabinet has a false bottom that will hide the plumbing and line set, and above that, a litter box area for the cats (a porthole will be cut into it) and storage. It has a butcher block top that will be ripped down the length and piano hinge installed, for access. On the left side, a washer/dryer combo will sit. The carpeted step-up hides the slide bolts and provides a hard stop to keep the W/D from sliding forward, at exactly 25"D. The gapped rear corner is where the drain connection will go.
 

Attachments

  • IMG_1682.jpeg
    IMG_1682.jpeg
    1.7 MB · Views: 26
  • IMG_1683.jpeg
    IMG_1683.jpeg
    2.7 MB · Views: 24
  • IMG_1688.jpeg
    IMG_1688.jpeg
    2.8 MB · Views: 27
  • IMG_1691.jpeg
    IMG_1691.jpeg
    3 MB · Views: 28
  • IMG_1692.jpeg
    IMG_1692.jpeg
    2.3 MB · Views: 26
  • IMG_1693.jpeg
    IMG_1693.jpeg
    4.5 MB · Views: 28
  • IMG_1694.jpeg
    IMG_1694.jpeg
    4.1 MB · Views: 28
  • IMG_1695.jpeg
    IMG_1695.jpeg
    3.3 MB · Views: 26
Last edited:

n0arp

Member
Had a lot going on today, so all I was able to accomplish was the rear seat delete.

We have two Border Collies and two cats, so the lower area will be for the dogs and the upper area for the cats. I have 3x 20x20" portable crates tied together for the cats, with two habitats (lower lounges/ upper hammocks) and one litter box.

This should allow the animals to travel with us with relative safety. In the motorhome, they run free on travel days, for better or worse.

The dogs can peek through/ stick their heads through between the front seats but shouldn't be able to easily crawl through (not that they would), and by using three crates, we have access to the cats on either end and through the center between the seats. I might try to find a way to add lights to the platforms and will be looking for pet bed(s) that are appropriately sized for the dog area.
 

Attachments

  • IMG_1703.jpeg
    IMG_1703.jpeg
    1.3 MB · Views: 20
  • IMG_1702.jpeg
    IMG_1702.jpeg
    2.2 MB · Views: 18
  • IMG_1699.jpeg
    IMG_1699.jpeg
    1.5 MB · Views: 16
  • IMG_1701.jpeg
    IMG_1701.jpeg
    1.8 MB · Views: 20
Last edited:

n0arp

Member
Didn't bother updating the build thread for a while because it didn't seem like anyone was interested.

In case anyone is interested in the more or less finished product, here are some of the more recent progress photos. It's done but I didn't take final photos except for the few I grabbed on a drive into town today. This will be split into two posts due to post limits.
 

Attachments

  • IMG_1772.HEIC.jpg
    IMG_1772.HEIC.jpg
    3 MB · Views: 8
  • IMG_1773.HEIC.jpg
    IMG_1773.HEIC.jpg
    3.2 MB · Views: 9
  • IMG_1774.HEIC.jpg
    IMG_1774.HEIC.jpg
    2.2 MB · Views: 11
  • IMG_1775.HEIC.jpg
    IMG_1775.HEIC.jpg
    3.3 MB · Views: 11
  • IMG_1776.HEIC.jpg
    IMG_1776.HEIC.jpg
    2.9 MB · Views: 10
  • IMG_1777.HEIC.jpg
    IMG_1777.HEIC.jpg
    2.2 MB · Views: 10
  • IMG_1778.HEIC.jpg
    IMG_1778.HEIC.jpg
    2.2 MB · Views: 10
  • IMG_1779.HEIC.jpg
    IMG_1779.HEIC.jpg
    1.6 MB · Views: 9
  • IMG_1781.HEIC.jpg
    IMG_1781.HEIC.jpg
    1.2 MB · Views: 8
  • IMG_1782.HEIC.jpg
    IMG_1782.HEIC.jpg
    1.2 MB · Views: 8

n0arp

Member
Second batch
 

Attachments

  • IMG_1783.HEIC.jpg
    IMG_1783.HEIC.jpg
    1.3 MB · Views: 16
  • IMG_1796.jpeg
    IMG_1796.jpeg
    4 MB · Views: 16
  • IMG_1793.jpeg
    IMG_1793.jpeg
    4.1 MB · Views: 17
  • IMG_1794.jpeg
    IMG_1794.jpeg
    3.4 MB · Views: 20
  • IMG_1788.jpeg
    IMG_1788.jpeg
    3.2 MB · Views: 20
  • IMG_1790.jpeg
    IMG_1790.jpeg
    3.1 MB · Views: 18
  • IMG_1792.jpeg
    IMG_1792.jpeg
    2.5 MB · Views: 15
  • IMG_1789.jpeg
    IMG_1789.jpeg
    1.9 MB · Views: 15
  • IMG_1770.jpeg
    IMG_1770.jpeg
    5.2 MB · Views: 14
  • IMG_1767.jpeg
    IMG_1767.jpeg
    4.5 MB · Views: 16

n0arp

Member
One leftover... also stripped all the thumbnail inserts out of the posts so they display properly.
 

Attachments

  • IMG_1766.jpeg
    IMG_1766.jpeg
    3.3 MB · Views: 4

ITTOG

Well-known member
Don't be discouraged, that is just the way it is here. One day you will post an update that catches someones attention and there will be a lot of questions and interactions. Other days, nothing. :)

I love your build so keep the info coming.

What is the hose going from the back of the camper down to the bumper?
 

n0arp

Member
Don't be discouraged, that is just the way it is here. One day you will post an update that catches someones attention and there will be a lot of questions and interactions. Other days, nothing. :)

I love your build so keep the info coming.

What is the hose going from the back of the camper down to the bumper?
Thanks. There is no way to run water/sewer into the slide so the W/D is plumbed externally, so that hose is only used when the W/D is needed. I use SaniCon Turbo and 1.5" Camlock connections for all septic (and swapped in a composting toilet) and that hose specifically tees into the main drain.
 

SimplyAnAdventure

Well-known member
Didn't bother updating the build thread for a while because it didn't seem like anyone was interested.

In case anyone is interested in the more or less finished product, here are some of the more recent progress photos. It's done but I didn't take final photos except for the few I grabbed on a drive into town today. This will be split into two posts due to post limits.
This site has EXTREMELY low engagement. Heck even threads barely move on here, guess people have moved to other spaces.

Personally one of my major frustrations with this site is you can’t post what I would consider normal sized photos…. Any modern phone made in the past 5 years takes pictures too big to post it’s very annoying.

I still love the idea of this site but it’s seemingly not managed for engagement.

All that said your truck looks great! Nice work!
 

n0arp

Member
This site has EXTREMELY low engagement. Heck even threads barely move on here, guess people have moved to other spaces.

Personally one of my major frustrations with this site is you can’t post what I would consider normal sized photos…. Any modern phone made in the past 5 years takes pictures too big to post it’s very annoying.

I still love the idea of this site but it’s seemingly not managed for engagement.

All that said your truck looks great! Nice work!
I used to post here under another name, and it was a great site at some point. But it seems most forums have been replaced by Facebook Groups, which is less suited to a lot of use cases but keeps the effort for entry very low. And with that, upkeep and updates to existing sites has faltered.

Regarding the build itself, thank you.
 

Forum statistics

Threads
190,677
Messages
2,930,487
Members
234,353
Latest member
Dawid.alex

Members online

Top