Another DIY Portable Power Pack

cruxarche

Observer
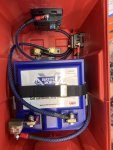
front.jpgI worked extensively with @vomhorizon on this project, who offered me endless support for the build. I am writing this to pass it on. But...Disclaimer: I am a weekend warrior, NOT a professional in any way. Batteries can shock you and burn things down. Be careful. Do your own research regarding risk. This write up as some basic stuff that I hope will help out others at my level of experience.

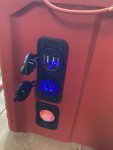
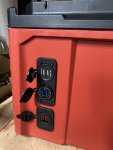
This is a 50Ah portable power pack tailored to my particular use case. For me and my family that mostly means road trips, camping, and backup power for personal electronic devices during short term power outages. On the load side it has four USB ports, and two Anderson Powerpoles. These are used primarily for my Engel MT45 and the personal electronic devices. It charges via solar, AC, or DC/DC. There is no inverter in this box. I just don’t really need one. If I add one in the future, I will utilize the Packout modular system and mount one externally on top of the lid.


I have not taken it camping so I cannot comment at length on functionality yet. I have tested it. All three charging systems work and can be configured via the VictronConnect app. I am happy to answer any questions I can. I would also appreciate any suggestions for improvement. This is a prototype that no doubt will change over time.

VictronConnecf.jpg

I went this route, purchasing all the individual components so that I could easily disassemble the pack and use the individual parts as needed in the future. I also just enjoy spending time on these projects. This is not necessarily an economical way to go.

Components and Materials

Box


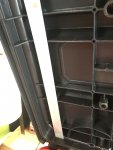
Milwaukee Packout Compact Toolbox: This is a really cool box, with lots of aftermarket/custom mods and options being offered by instagrammers etc. I had to cut out or file down various internal molding strips (you can see scratch marks in the pics) to create flat surfaces. This was not a big deal, but took some time. Would I use it again? Who knows. While it does have some constraints, I am happy with it. Other boxes may be easier, but my guess is that they all have unique challenges. My goal was to get this functionality and to do it in under 30 pounds. I came out at 30.5. The box weighs 5.5 pounds.


Battery

Battle Born 50Ah LIFePO battery. This battery weighs 17.6 pounds. There are lots of options for batteries. Do your research, lots to choose from. This one met my needs, and fit the box.


Charging and Battery Monitor

There are lots of companies offering good quality DC components. I already am familiar with the Victron line and am happy with the products. I really like the ability to control everything via a single bluetoth app. These components are highly configurable. Know that Victron generally has the dealers provide support. So buy from a company you have confidence in. Feel free to PM if you want my thoughts on this. I would rather not talk about companies on the thread.

- Victron Smart Solar MPPT 75/15

- Victron Orion-Tr Smart 12/12-18 DC/DC Isolated Charger

- Victron Smart Shunt 500 A


AC/DC charger: NOCO G26000. This is a 26 Amp “smart” charger that I use for my lead acid bank on the trailer. It has a Lithium program that works fine on the BattleBorn. It is not programmable.


Circuit Protection

Blue Sea 50 Amp Terminal Fuse Block

50 Amp Marine (forget brand, I had it around) Circuit Breaker

Blue Sea 6 circuit Fuse Block with Negative Bus and Cover


Wire

In general I used what I had and bought more if I needed it. I only use flexible (fine strand) wire. I had a bunch of Ancor 10awg marine duplex which I used, but found I needed to remove the stiff exterior protective insulation in some cases due to routing requirements. For 8awg I purchased some Windy Nation welding cable from amazon and it worked well.


Terminal Connections

For 8 awg wire connections I used ring terminals. I had a set similar to this. In general I think it’s worth paying more for higher quality tinned (usually marine grade) connectors. The cheap ones tend to break under crimping.

For 10 or 12 awg connections I use marine grade heat shrink butt/ring/spade type connectors. Ancor is great, I have used Wirefy, and others as well. Buy a cheap heat gun to seal all these connectors.


Crimpers

In addition to a good quality crimper for the smaller gauge wires, this project requires making lots of connections with 8awg wire. I have a couple different crimpers, and frankly the best one almost depends on the specific terminal being crimped. For the 8 awg wire I used the IWISS crimper with pretty good results.

The Anderson Powerpoles also really do need a specific crimper as well. I use this one for the 15-45 amp connections, and this one for the SB50 connectors.

I used a couple Ferrules, which also require another type of crimper. I already had this, and it is definitely not necessary for the build.


Wire Stripper

I personally love the simplicity and quickness of the spring loaded wire strippers. Not sure which brand I have, but it is something like this. For larger gauges I just use a sharp wire cutter to strip.


Wire Management

The tight constraints of this particular box setup requires pretty careful routing of the wires. If I had to do it again I might reimagine the whole thing. There are many options and at some point you just have to pick a path.

There are a ton of options when it comes to adhesive based wire clips/holders. I used a couple different types. I found the ones like this that incorporate a zip tie to be the strongest.

I heat shrink everything and I went through a ton of heat shrink for this project. I had a couple sets of the stuff and burned through a couple sizes pretty quickly.

I also wrapped most of the wires in loom. This is partly for protection and honestly to help clean up the look of the project. There are a ton of options including size and split vs. expandable. If you want to go down this route, I suggest buying a few different types and sizes to see what works for your application.

IF you wrap your wires in loom you must take care to mark the ends of the wires or you will not know if they are positive or negative. For negative wires, the black heat shrink works fine. For the positive runs I used the red boots in my battery stud (ring terminal) kit. There are other options but this is important. Wires get tight and convoluted and it is not always obvious which is which.


Hardware
To mount all the panels, devices, battery supports etc., I used a hardware kit.
 

cruxarche

Observer
Arrangement
There are a lot of priorities to consider when laying out the box contents. The primary challenge when trying to minimize the size of the box is finding enough real estate to on the walls to mount the panels for the power sources and charging ports. Panels are flush on the outside, but extend 1-2 “ on the inside, plus the wires. So they need a lot of room. I considered using the lid for this, but decided for various reasons against it. From there it was just a jigsaw puzzle, trial and error.

Battery Mount.jpg


Battery Mount

The battery is the biggest item in the box. Ultimately I chose to mount it vertically in the middle of the box. There are probably a few ways to fit everything in. I spent a lot of time with sticky tape staging different configurations. In the end I chose one that worked. It is not perfect. The biggest deficiency in my arrangement is that the wires coming out of the Orion (which is mounted in the lid) have to make a pretty hard bend when the lid is closed. I think it will hold up for a long time though.

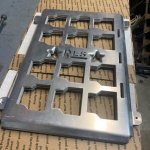
Given the sensitive electronics and wiring in close proximity to the heavy battery, I wanted to carefully secure the bottom of the battery. I used aluminum angle bar sourced at a local hardware store for the front and back, and some U channel aluminum for the sides--and footman loops mounted in the channel to hold the straps that go over the top. I had to use some diagonal cutters to trim the angle bar around the protrusion at the front of the box. Had I been more patient I would have used a jigsaw and made a careful cut. All cut edges need to at least have the sharp edges filed down.

Basic Circuits
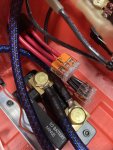
Battery to Fuse Block:
Negative-Battery terminal (8awg) >Smart Shunt (8awg)>Blue Sea Fuse Block
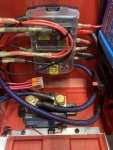
Positive-Battery terminal> Blue Sea Terminal Fuse (8awg)> Circuit Breaker(8awg)> Blue Sea Fuse Block8awg wiring.jpg
The Shunt

The Shunt is mounted just behind the battery on the bottom of the box. There is a small power wire that goes directly to the battery positive to power the battery monitor all the time.

The Circuit Breaker
The Circuit breaker is mounted on the right side of the box under the solar charge controller. This is extra protection, and also makes an easy way to depower the system without messing with the battery terminals.

Fuse Block
The fuse block is the central point for all wire runs. It is mounted centrally on the back wall of the box to allow room for wires to enter both sides of the block. It is mounted a couple inches lower than is optimal to make room for the Orion DC/DC charger mounted in the lid.
.FB close up.jpeg


Charging Victron Smart Solar MPPT 75/15The MPPT controller is mounted directly above the circuit breaker. You can see that the pos and negative from the controller (10 awg is the max that can fit into the MPPT) to the fuse block leave the bottom of the controller (mounted sideways), make a U turn, return over the top of the controller and head down in the corner of the box and turn right into the fuse block. The line from the controller to the solar PV curves around over the front of the battery and goes down to the Anderson power pole port in the (left) front of the box. It is really tight down there, and the wires have to make another loop out to the side to clear the battery. In fact, to make enough room for the wires to clear the battery I had to use an extra panel nut on the OUTSIDE of the box to move the whole assembly out a little.

IMG_4040 2.jpg


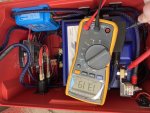
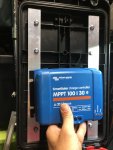
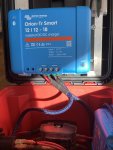
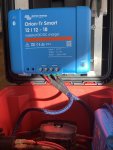
The Orion DC/DC charger This charger is mounted in the lid. This was a lot of work. I took to flat bars of aluminum and mounted them to the underside of the lid using preexisting holes in the lid. I used ¼” coarse thread screws which happen to fit perfectly into the existing holes. Again, this is a totally imperfect system that took a lot of effort to pull off. But it works. I have not added vents to the box yet. My first trial charge with the Orion did not indicate that vents would be necessary. But I am prepared to add them if they become so. In the pic below I am holding up a different Victron MPPT controller which I was using as a placeholder til the Orion arrived . They have the same form factor. Lid.jpgLid2.jpg Lid3.jpgOrion Close.jpg

The port to charge via the Orion is the other set of connectors in the Anderson Powerpole port on the front of the box. In the pic you can see one set of wires (10 awg) coming down to the right. Those are the “output” wires and they go into the right side of the fuse block. The other set of “Input” wires run along the left side of the box up to the Powerpole connector.

Charging AC via the NOCO G 26000 is done via an Anderson SB50 connector. It is mounted on the front of the box and runs straight back to the fuse block. Technically this could be used as for a load as well. I just cut off the proprietary connectors that came with the charger and added SB50’s to both ends. It is a 26amp charger, and the largest load in the system. It is rated at 443 watts, so technically this could blow a 30 amp fuse if it surges to 100% power at lower voltage. But it does not seem to do that. If it does, I will have to route it to a separate inline fuse and take it off the fuse block.
 

Attachments

  • Orion Close.jpg
    Orion Close.jpg
    1,000.9 KB · Views: 35
  • PowerPole Hole.jpg
    PowerPole Hole.jpg
    759.3 KB · Views: 38
Last edited:

cruxarche

Observer
Loads
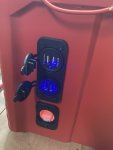
I used a Powrwerx double connector panel mount.

The easiest way to cut the hole is with a 1 1/8” hole bit. In this case because the plastic of the box is not that thick, if you do not have a hole bit you can mount the cover plate and use a razor knife to cut out the hole.

PowerPole Hole.jpgLoad Ports.jpg


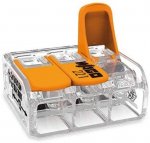
I tend to use the 45 amp terminals in these only because they are easiest to use. One of the connectors is for the fridge, the other is aux for whatever. Because the fridge draws under 3 amps and I don’t have any other heavy current usages I daisy chained the two connectors and ran them to the same fuse at the Blue Sea Fuse Block. I used 10 awg for the pos and negative runs. I could not find a standard butt connector that could fit two 10 awg wires together, so for the three way splice I tried two different connectors

The WAGO below worked best. It was my first time trying it, and I liked it. For a good connection the wires have to be the exact same length, otherwise the longer wire prevents the shorter from getting a good bite in the connector. If you bend the longer wire it will work temporarily, but it creates an opposite force pulling the shorter wire back out.

Picture1.jpgWAGO.jpg

USB ports

I installed two different ports. I did that to see if one worked better then the other. No results yet. I installed these the same way as the powerpoles, with three way splices and sharing a fuse at the fuse block.

General Thoughts
I am very happy with the outcome of this project. The Packout which I will mount securely in the cargo area of my Land Cruiser via a custom mounting plate (by rainbowlanespeed)RLS.jpg
is a good little box. It is sturdy enough for the job, but pretty lightweight. I can also mount additional Packout modules on top of the battery box (or use the mounts for an eternally mounted inverter). I just generally think the dimension of the box are user friendly

Overall I cannot say if I would do it the same way again. Probably not just because I learned so much along the way. That said I have not seen a more compact version that I really want to replicate yet. If you have one with these components --let’s see the pics! I would love to improve this so please feel free to make suggestions. It works great, but all the components can be unscrewed and reconfigured or even moved to another box. It probably would have been cheaper to just buy one of the off the shelf models, but where is the fun in that! Plus if it breaks down somewhere I can easily diagnose and fix it. That is worth a lot.


Thanks for reading, and for helping out along the way.
 

MagicMtnDan

2020 JT Rubicon Launch Edition & 2021 F350 6.7L
Thanks for sharing these details on your build. My plan is to do something similar and I appreciate all your input here
 

vomhorizon

Active member
What is the purpose of the shunt?

It indicates your state of charge by measuring the current flowing in or out of the battery. Doing so by looking at voltage is practically useless when using LiFePo4 batteries (and is tricky even with LA). Most shunt systems also come with a voltage monitor that attaches to the positive battery terminal so that you can measure that as well.
 

Forum statistics

Threads
188,182
Messages
2,903,480
Members
229,665
Latest member
SANelson
Top