I haven't found a ton of information out there about people that have bought a Four Wheel Camper without a furnace and have attempted to do the install themselves. I have talked with Terry @ FW and he said that most people bring the camper to them and have it done. I was a little skeptic about doing it myself but I figure for $500 to install it I'd give it a whirl. After trying to figure out what went in to mine in 2005 and researching everything else such as the buddy heaters and other radiant type I decided to call four wheel and ask them what they currently are using in their new models. Currently they are using an Atwood 8012 model (in Hawks anyway) which is a 12,000 BTU forced air furnace. I found one on ebay for $430 plus $30 shipping from rvtec (which I believe is RV adventure). In about a week I received it, opened the box and seemed everything was there. I was happy to see the front face plate came in black (they also come in tan). After removing it from the box it was a little banged up, nothing too bad but had some bends on the corners that were easily fixed with pliers or a small hammer, seems they could have done a better job packing it. After inspection it I decided it was time to tear into the camper, I first removed the front panel of the cabinets to check out the spot for the furnace:

In place of the furnace from the factory is a framed box that acts as a cabinet, as you can see on the left is the propane line from the tank. To my surprise there was a handy "T" waiting for me to plumb the furnace right into it, it also looks like a set of wires for (+) and (-) to the battery as well...a big thumbs up :bowdown: to FWC for making this seemingly hard part easy! I tore the cabinet box thing out and it looked like this, you can see the propane "T" and free wires in this picture a little better.

Now that the cabinet box was out of the way I could cut the hole in the cabinet face for mounting the furnace. Please excuse my lack of pictures for all the steps, this is my first DIY post so I'm somewhat of a newbie I had to cut about 1/2" off the left side of the cabinet opening to get the furnace in the opening, the dimensions came with the furnace instructions. Now the darn furnace is not flat on the bottom so I had to create some sort of a spacer with cutouts where there was extra sheet metal folds or bolts protruding. I used a rough template to mark the locations of the bolts and excess sheet metal on the bottom of the furnace and transferred it to the piece of wood from the removed cabinet box, then cut everything out with a hole saw and jig saw. Then lined it up inside and screwed into place.

Here is a bad picture of the bottom of the furnace but you can see on the bottom the excess sheet metal and screw heads, it's not a huge deal but prevents the furnace from sitting flat and sits crooked when mounted into the hole.

After test fitting the furnace the fun (and stressful) part started. CUTTING THROUGH THE CAMPER!!!! Included in the furnace instructions were dimensions for the exhaust cutout, I used the dimensions and created a basic template on the back side of the furnace opening. After test fitting the furnace and triple checking everything I held my breath and blasted three holes through the side of the camper with a hole saw. I was amazed at how easy it was to cut through both layers. I made sure to stay way inside my lines as I want to sneak up on the actual opening so I don't go to big.


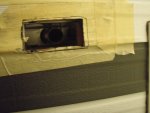
Here is a picture of what the outside holes looked like, my work space limits the amount of space I have to work on this side so the pictures are kinda close and you can't see the whole side of the camper.

At this point I went ahead and installed the furnace in its place, lining up everything inside to make sure it's straight and screwed it in place. There are only two screws, one on left and one on right to screw it to the cabinet opening. I may try to add more mounting points later. Now is a good time to test fit the louver cover. It slides itself on the top flange of the furnace and pops into place on the bottom, there is a little plastic clip that needs to be turned before it pops in and then turned 90 degrees to lock it. In order to get it to sit as flush as possible to the wood surface you may have to bend the metal flange on the furnace towards the wood cover and re-test the cover again. I massaged it with a small hammer until I was happy and then installed it. I was stoked on the fit!

Ok, back to the outside. I taped up a big area with masking tape around where the holes were and where I may be dragging a saw. This prevents the saw from scratching up the camper and gives you something nice to draw templates on. I used the ducting that came with the furnace to create a template on the masking tape and proceeded to cut the hole making sure to "sneak up" on the outside lines as much as possible. I used my craftsman jig saw with a short medium metal cutting blade. The short blade won't protrude into the camper too far as to hit the furnace. It's nice to have the furnace installed so you can eye up the hole and make sure you're not making any mistakes.

Once I got close to the lines I check the hole with the ducting until I got it right. I took my time and it came out pretty good.
In place of the furnace from the factory is a framed box that acts as a cabinet, as you can see on the left is the propane line from the tank. To my surprise there was a handy "T" waiting for me to plumb the furnace right into it, it also looks like a set of wires for (+) and (-) to the battery as well...a big thumbs up :bowdown: to FWC for making this seemingly hard part easy! I tore the cabinet box thing out and it looked like this, you can see the propane "T" and free wires in this picture a little better.
Now that the cabinet box was out of the way I could cut the hole in the cabinet face for mounting the furnace. Please excuse my lack of pictures for all the steps, this is my first DIY post so I'm somewhat of a newbie
I had to cut about 1/2" off the left side of the cabinet opening to get the furnace in the opening, the dimensions came with the furnace instructions. Now the darn furnace is not flat on the bottom so I had to create some sort of a spacer with cutouts where there was extra sheet metal folds or bolts protruding. I used a rough template to mark the locations of the bolts and excess sheet metal on the bottom of the furnace and transferred it to the piece of wood from the removed cabinet box, then cut everything out with a hole saw and jig saw. Then lined it up inside and screwed into place.Here is a bad picture of the bottom of the furnace but you can see on the bottom the excess sheet metal and screw heads, it's not a huge deal but prevents the furnace from sitting flat and sits crooked when mounted into the hole.
After test fitting the furnace the fun (and stressful) part started. CUTTING THROUGH THE CAMPER!!!! Included in the furnace instructions were dimensions for the exhaust cutout, I used the dimensions and created a basic template on the back side of the furnace opening. After test fitting the furnace and triple checking everything I held my breath and blasted three holes through the side of the camper with a hole saw. I was amazed at how easy it was to cut through both layers. I made sure to stay way inside my lines as I want to sneak up on the actual opening so I don't go to big.
Here is a picture of what the outside holes looked like, my work space limits the amount of space I have to work on this side so the pictures are kinda close and you can't see the whole side of the camper.
At this point I went ahead and installed the furnace in its place, lining up everything inside to make sure it's straight and screwed it in place. There are only two screws, one on left and one on right to screw it to the cabinet opening. I may try to add more mounting points later. Now is a good time to test fit the louver cover. It slides itself on the top flange of the furnace and pops into place on the bottom, there is a little plastic clip that needs to be turned before it pops in and then turned 90 degrees to lock it. In order to get it to sit as flush as possible to the wood surface you may have to bend the metal flange on the furnace towards the wood cover and re-test the cover again. I massaged it with a small hammer until I was happy and then installed it. I was stoked on the fit!
Ok, back to the outside. I taped up a big area with masking tape around where the holes were and where I may be dragging a saw. This prevents the saw from scratching up the camper and gives you something nice to draw templates on. I used the ducting that came with the furnace to create a template on the masking tape and proceeded to cut the hole making sure to "sneak up" on the outside lines as much as possible. I used my craftsman jig saw with a short medium metal cutting blade. The short blade won't protrude into the camper too far as to hit the furnace. It's nice to have the furnace installed so you can eye up the hole and make sure you're not making any mistakes.
Once I got close to the lines I check the hole with the ducting until I got it right. I took my time and it came out pretty good.