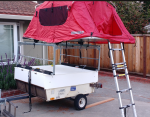
For the past few years my wife and I have been mounting our Tepui Ayer 2 on top of my VW Golf whenever we can for camping trips. It was a major pain but for us it was more than worth it for the quick set up/take down time. I've been scouring craigslist for the right trailer ever since. Because i'll be towing with the Golf, it needed to be light. Because we live in an apartment without much work space, it couldn't require too much fab work on my end. In the beginning of May I was able to score this 1978 Coleman Versa for $150. Weighing in at just under 300 pounds with a capacity of 1250, it was just what I was looking for. Even better, it came with the lid!

Overall it looked to be in OK shape. The lid had a handful of cracks, needed new taillights, the frame, floor, and sides were in great shape other than some surface rust. At first I figured I would re-grease the hubs, replace the tires and taillights, fix the lid, and take it out for a weekend for a shakedown to get a better feel for what I would add to my build list. I was wrong. The first issue was that one of the lugs was seized in the hub and no amount of pb-blaster, heat, or breaker bar extension would free it. Luckily It was easy to pull the hub off with the wheel attached. I figured I would just order a replacement. Turns out it was impossible to find a replacement hub because of the tapered spindle and odd bearing combination. The only thing I could do was order a new axle and hubs which took a month longer to be deliver due to COVID related delays.
In the meantime I decided to do a full teardown to fix as many rust issues that I could. Unfortunately I didn't take many pictures of the whole process. There isn't much to this little trailer and if all the hardware wasn't rusted in place, I could have had it apart in an afternoon.


After a lot of sanding, priming and painting It all bolted back together quite easily. Rustoleum black for everything and Krylon fusion for the lid. Unfortunately, the axle still hadn't been delivered so there was only so far I could take it. I did get a set of rear stabilizing jacks that helped support the trailer while I waited.
I was able to straighten the original tail light brackets and replace the light housings. I bought a set of incandescent lights but decided to drop in some LEDs since I was planning on tapping into the accessory circuit on the Golf for the trailer wiring and wanted to keep the amps down. The trailer originally came with side markers but the ones that came with the kit did not fit the mounting holes of the originals. Because I liked the look of the marker lights and didn't feel like filling any holes, I epoxied the light sockets of the new lights into the housing of the original.
The flaking paint on the lid was pressure washed off the best I could before painting. I fixed the cracks by drilling out the ends of each crack, shaving down the crack itself to create a gap, and filling with JB Plasticweld. After I repaired it, I read about a paste you can make with Wendy's plastic silverware and acetone that will patch ABS. Might try that in the future if (or when) it cracks again.


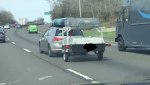
Here it is after the axle, hubs, and tires were installed.


The eventual plan was to mount a rack to it so we could mount the RTT. The problem was that there wasn't anything off the shelf that seemed to fit the bill that wouldn't require significant modification or costing way more than I felt like spending at the moment. I figured I would enjoy the trailer for now and figure out the rack some other time.
Overall it looked to be in OK shape. The lid had a handful of cracks, needed new taillights, the frame, floor, and sides were in great shape other than some surface rust. At first I figured I would re-grease the hubs, replace the tires and taillights, fix the lid, and take it out for a weekend for a shakedown to get a better feel for what I would add to my build list. I was wrong. The first issue was that one of the lugs was seized in the hub and no amount of pb-blaster, heat, or breaker bar extension would free it. Luckily It was easy to pull the hub off with the wheel attached. I figured I would just order a replacement. Turns out it was impossible to find a replacement hub because of the tapered spindle and odd bearing combination. The only thing I could do was order a new axle and hubs which took a month longer to be deliver due to COVID related delays.
In the meantime I decided to do a full teardown to fix as many rust issues that I could. Unfortunately I didn't take many pictures of the whole process. There isn't much to this little trailer and if all the hardware wasn't rusted in place, I could have had it apart in an afternoon.
After a lot of sanding, priming and painting It all bolted back together quite easily. Rustoleum black for everything and Krylon fusion for the lid. Unfortunately, the axle still hadn't been delivered so there was only so far I could take it. I did get a set of rear stabilizing jacks that helped support the trailer while I waited.
I was able to straighten the original tail light brackets and replace the light housings. I bought a set of incandescent lights but decided to drop in some LEDs since I was planning on tapping into the accessory circuit on the Golf for the trailer wiring and wanted to keep the amps down. The trailer originally came with side markers but the ones that came with the kit did not fit the mounting holes of the originals. Because I liked the look of the marker lights and didn't feel like filling any holes, I epoxied the light sockets of the new lights into the housing of the original.
The flaking paint on the lid was pressure washed off the best I could before painting. I fixed the cracks by drilling out the ends of each crack, shaving down the crack itself to create a gap, and filling with JB Plasticweld. After I repaired it, I read about a paste you can make with Wendy's plastic silverware and acetone that will patch ABS. Might try that in the future if (or when) it cracks again.
Here it is after the axle, hubs, and tires were installed.
The eventual plan was to mount a rack to it so we could mount the RTT. The problem was that there wasn't anything off the shelf that seemed to fit the bill that wouldn't require significant modification or costing way more than I felt like spending at the moment. I figured I would enjoy the trailer for now and figure out the rack some other time.