Cody Averhoff
New member
DIY Water Heater –
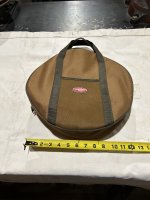
Heat 7 gallons of water from 50 to 105 deg F in 37 minutes with a single burner stove. The kit packs nicely in a jumper cable bag, weighs less than 5 lbs and will fit under/behind most seats.
Hot water is a luxury when camping. Whether you’re washing clothes or dishes, cleaning gear, or taking a shower, hot water makes all the difference. No need for bulky expensive hot water systems with this DIY kit. What’s even better, utilize your cooking stove/fuel for your heat source, which you will likely already have in your kit.
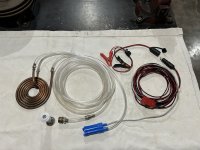
I won’t bore you with all the details… Pictures are worth a thousand words! Also, I figure most folks are savvy when it comes to DIY. The pump, hoses, & wiring are fairly self-explanatory. Main thing is to select a pump with adequate flow and head pressure. The pump I selected works well, but a little more pressure would be nice! I do like the “Oetiker” clamps for my hose connections, no sharp edges to catch things on or cut your hands.
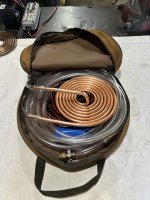
The heart of this kit, the heat exchanger, is more challenging to build. I’ll share how I tackled this task. Having done some mechanic work in the past, I knew I would need a tube bender to prevent the tube from collapsing when it is coiled. I utilized CAD software to design a fixture using two round plates separated by a spacer of the same thickness as the tube diameter (3/8”). The spacer profile is shaped to start at the innermost coil of the heat exchanger. I securely bolted together the three fixture parts. Then, with a little trial and error, I was able to bend the entire length of the copper tubing into a circular shape that is ideal for sitting on top of my camp stove. The attached pictures illustrate this in more detail.
To heat water, remove the shower head for maximum flow, circulate the water through the heat exchanger and back to your water storage container (5–7-gallon containers work well). It’s very important to have the water circulating while the heat source is on, otherwise, it will very quickly overheat the exchanger, hoses, etc. Once the desired temperature is reached, shut off your heat source, re-install the shower head, and you’re ready for a nice hot shower! Best of luck with your DIY projects and remember to have fun and most importantly, add a little creativity!
Picture, description, & CAD files - Google Dropbox
Heat 7 gallons of water from 50 to 105 deg F in 37 minutes with a single burner stove. The kit packs nicely in a jumper cable bag, weighs less than 5 lbs and will fit under/behind most seats.
Hot water is a luxury when camping. Whether you’re washing clothes or dishes, cleaning gear, or taking a shower, hot water makes all the difference. No need for bulky expensive hot water systems with this DIY kit. What’s even better, utilize your cooking stove/fuel for your heat source, which you will likely already have in your kit.
I won’t bore you with all the details… Pictures are worth a thousand words! Also, I figure most folks are savvy when it comes to DIY. The pump, hoses, & wiring are fairly self-explanatory. Main thing is to select a pump with adequate flow and head pressure. The pump I selected works well, but a little more pressure would be nice! I do like the “Oetiker” clamps for my hose connections, no sharp edges to catch things on or cut your hands.
The heart of this kit, the heat exchanger, is more challenging to build. I’ll share how I tackled this task. Having done some mechanic work in the past, I knew I would need a tube bender to prevent the tube from collapsing when it is coiled. I utilized CAD software to design a fixture using two round plates separated by a spacer of the same thickness as the tube diameter (3/8”). The spacer profile is shaped to start at the innermost coil of the heat exchanger. I securely bolted together the three fixture parts. Then, with a little trial and error, I was able to bend the entire length of the copper tubing into a circular shape that is ideal for sitting on top of my camp stove. The attached pictures illustrate this in more detail.
To heat water, remove the shower head for maximum flow, circulate the water through the heat exchanger and back to your water storage container (5–7-gallon containers work well). It’s very important to have the water circulating while the heat source is on, otherwise, it will very quickly overheat the exchanger, hoses, etc. Once the desired temperature is reached, shut off your heat source, re-install the shower head, and you’re ready for a nice hot shower! Best of luck with your DIY projects and remember to have fun and most importantly, add a little creativity!
Picture, description, & CAD files - Google Dropbox