Dual Batteries on 2012 Wrangler with 3.6L

lbrito

Broverland Expert
I recently installed a Mountain Off-Road Enterprises (M.O.R.E) Dual Battery tray in my 2012 JK with the 3.6L Pentastar V6. http://www.mountainoffroad.com/_e/J...tery_Tray_for_12_and_up_Jeep_Wrangler_JKs.htm

Here is a picture of the M.O.R.E tray with 2 Optima Yellow Top D34/78 batteries, test fitting before install:
8049789183_5ea69fd7f8.jpg


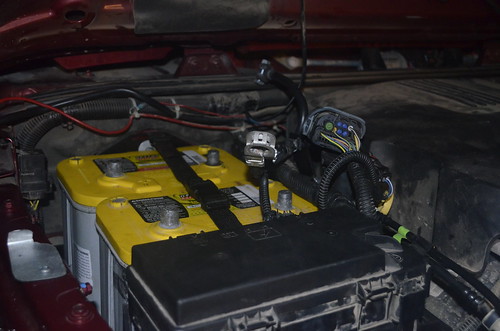
The batteries are held down by a strap that uses a buckle to secure them as shown here:
8049796100_440d9c0f7c.jpg


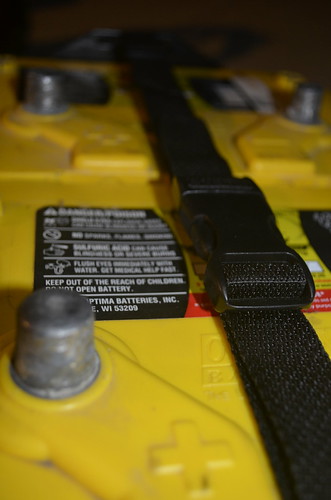
I had my reservations about the strap system. However, after further thought, the straps should be just fine. They should never really have to hold down the heavy batteries, even when off camber, they won't have the tendency to pop upward. Big bumps shouldn't pop these upward much either, so unless you flip the rig, they won't have to do much. So, it does save some space, and prevents a conductive metal bar from running along the top of the batteries where it could potentially cause a short between the terminals.

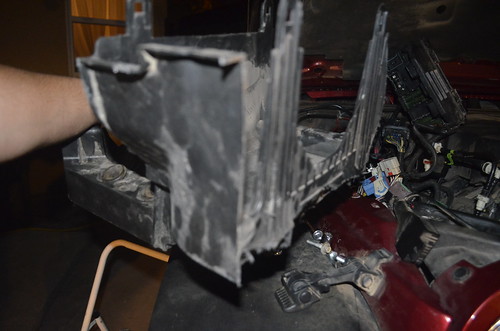
Install requires quite a bit of work. You have to remove the old battery tray, and cut it down. Here is the tray installed, the TIPM is still in pieces:
8049796566_d582197e17.jpg


Install requires that you cut down the factory bolts, wasn't a fan of this step, it was hard to get my sawzall in there and make the cuts without scratching up the tray, as you can see.
8049796808_08e93dc020.jpg


The old tray had to be cut off (this whole assembly is one big plastic piece that has the TIPM box, the battery box, and the intake box. You essentially cut off the battery box + expand some of the holes originally used to move it over a bit. It was a pain, you have to really cut as much as possible on the TIPM side, eventually it all bolts up. This is necessary to buy yourself as much space as possible.
8049791679_1fd72ff7d0.jpg


Once you get that all worked out, you can re-install the TIPM and intake.
8049798574_9bba880285.jpg


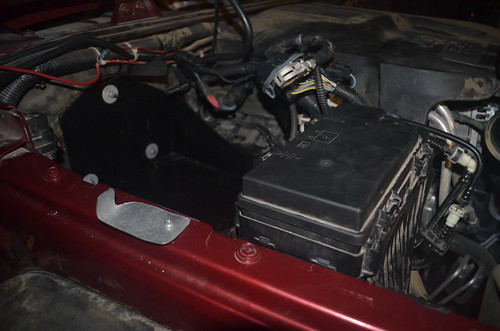
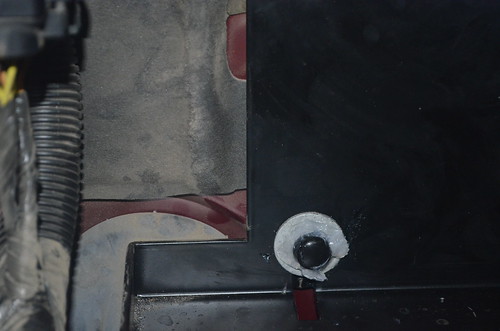
There were 2 plastic pieces in the kit, I assume they are to protect the batteries from the factory bolts that you cut down. I took additional steps using clear silicone to make it stick and cover the full bolt. Otherwise, its almost guaranteed they will fall off. I highly recommend that you do this.
8049793635_558decac41.jpg


Finally, with all that worked out, you can install the batteries!
8049799476_3c06a64c2b.jpg
 
Last edited:

lbrito

Broverland Expert
Dual Battery Isolator

I wired in a Cole Hersee Smart Isolator (48530), a 200 AMP dual battery isolator. It will sense the voltage of both batteries and automatically connect your auxiliary battery to the charging system once the main starter battery is charged (or when either battery reaches above 13.2V for at least 1 minute -- this ensures that if your main battery is going bad, you can still top off the aux). It will also automatically isolate the batteries when the charging system is off and both battery voltages are below 12.7V for 1 minute. It features a BOOST function, which you can use to jump start yourself, or otherwise connect the batteries in parallel via a switch to increase available current for things like winching. Also has a STATUS indicator, which will tell you what the status of the batteries is (connected, or isolated).

Neat system, and to connect it, you simply connect the Smart Isolator between the positive lead coming from the main battery to the aux battery. The two batteries are grounded directly to each other. Then some pigtail wires are used for the boost switch and status LED.

Here is what it looks like, mostly done, still have to clean up some of the wiring and add some more tubing in certain areas:
8049795809_8256ae3756.jpg


This is what my internal monitoring system looks like:
7075898929_2941a219e9.jpg

The voltmeter I sourced from Amazon: http://www.amazon.com/gp/product/B0...N=B001HEE8IS&linkCode=as2&tag=integroverla-20
They also come in red.

I basically used a double pole double throw with center off switch to wire the batteries to a digital multimeter (this one has compensation functions, so you can dial in an accurate reading using a potentiometer). The boost switch is there, and at the time of this picture, the status LED was not in.

For accessories, I am using a Blue Sea Systems Fuse Block:
8129401714_6e765816ff_c.jpg

I bought mine from Amazon: Amazon.com: http://www.amazon.com/gp/product/B0...N=B000THQ0CQ&linkCode=as2&tag=integroverla-20

In this picture you can see how I mounted it using an L-bracket.
8129402530_64a3f7ccbb_c.jpg

And you can also see the 4 AWG cable that feeds into it. Doing some re-positioning of accessories at the moment, so only 1 item is connected to the bus in the picture.


That wire runs over to the other side of the engine bay, and I used the breaker to protect it. Here is a picture of where I located it. There was already a stud there, and so I flattened an L-bracket and used that bolt to secure it to the side of the jeep, and then used other holes in the L-bracket to secure the circuit breaker to it.
8129405166_6747a344ba_c.jpg

Got that from Amazon also: http://www.amazon.com/gp/product/B0...N=B0024JOKM4&linkCode=as2&tag=integroverla-20

I just used a 50amp version of one of those:http://www.amazon.com/gp/product/B0...N=B0024JHQ02&linkCode=as2&tag=integroverla-20
And ran an 8 AWG wire to the rear of the Jeep. This will feed the rear mounted ARB fridge, which was using the factory plug that was coming from the main battery, with a dedicated charge port from the aux battery. It will also go to additional 12V outlets. I'm running it to the cubby in the trunk, and there I will use a relay/switch/fuse combo to run a 10AWG cable to the trailer for additional accessories. The relay and switch will allow me to terminate trailer power when the trailer is not there, so there isn't any issue with a live wire back there. That's a work in progress, since I am waiting on some water proof connectors and some lots of other things. But, ran the wire using the foam plug method on the passenger side as shown here:
8129406154_a25eb9d012_c.jpg


In case anyone was wondering, this is just like the driver side, and feeds into the engine through here:
8129405448_fbf4cd971e_c.jpg


Easy run, straight to the batteries. Then I fed it through the sills all the way to the rear of the vehicle.
 

Septu

Explorer
What was the total time of the install (of the battery tray), and any tips to making it go smoother/faster?

It's something that's on my wishlist, but to be honest, it's pretty far down it.
 

lbrito

Broverland Expert
It took me about 3 hours. The hardest part is removing the TIPM, being careful not to mishandle the several harness that connect to it and figuring out how to unlatch them. Its not complicated, but being that it is the main power module, I was very careful. It is pretty robust though. I have taken it apart several times for different purposes.

I would just recommend having your sawzall ready, and your basic tool set and a good amount of space to stage up the different parts, make the cuts to the plastic, etc.

As far as the isolator goes, I pre-made all the connections, so I only had to plug and go. This takes some time, since you have to source the wire and cut and heatshrink, etc. I would say another 2 hours to get it nice and clean and ready for install.

What was the total time of the install (of the battery tray), and any tips to making it go smoother/faster?

It's something that's on my wishlist, but to be honest, it's pretty far down it.
 

rho

Lost again
Very slick.

When I do dual batteries in my '12 jk ill be referencing this.


Sent by smoke signal.
 

TexasTJ

Climbing Nerd
I like it other than the strap. you think they could make a better one that a nylon strap with a plastic buckle.
 

crawler#976

Expedition Leader
Good job on the install. Looks like a nice setup.

I'm not a fan of the strap tho.

That's close to a hundred pounds of battery in there. Hours of washboard roads loosen nuts and bolts, and I'd personally never trust a strap to stand up to the same abuse. The box is steel, so I guess I'd have to see it in person to understand why a proper tie down can't be used.
 

lbrito

Broverland Expert
I'm speculating here, but I think the strap was done to save some weight. Probably also to save on material cost. But, you can very easily adapt a top clamp to the tray and it would be solid. There are 2 notches where the straps go through, and they are on thick metal. You can easily make a clamp that has an L shaped insert that can be put into where the strap goes through, and the other side can have one of many possible latch down configurations from screws to clamps, and it would be solid.

I'll try and talk to one of the guys at M.O.R.E. and see what the rationale was there. I don't see a reason they can't build a top clamp that works in place of the straps if enough interest is present. As I mentioned though, it does feel pretty solid. But I hear your concerns on the washboard roads. So, definitely more evaluation needed on that aspect, I've not driven nearly enough washboard roads recently to say for sure. I must say, that was my first thought when I saw the tray... straps? really?... and that seems to be the general consensus.

I like it other than the strap. you think they could make a better one that a nylon strap with a plastic buckle.

Good job on the install. Looks like a nice setup.

I'm not a fan of the strap tho.

That's close to a hundred pounds of battery in there. Hours of washboard roads loosen nuts and bolts, and I'd personally never trust a strap to stand up to the same abuse. The box is steel, so I guess I'd have to see it in person to understand why a proper tie down can't be used.
 

lbrito

Broverland Expert
Not by design :ylsmoke:

I hear some people take a non-permanent marker to it and dim it down via coloring. Others apply a small tint. I personally like the brightness, but, my placement is not in a highly visible area.

Can the stinger gauge be dimmed? I know previous blue LED gauges I have had, the blue was intense.
 

Hilldweller

SE Expedition Society
That is so clean; well done, sir.

I have to start planning something similar for the Power Wagon. I think I can fit two Yellows like you did...
 

Bigjerm

SE Expedition Society
Very Nice! I have been looking for a dual set up after finding my Jeep dead from a bad relay. The LJ has a little less room and the tube fenders make it even less.
 

MORE

New member
M.O.R.E. Dual Battery Tray with Metal Buckle

For every ones information we here at M.O.R.E. have upgraded the buckle to a metal synch strap. I am attaching a few new pictures to update everyone. If anyone has received our Dual Battery Tray with the old plastic style buckle please contact us and we will get you out the upgraded buckles.
IMG_0017_edited-2.jpgIMG_0013_edited-2.jpgIMG_0015_edited-2.jpg
Thanks,
Scott
 
For every ones information we here at M.O.R.E. have upgraded the buckle to a metal synch strap. I am attaching a few new pictures to update everyone. If anyone has received our Dual Battery Tray with the old plastic style buckle please contact us and we will get you out the upgraded buckles.

Thanks,
Scott

Thumbs up for above and beyond customer service!
 

Forum statistics

Threads
187,137
Messages
2,891,325
Members
227,788
Latest member
coast runner
Top