Ford Transit Custom Build

Johnboyy

Active member
PXL_20231118_092118678 (1).jpg
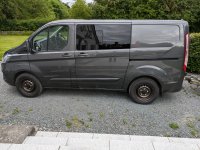
Not a custom build of a Ford Transit. The Transit Custom is the mid sized member of the transit family. It's existed as a distinct model since the mk8 platform came out in 2013 whereas in the past there was just the transit in different sizes. The new 2024 model is first cousins to the new VW transporter, and by cousins I mean ford are building them for VW on the same production line.

The obvious difference between the Transit and the Custom is that the Custom is FWD only in 2013-2023 versions. My van is a 2019 2 litre diesel with twin sliding doors.

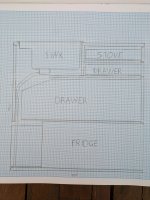
The layout will be similar to our last van, a Nissan Primastar I documented here: https://forum.expeditionportal.com/threads/nissan-primastar-camper-build.223043/

The usage will be similar too. Day trips, camping trips, pulling trailers, hauling stuff for DIY projects. It'll be a multipurpose machine.

I've had the van for nearly 6 months now, I bought it as a highish milage builders van. It's needed a number of small things sorting in the radio, a timing belt and two door locking issues, one is fixed and one I'm digging through the wiring to resolve. It will lock but not unlock.

First upgrade was a reversing camera which I was able to wire into the Ford screen, the reversing sensors on the van arent great, they tend to allow you to get too close to things before they beep, few dents on the ******** end because of that.
PXL_20240413_082106696.jpg

Now onto the actual conversion. Seats need to mount first because everything else has to fit around them. The requirement for seat mountings is that I cannot modify the mounting bracket and when bolted through the floor I have to use an 80x80x4mm spreader plate. Where that plate meets an obstacle it must be bent. The seats I'm using are from the passenger version of this van, sold as the Tourneo Custom. I've bought a pair of front seats and a double for the rear in matching fabric.

Finding the perfect location took quite a while of moving and measuring and sitting and folding the seats to be sure we liked where we had them. Then drill the first hole through the floor to see where the bolts will be coming through. Then we discover that we can't go there because there's a whole spring hanger structure in the way and we'd be drilling down through the side of it. What follows is yet more tweaking and re-measuring and negotiating with the engineer who will sign off the conversion and eventually we have a final location with the bolts coming down in the middle of the spring hanger. I'm losing a bit of space from my kitchen unit and a bit of space from the bed, about 40mm in each case which is not ideal but such is life.

PXL_20240502_175605488 (1).jpg

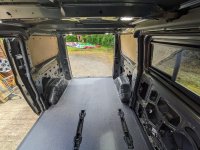
With the seats in I could finally start on the floor, to add some insulation and to finish right for the seat brackets I put 10mm extruded polystyrene between the floor ribs and then full boards of it across the top. this will be covered with 12mm marine ply and vynil flooring.
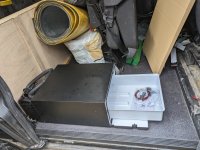
I've also run three lengths of electrical conduit across the floor at the rear where there was no ribs. Electrics and plumbing will be in wheelarch boxes so this allows anything I might need to be routed from one side to the other.

PXL_20240505_200611072 (1).jpgPXL_20240506_164949383 (2).jpg


I have to get the seat mounts finished off so I can reattach the rear axle and go buy the plywood so I made up the spreader plates that go in the spring hanger. I'm welding the nuts on and bonding them into place so that in future I'll be able to remove/refit the seat mounts from above. On the last van we just had the plates, washers and nuts and it was a big job to remove or refit the seat mounts with someone lying under the van

1715161416068.png 1715162832073.png

That's the last 6 months caught up. I'm hoping to move things on at a much faster rate now, I'm hoping to have a basic legal camper conversion done by the end of june. That means seat, bed, table, storage and cooking installed. Then it needs inspection by the engineer, some paperwork and taxes and it will legally be a camper and I can use the back seats. (In Ireland we have lots of different tax classes for vehicles. this is a 3 seat commercial right now so I'm not legal or insured to have the seats in the back until I'd change it to either a crew cab commercial, passenger car, or campervan class. The camper van is the cheapest of the three so I will be going that way)


AP1GczPRzjfjBiVJln1i9SiPV-f7UIgoABuj4GtU-s8or5bM0RxQUB1DjfJLCx9UZITHZCEfSCcZ59zEmkyIhy8xjq2tHptg0e0-1S58b3DU8z-qpGl0RyPO79qX9A_7Ej1GFMo8zrapwaTtAHHRaepEUyaUgaFQooVCLnNum_BpXtD45E5sH63aFj_dFGsehO2XcvdxRJ7cZjowAxt3Xb4QfINBdyN6AObgShMLsTyG6-dP_CMSj_OnlqLiaAkwf_hcCQ284k6YAWqloGGXqvWPwGbbwp5TvvZuKzRfskpB1UamotYzSq-3G1sG4LA5wWLYRXmn6Z_Du6yMO18AC-bmmjMpLyjKfNirrkWrdO2n8Fyvy_vsU4gEgP0YviX8Py6YtTfWMOYThcGTOOjxnC0NUVgvp3tO7F58NMmueubz2W7ndpEQuN3xgmzJziqheRyKV9hNvzfcgerDwxk8EVz6r0BDabTp5i_9ltwpgy0FbBruriD-EjTDjhD23H_s5H9zWdgbqjqeZ4qHO2fDHI2tJPN1YaryL6_R7xYYOUSlsL_KshODYKxnaenl6kZdiWu_s7zg_7Oh7KHdzzXTe66XRsNDvyfnXqX-CNN4gTbPcMJsH4ODPPskt278_YeuUzQVfVmdmoSw-z-PvGnUueJpwvtZXQ23IyxKDtCy_kshEOt-ZRmQnslLafJ2NI6w3vD6ybI9jm6j7_6pO-dSusxud2R-TXL1vNrHO660HXtPUy7JP6Z_-Dnd8zfzecoUF9fXKcE324eU5X0esbvfX8URyGrRiczQCwUuMrscGAbaUodIe3SwupwuWVwoE29yctI8-NSdB0hheYkBbQGt1s9fqJEBgjssQCjje9yp5f9HP_JkwaQ1ORYQLVOHghYsnvbuz-DdO9_Y8cG_sPiua3WvQ4uqxA=w683-h911-s-no-gm
 
Last edited:

Johnboyy

Active member
Progress was very fast for a few weeks, but has seriously slowed since.

I have the vynil floor fitted and the door thresholds done, I also put on my brave boy pants and cut two big holes in the doors to install windows. always a bit intimidating chopping up a car. Last thing done is I replaced the alloys with some steelies and yokohama GO15s.

I'm currently stuck in a furniture planning holding pattern. I really want to use a very specific plywood, but it just can't be gotten in Ireland at the moment. I've the phone worn out checking places for it but have concluded if I want it I'll have to import it myself (no one wants to ship a few sheets of ply, and I don't want to buy it by the bale!

I was hoping to use a birch ply finished with a black hexagonal patterened phenolic coating but i'm probably going to have to settle for a lesser product. This delay has at least allowed me to refine my kitchen unit design.

The whole concept here is something similar to our last van. Lots of boot space (trunk/garage space?). I'll mostly cook outside the van but legally need to be able to cook inside it to qualify as a camper. The kitchen needs to sit beside the two seats and be accessible inside and out. The main components are the sink, fridge and stove. Using a drawer fridge intended for heavy trucks as the bottom drawer in the unit.

Once I finalise on my plywood I'll get cracking with the furniture build.
 

Attachments

  • Ultralight-Riga-Heska-Plywood-Samples-Image-1.jpg
    Ultralight-Riga-Heska-Plywood-Samples-Image-1.jpg
    216.6 KB · Views: 18
  • PXL_20240609_175551227.jpg
    PXL_20240609_175551227.jpg
    1.8 MB · Views: 18
  • PXL_20240602_192900281.jpg
    PXL_20240602_192900281.jpg
    1.6 MB · Views: 18
  • PXL_20240610_110232829.jpg
    PXL_20240610_110232829.jpg
    1.8 MB · Views: 19
  • PXL_20240524_180521912.jpg
    PXL_20240524_180521912.jpg
    2.4 MB · Views: 19

Johnboyy

Active member
Right, I'm wayyyy behind on updating this.

I spent ages in the spring searching for plywood, looked at a few alternatives but none were good enough for what I wanted to try and achieve here. I almost went to the UK for some but at the last minute found someone to import four sheets for me (and a friend had been chasing some for me too and managed to persuade someone to import another four sheets of it, which thankfully I didnt have to buy, this stuff aint cheap)

By the time it was imported I only had four weeks to get the furniture built and the van inspected by an engineer before I went on holidays (not in the van) to register as a camper here needs a few hoops jumped through and some paperwork sent off to the tax man. I knew that would take weeks so wanted them doing their paper things while I was away.

Two days before the plywood was due to arrive in Dublin my turbo went!!
image_34840.jpg


So a week of frantically gathering parts and persuading my mechanic to get me to the top of his list and I was able to go and spend nearly $800 on four sheets of plywood.

I dove straight into furniture making getting the boot framed out and the kitchen unit built. I couldnt find an adjustable table prop I liked so I bought an adjustable hiking pole and chopped it up
image_35090.jpg image_35192.jpg image_35216.jpg

The plan for the boot is to hide electrics over one wheelarch and plumbing over the other, giving the maximum amount of boot capacity. The bed board and the front of the boot can be removed with butterfly latches and the seat is removable too allowing it to still do reasonable service as a van
image_35290.jpg PXL_20240715_084724389.jpg

The fold out table is a cooking table. for dining I've gone with a lagun clone which allows the table to pulled in or outside. I might even put a second one on the opposite B pillar as it's not exactly a huge top.

image_35294.jpg

Fitted some roof bars up top, these are an optional extra from Ford that I got from a breakers yard, they're so clever the way they fold down when not in use and are still rated for around 100lbs folded.

image_35361.jpg image_35362.jpg

I did all that, got my engineer's report and sent off all my paperwork and it is a Motor Caravan class now on the registration papers, it has to go for a roadworthiness test tomorrow and assuming it passes that I'll finally be able to insure it as a camper van and use the new seats.
 

Johnboyy

Active member
Now the focus moves to fitting out the kitchen unit, electrics and plumbing. The kitchen only had a cheap alcohol stove installed in it for the inspection as the fastest cheapest thing to tick the box for installed cooking facility. I have a single ring 800w induction hob to go in there (the stainless ring is actually part of the induction hob) The plan as shown in the post above is for a drawer fridge, a similarly sized larder drawer and two smaller drawers up top. I had a lovely dometic sink with glass lid bought but it wouldnt fit with the matress on top so I've a new one bought.
image_35298.jpg PXL_20240901_180318144 (1).jpg

I modified the fridge slightly to allow it to fit back behind the wheel arch a little and also to allow space for the waste water pipe to go down through the floor.
image_34974.jpg image_34976.jpg image_35085.jpg

I've power run from the battery back to the left wheel arch. I'm putting the house electrics back there. Power for the DC charger is run inside some hose which I wrapped in foil tape over the exhaust heat shield and I've a circuit breaker right up at the battery end.
PXL_20240825_184435522 (1).jpg PXL_20240825_185645123.jpg

The waste tank I've setup with a valve and hose quick connect. I'm not sure how the layflat drain hose will work in reality but I'm gonna try, because the compactness is wort a lot in a small van. I'll make an ali skid plate for the tank, not so much to protect the tank as the valve which has a lot of leverage on it's welded bung.

PXL_20240831_165322452 (1).jpg PXL_20240831_165529336 (1).jpg


That's us pretty much bang up to date. I'm hoping to put some hours in making drawers, plumbing and wiring in the next week or two. the drawers are going to be a real test of my woodworking skills, full extension slides are not very forgiving to poor tolerances!
 

Forum statistics

Threads
187,620
Messages
2,895,944
Members
228,596
Latest member
donaldsonmp3
Top