Got a wild hair - M101A2 Build

69Chevy

New member
I have spent plenty of time on this forum watching builds, taking notes, drooling and wishing I could do much of the same. Well, after some self encouraging, a wild hair and a the help of some good friends, I did it. This won't be a complete build thread as I did a very poor job of documenting the process. It is nearly completed now, but for what it is worth here is my story...

A few years ago, a friend and I bought several of these from the auctions with the intention to sale. However, the market changed a bit and quite frankly I liked them too much to list them for sale. So, I had a couple in the back yard. I have one more that I would possibly sell....
m101a2 Trailer.jpg

I woke up one day and drew a couple sketches...
TrailerSketch1.jpg
TrailerSketch2.jpg

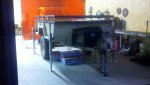
Then I went over to my friend, Lou's, place who happens to be a welder and has a very nice shop I could possibly use. (My shop currently has my 69 Chevy 4x4 build project and has no floor space left). I showed him my sketches and told him my plans. He asked when I wanted to start and how long I thought it would take. I said as soon as possible and I have approximately 5 weeks. His son, who is my very good friend and business partner, had a coveted early rifle Elk Hunt in Unit 10 in Arizona and it had to be done for the trip. It was a huge undertaking since I own 2 businesses and have children to chase around with very limited amount of time to devote to the project. I figured I could get 2 days a week x 4 hours each day with an occasional Saturday and Sunday. I made it clear to him that I wanted to do the bulk of the work and was only looking for space, guidance, and use of tools. He obligied me.

Prior to taking the trailer over to Lou's I cut out and installed some LED tail/running/turn/brake lights as I will be removing the military lights. I prefer the brighter lights. Yes, I had already converted them to 12V but was not impressed.

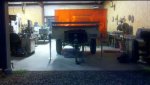
Lou could not help himself and insisted on building the fuel tank, though I had told him it was a very low priority. After some deliberation we decided to modify it from my original sketch. It is 45" in length instead of the 65", which I believe will result in (approximately) a 45 Gallon tank. Here is the result minus the transfer pump as I will add that later on. 2012-08-30_19-14-27_321.jpg

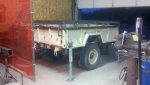
I installed the Tongue Box from Harbor Freight which will be used primarly to house the 6V batteries, electronics and switches.

I then added some outriggers using some manual 3500lb Drop Leg Trailer Jacks from Harbor Freight. Then began the build of the top...
 

Attachments

  • 2012-08-30_19-11-31_304.jpg
    2012-08-30_19-11-31_304.jpg
    524.9 KB · Views: 43
  • 2012-08-30_19-11-48_562.jpg
    2012-08-30_19-11-48_562.jpg
    523.6 KB · Views: 36
  • 2012-08-30_19-12-06_492.jpg
    2012-08-30_19-12-06_492.jpg
    514 KB · Views: 42
  • 2012-08-30_19-12-19_623.jpg
    2012-08-30_19-12-19_623.jpg
    514 KB · Views: 38
  • 20120911_201546.jpg
    20120911_201546.jpg
    514.6 KB · Views: 35
  • 20120911_201601.jpg
    20120911_201601.jpg
    512.6 KB · Views: 36

69Chevy

New member
The top was made out of 2" angle to create the frame work for the top of the bed/tailgate sides. Then 1" was used to create the verticals. 1" was used to create the crosses and finished with 1" x 3" to create the trusses. 3/16" plate was used for the sides and the top. Yes it is heavy, but if I was concerned about weight I wouldn't have selected the M101a2 as its platform. I plan to pull this with my 69 Chevy 4x4 when finished. It has a LS1 with a 4l65e and NP205 Twin Stick and 3/4 ton axles, so weight should not be a factor. As a side note, I pulled this with the wife's Durango for its maiden voyage and I was very pleasantly surprised. Ended up getting 14.5 MPG and it pulled like a dream!

During this time frame I had my friend Jay start building 2 Storage boxes that will mount on the fender wells, 1 Storage/Drawer Combo box, and a pull out kitchen inspired by the Drifta Kitchens. These are the results:20120923_083417.jpg
20120923_083421.jpg
20120923_083430.jpg
 

69Chevy

New member
Yes that is my 69 Chevy cab in the "wife's garage". My shop is full...here is a pick of the truck in it's current state of "progress"...well not quite current but close!
DSCN1089.jpg
DSCN1082.jpg
DSCN1083.jpg
 

69Chevy

New member
Trailer heck I wanna know about the 69' LS power :) Looks like it's going to be super sweet!

the trailer looks nice too lol..

Highlander, thanks for your kind comments. I won't updated much about the 69 here, but will occasionally put a blurp. If I could get my brother to finish the body work and paint, it wouldn't take much more to have it running.
 

69Chevy

New member
Continuation on the top...I was very pleased with the way the top came out. No warpage and solid as can be! In the previously posted pictures you can see I fabbed up a rack to hold my ARB Simpson III Tent. I orginally thought the rack would be centered on the lid, but it ended up being pushed over to the driver side as I also have the ARB Annex. Pushing the rack over to the side allows for me to install the Annex without issue. It also free's up space to walk around the tent during setup and breakdown, which is a nice bonus. I will eventually add some bike mounts in the free space and will add expanded metal around the rack to make an enclosure to store/haul "stuff".

I was going to use the electric camper jacks to move the lid up and down. The reason I wanted this feature was so that the bottom of the tent was high enought to allow the ARB Annex to be installed without having a bunch of Annex sitting on the ground. I decided the electric camper jacks would be too tall and too expensive. I began looking into alternatives. I found the Husky Brute HB3000 electric trailer tongue jack and purchased one for mock up. After mock up it looked like it would work well. So I searched the Internet and purchased 3 more from AdventureRV.net. Locally, the cost was $223.00. AdventureRV.net had them for $159. We made 1/4" foot plates that were welded to the bottom edge of the trailer. Then welded a piece of angle to the lid so the jack body could be welded to it. My welding is pretty good but I had my friend Lou do the finish weld on the jack body because I was SCARED. :Wow1:

A friend of Lou's, Ron, stopped by and wired all four jacks together. This was the moment of truth as I was uncertain how close the gearing would be between the 4 jacks. I was hoping they would be close enough that the lid would move up and down nearly level throughout the process. One reason I went with the Husky jacks is that they have an automatic stop built in so that when it reaches its top or bottom stop point it automatically shuts itself down despite having power to it. So, we tested and to my surprise the lid went up and down nearly level. The rear passenger side seems to be a second or two off. The rest seem to reach their limits nearly the same time (at least I can't tell the difference). With the set up. The jacks take the top of the lid to 73". The rack I built to hold the ARB Simpson III tent is 6" tall. So, when fully deployed the bottom of the tent floor is at 79" tall. Here are some more pics:
20120918_194125.jpg20120918_194135.jpg20120918_194149.jpg20120918_194202.jpg20120923_195016.jpg20120924_202122.jpg20120924_205137.jpg
 

69Chevy

New member
Before you get all over me. Some of the pictures I posted are no longer accurate. Let me explain. Affriend of Lou's, Tom, was helping Lou build his Jeepster. Tom also started helping me at previous stages. He is a fabulous welder and has a ton of experience. But, we/I quickly found out that we could not count on his measurements or we would find ourselves redoing things. Let me explain. When we built the lid, he was giving us the cut measurements for the angle pieces I mentioned previously. Somehow after all the cuts were made we found he forgot to add 5/8". So we had to cut the angle and add a section to make up for the difference. That result in nearly 2 hours lost. He took a lot of grief for that. Then when we mocked up all the jacks, we were playing around (I mean experimenting) with the extend/retract feature. Tom got a bit carried away and when it came time to tack them in place the measurements were off. So, in some of the pictures the head of the jack looks way too high...well they were. The bad thing is, in all of our excitement, noone caught this. Heck we were excited that my idea actually worked! But, I woke up the next morning at 3:00 am with a horrible feeling. Went onsite in the morning and confirmed my fears. So that night I had to knock the spot welds off, adjust, and then re-welded. You can see the difference in the pictures. Yes, Tom still gets a reminder or too...but it is all good. I can't bash him too much, because I would not have finished this project on time without his help!

Anyway, a day or two later I started to fab up the awning mounts. Originally, I planned on mounting them to the sides of the lid. But, once the lid was lifted, I realized they would not be high enough. So, I hit a bit of a road block. I was out of material and didn't want to steal any of Lou's and I also wanted a clean look. So, I thought about it for awhile and decided the fasted and cleanest way to resolve this problem was to purchase some awning mounts from Adventure Trailers. The next day, I went over to Adventure Trailers and saw Martin. One of my customers, Clay, also works there. I bought a set of two. It is nice to have Adventures Trailers so close! Here is a picture of Martin actually doing the assembly:20120924_113950.jpg

So, the next day I began the install of the Awning Mounts. I don't know why I bought 4 when I only needed 3, so I had to take one back and Martin graciously credited me back for 1. I have the ARB3108 (98") and ARB3110 (42") awnings. The 3108 is going to mounted on the Passenger side and the 3110 is going to be mounted on the rear to cover the "kitchen area". Since the trailer is longer and wider than the awnings I had to come up with a solution to mount them despite purchasing the awning mounts from AT. So, I scratched my bald head for a bit. This was the last day of fab work and wiring work. What wasn't finished here, would have to wait until I returned from the hunting trip so I had placed a lot of pressure on myself and was beginning to worry. Then Tom and his wife Rosemary stopped by and Rosemary graciously "allowed" Tom to stay and help. Thank God he did. It was Tom's idea to steal some of Lou's steel to get this project finished. With his prompting, I looked over at Lou's steel racks and found some 3" flat strap by 3/16" thick. I cut it up and mounted it to the awning mounts and then mounted the awnings directly to the 3" strap. I will have a price to pay with Lou, but will gladly replace his stock! It looked like it would work well just like this, but I didn't want any flex whatsoever, so I then cut up some 1" square tube and welding in vertical pieces - 3 on the long side and 1 on the short. This made it bullet proof. No flex at all, but will prevent me the ability to use the AT Awning Mounts verticle adjustments. I decide this would be okay since the awning mounts give me another 12 or so inches when the lid is deployed. Doing this also gives me a short railing on the lid, which provides some sort of "safety" when walking around the lid and gives places to lash "stuff" to.

I'll have to get pictures of this. So, I'll post them later.
 

69Chevy

New member
Cool idea!
what is the weight of the top?

Thanks.
Not 100% sure, but I think the lid itself is close to 500 lbs. I figured the top plate was around 475 by itself. With the jacks, awning and tent, I'm guessing around 800 lbs. Not light, but again not concerned either. The cool thing as you probably know already these trailers are balanced so well that lifting and moving by yourself is an easy task. I can still lift the tongue and move the trailer around with ease even with the lid and tent on. However, I can't when the interior components are in place.
 

Fresno

Adventurer
It is nice to have Adventures Trailers so close! Here is a picture of Martin actually doing the assembly:View attachment 125452

Great build. This last weekend I meet Martin from Adventure Trailers. During a busy day he helped me on my M1102 build. Great company and people. All of their parts are available to the DIYer. They custom designed a rack for me. I see your experience was good as well.
 

69Chevy

New member
Great build. This last weekend I meet Martin from Adventure Trailers. During a busy day he helped me on my M1102 build. Great company and people. All of their parts are available to the DIYer. They custom designed a rack for me. I see your experience was good as well.

Fresno, thank you. Agreed the Adventure Trailer Team are wonderful people. They always have a smile on their face and ready to help in any way they can. They can build you a complete trailer to your specifications or provide you the parts to build it yourself. Everything is built of the highest quality. I have never had a bad experience. Highly recommend AT!
 

Forum statistics

Threads
188,510
Messages
2,905,999
Members
230,547
Latest member
FiscAnd

Members online

Top