In late-November when I started on this project things seemed to move along quickly. The frame came together in a few nights and I thought the end was in sight. Looking back, it was a lot like building a new house, not that I’ve ever done that. The general structure comes to together quickly, however the insulation, siding, interior work and other elements pile on the time. And that doesn’t event include the custom fab work associated with building your own camper from your own design. From scratch. Without any prior experience. You live and learn, I suppose.


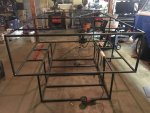
After placing the basic frame in the truck I confirmed my design would indeed fit and I set to completing the metalwork. Several late nights were spent in the garage cutting, aligning, welding and grinding. I rinsed and repeated the aforementioned steps over a hundred times and then, finally, the frame was complete. I test fit the entry door on the frame just to get a visualization of what the end product would look like. Then I sat inside on what would be the main couch and drank a beer marveling at my progress. Good thing it was late at night because if my wife or one of my kids would’ve come out to the garage I’m sure they would’ve wondered what I was doing.


The next step was the interior trim out. Now, there’s no doubt I have a vast selection of tools for wrenching on cars and doing associated fab work, however I’m light on woodworking tools. Cutting 4 x 8 sheets of plywood cleanly and with straight edges proved to be a precarious and stressful endeavor. My grit prevailed and I managed to get everything cut while keeping all ten fingers and toes for that matter (I may have used a foot on an occasion to keep a sheet level on my rusty but trusty table saw).


Woodworking complete, I made a trip or two (who am I kidding, it was problably four) to home depot to find the finest carpet material I could find to line the walls with. I landed on
TrafficMaster indoor/outdoor carpet in Ocean Blue at a budget friendly $.86/square foot. Despite the low cost, the material is well-suited for the interior and really ties the room together, you know like a fine persian rug in your living room. Except this space rivaled that of a low rate prison cell and the rug was the finest synthetic materials that could be had for less than a buck a foot. Wall treatment complete, it was time to celebrate this milestone with a moment of reflection to marvel at my work. Beer in hand of course.

My next task was to install the siding. I opted for .032 inch aluminum sheet for it’s light weight, durability and relative ease of cutting. Like all of the other metal used for the build I sourced it from
Discount Steel in NE Minneapolis. I’m pretty sure they know me by name now given all the metal pickups I’ve done there. Instead of using screws, bolts or rivets to affix the siding I opted for
3M VHB tape. The VHB stands for very high bond and believe me, this stuff is indeed sticky. If you don’t get the panel placed just right you better be comfortable with the placement because it will be stuck in place. Just ask my wife, who made the mistake of helping me affix a panel then hear me gripe when it was misaligned. That said, you know once the panel is in place correctly it’s not going anywhere and the tape helps avoid water intrusion at the seam acting like a seal. By the time all the panels were in place I became an expert in sheet metal cutting. I can also tell you which low-budget electric sheet metals shears to avoid. One tip,
saving big money doesn’t save you any time. The right tool for the job makes a world of difference.