GREAT SUCCESS! 1997 Montero SR Starter Motor Replacement Recap
Just completed my own starter motor replacement on my 1997 Mitsubishi Montero SR - This thread is the best thread I found on the internet on this topic for the 91-99 (Gen 2) series Montero's (not sport!). Jay's post about tools, suggesting the extension was far and away the most helpful, so thanks Jay! I tried coming in from the top with a long ratcheting box wrench but the one I bought (Tekton) was not low profile enough and wouldn't fit around the bolt- I now am noticing that the socket part of jlocster's wrench extends outside of the body creating a much lower profile for wrapping around the bolt- this is essential, especially for the top bolt- however- even if I had that. I think I'd prefer the extenders so that I can do the entire job from under the car and without removing the airbox/hose- you should have plenty of clearance and not need to jack at all.
I wanted to add my experience to help any others who love keeping this beast alive.
I did not end up needing the electric socket, I used all manual ratchets and one box wrench however, I can see how it would have been extremely helpful.
If you have all the right tools, this job should be 45-90 min depending on how stuck things are, an expert could probably clear <30 min. It took me about 4 hours over a few days because I was scrambling around looking for and ordering tools.
Most of the steps above are great - but to centralize, I'll repeat the info here:
1. DISCONNECT THE BATTERY - you're working around an exposed positive contact right next to the frame, so definitely do this.
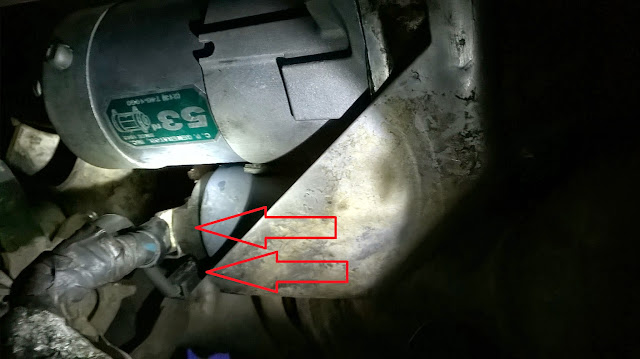
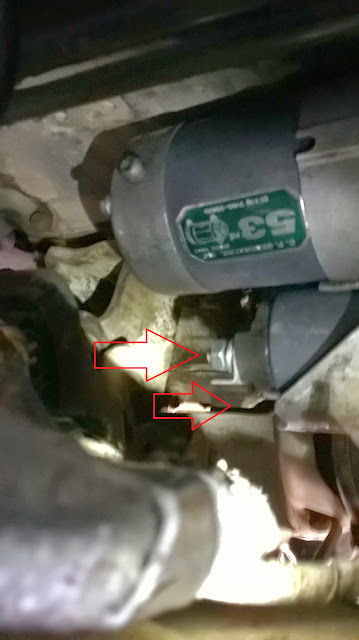
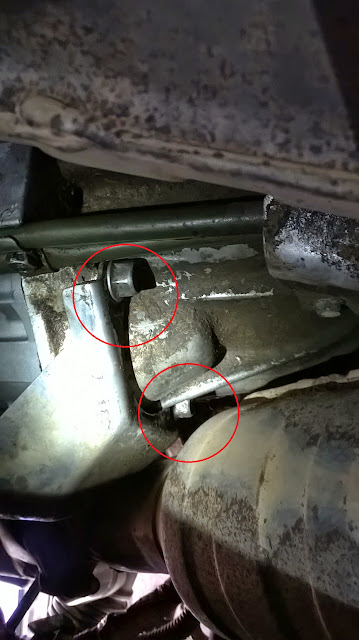
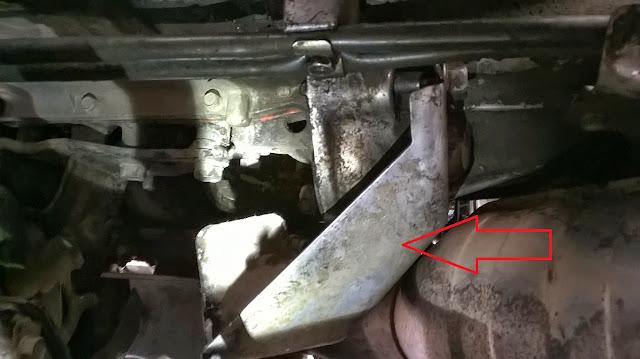
2. The lower bolt is pretty obvious, hanging at the bottom next to the pre-cat, 14mm and regular ratchet should do this fine - soak it with some PB Blaster first
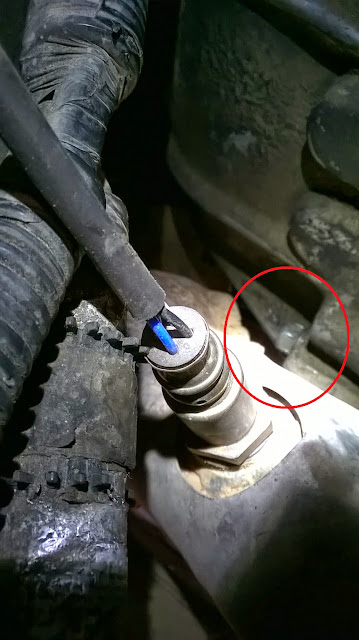
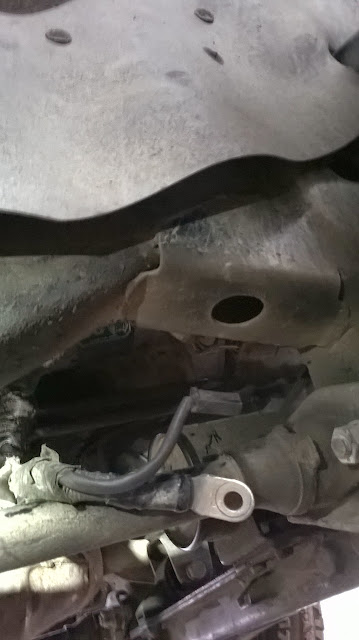
3. before going after the top bolt, disconnect the battery contact (13mm), which should be pretty easy since it has a lock washer and shouldn't be torqued down too much - I used a 13mm box since I couldn't get a ratchet in here- not enough clearance -- you do this because after you get the top bolt, the unit will start to fall out and it will be hard to disconnect the battery contact at this time, additionally, there is a secondary sensor contact that is delicate that you do NOT want to break
4. *carefully* pull off the sensor contact- for me this was a plastic boot connector on a flat male connector- I did not have to push or release anything it was just pressure fit on and came off with a gentle wiggle
5. Setup your ratchet - Here is where the fun begins... Getting that mf'n top bolt... For me I used, in order from bolt to ratchet handle, - 6 point 14mm socket +2.5" (3/8) wobble extension (from this set: see images below) + 18" (3/8) straight extenstion + 30" (3/8) straight extension (both from this set: see images below) + 2.5" (3/8) extension (had on hand) + 3/8 ratchet handle -- for me this length was very specific as it caused my ratchet handle to attach right around a sweet spot at the U-joint on the drive shaft just forward of the muffler. The indent of the U-joint allowed just enough extra space to go more straight on to the bolt, causing a little less lateral torque/twist on the very extended length of the ratchet rod. 2.5" shorter and I couldn't really get my ratchet on because frame was blocking me, even 1" longer and I would be past the U-joint indent and be pressed against the full width of the drive shaft and muffler, which would probably would have worked but been even harder. I started with teh 2.5 + 30" slide those in, then attached the 18 and other 2.5" -- Using a 6 point socket vs universal or multi-point socket is critical to ensure you can wail torque on the bolt without stripping.
6. With a persuader bar* start torquing the bolt off - even after blasting with PB Blaster I had to go pretty hard, probably around 50+lbs, maybe more, I wasn't measuring, however once the lock/corrosion broke the pressure gave way and it came out like a breeze. *(unless you are jacked up or on a lift the persuader will need to be short so you have room from the ground (probably 20" total, including the part overlapping the ratchet handle). I didn't have a pipe small enough so I clamped some vice grips to the end of my ratchet- that ended up working fine.
7. With one hand supporting the starter motor and the other hand ratcheting, back the top bolt off entirely. -- once its off, leave the extension in place
8. remove the starter motor , leave the heat shield in place- you shouldn't need to take out or remove anything else, it will wiggle out, just takes some finesse and patients
9. before you put the new starter motor in- compare the rotor/gear position on the one you just took out and the new one, try to make sure they are matched up in the same position- they only turn easily one way, if you pull it out a bit, it turns easier.
10. place the new starter motor in place. It should mount completely flush with no gap, the bolts are not supposed to pull it into place. If you have a gap, then repeat step 9 or stick your finger up and try and wiggle the gear around a little and push it in again.
11. hand start the bottom bolt to help align the motor- you will need to pull the starter motor out when you start the bolt because there likely isn't enough room to get your socket in there when the motor is flush and bolt is sticking out against the pre-cat -- once you get about 1/4 to 1/2" of thread on you can do the top.
12. for the top bolt, same thing as #11, you probably need to pull the motor off a bit to have room and so that the motor is straight and you are not cross threading -- to tighten the top bolt I held the motor aligned with my left hand and then used my right to manually twist the extension bar.
NOTE: I found that for the bottom bolt being being perpendicular or a little off perpendicular to the truck with my legs sticking out to the passenger side was great- then for the top bolt, being parallel to the truck under neath, with my feet pointing towards the back was comfortable.
13. once both bolts are started and you've confirmed the motor still will sit flat and flush against the mount take turns alternating ratcheting in each bolt - you want to do them evenly and alternate torque-ing them each a little at a time, evenly -- to finish them I used what I think was about 35-40lbs of torque after snug.
14. reconnect the plastic electrical connection
15. reconnect the battery terminal with lock washer, hand tight, then with 13mm box until just past snug
16. Reconnect your battery -- You did it!
17. cross your fingers and start the truck
")
Here is a snap of all the tools I used with labels: