My 2010 Tacoma escape vehicle...

Andy@AAV

Old Marine
I figured it was time after lurking for so long to actually post up my vehicle. I purchased a 2010 Tacoma Access Cab with the TRD Off-Road package to replace my 06 Jeep Unlimited Rubicon. The Jeep had been modified so much it was no longer a practical everyday vehicle unless every day was a rock crawling trip. I was done with the crazy rock crawling stuff and just wanted to be able to get away for some good hiking and camping trips. I was moving to southern California so my vehicle needed to be able to keep up on the freeway but be able to get to some back country areas. My goal was to buy another truck (my 2nd Tacoma), equip it well from the factory and leave it that way. Yep, that worked :)

Thanks to this forum and other great sources this is where I sit today:

Drive-line:
Engine: Stock 1GR
Transmission: Stock 6 speed
Transfer case: Stock
Front Axle: Stock IFS
Rear Axle: Stock 8 inch w/e-locker
Tires: 255-85R16 KM2s on stock wheels

Suspension:
Front: ICON coilovers set for no lift
Stock UCA/LCA
Rear: TSB springs (installed 12-2011)
ICON resevoir shocks


Protection:
ARB Front Bumper (old style)
Smitybuilt XRC 8 winch with synthetic line
All Pro Rock sliders
Bud Built 4 piece skids (modified exhaust to raise center skid, post coming soon)

Other Money Pits:
Auxiliary Battery http://www.expeditionportal.com/for...attery-system-installed?p=1017829#post1017829
ARB 50 QT fridge on rear shelf http://www.expeditionportal.com/forum/threads/68946-My-back-seat-storage-fridge-shelf-in-2010-Tacoma
Pioneer AVIC X920 Nav-stereo
Cheap tool box
Water and Fuel Jerry cans from Pep Boys
Recovery, survival, and tool kits
CB radio
Yaesu FT-7900 Dual Band Ham Radio
Safari Snorkel

Still to come?
RTT on a bed rack (maybe ARB) (ARB Simpson III installed)
Chuck box
More miles exploring the CA-AZ-NV area! (underway!)

Shameless poser shots as it sits now...
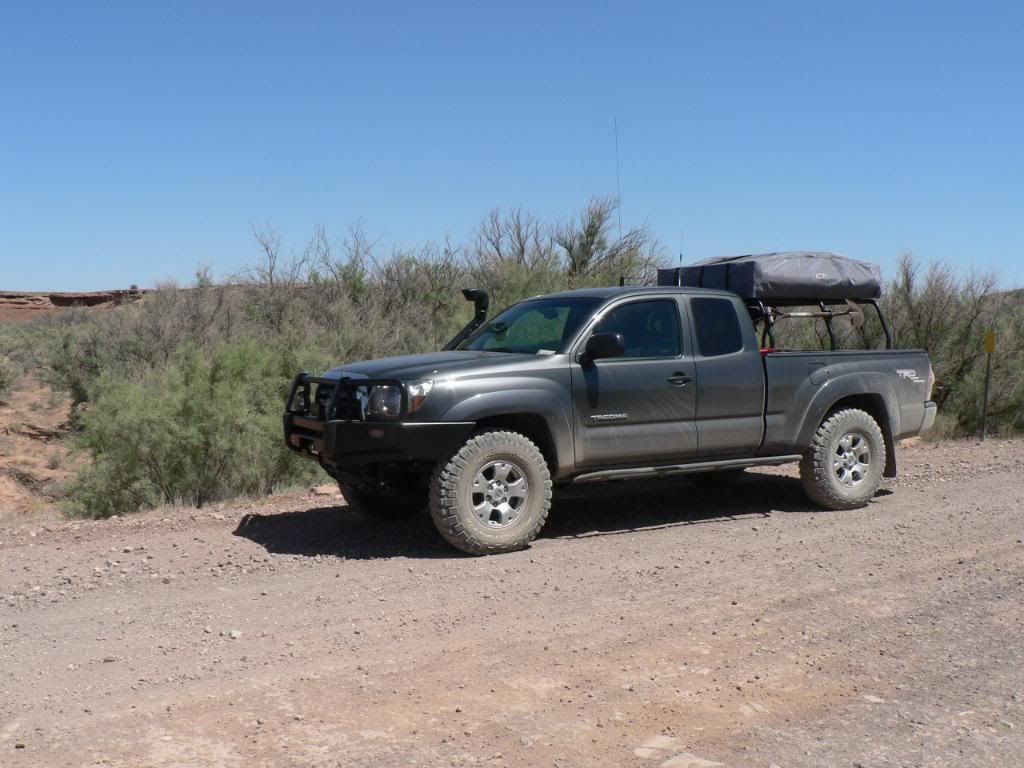
P1020290.jpg


So far I have been to:
Anza-Borrego, CA
Big Bear, CA
Mohave desert, CA
Prescott National Forrest, AZ
Valley of Fire, NV
 
Last edited:

docjake

Observer
I miss working out at San Mateo Range, San Clemente had some of the best taco shops in the world. What made you chose the old style ARB over the new one, I am going to be buying one when I get done with this trip I am just sorting opinions.
 

Andy@AAV

Old Marine
What made you chose the old style ARB over the new one, I am going to be buying one when I get done with this trip I am just sorting opinions.

First and foremost, I'm cheap. I got a good deal on this one. I didn't feel like paying more for the new style, then adding more cash for a set of ARB fog lights that I didn't really need anyway. I just didn't see the need to spend $125 extra dollars for the fog lights. Instead I put the extra cash into the KC lights I have now. I do think the new style looks better though.

When you get yours make sure you leave at least a 1/2 inch gap between the bumper and the body (like it says in the instructions) or you will get some annoying bumps and squeaks as the body flexes.
 

keezer37

Explorer
First and foremost, I'm cheap. I got a good deal on this one. I didn't feel like paying more for the new style, then adding more cash for a set of ARB fog lights that I didn't really need anyway. I just didn't see the need to spend $125 extra dollars for the fog lights. Instead I put the extra cash into the KC lights I have now. I do think the new style looks better though.

When you get yours make sure you leave at least a 1/2 inch gap between the bumper and the body (like it says in the instructions) or you will get some annoying bumps and squeaks as the body flexes.

The fogs are pretty cheap. Money well saved on your part.

docjake,
x2 on the bumper alignment. I think people look at the gap as per the instructions and see it as excessive and unappealing or perhaps get frustrated trying to get it dialed in just right. The gap is needed.
An easy way to align it for me, because I was soloing on the install, was to set the bumper on a pair of inexpensive wooden saw horses available from Home Depot and lift the front of the truck the few inches up to the bumper with a floor jack. Brought the mountain to Mohammed. If you have these items, it makes short work of it.
 

WU7X

Snow on the Roof
An easy way to align it for me, because I was soloing on the install, was to set the bumper on a pair of inexpensive wooden saw horses available from Home Depot and lift the front of the truck the few inches up to the bumper with a floor jack. Brought the mountain to Mohammed. If you have these items, it makes short work of it.

Another way to match the bumper to the frame is to use an engine hoist and some 1" climbing straps. A couple carabiners may come in handy too. The engine hoist allows you to elevate the bumper and get it mounted all by yourself.
 

ETAV8R

Founder of D.E.R.P.
Looking good so far. The dark gray is gonna show the scratches pretty good though! Looking forward to seeing your progress.
 
I like the "keep it mostly stock" attitude you have.

I have one question...... soon I will be replacing tires and have been pondering the 255/85 size.....

Any problems with rubbing etc with no lift?

Looking Good!

ROAM
 

Andy@AAV

Old Marine
I like the "keep it mostly stock" attitude you have.

I have one question...... soon I will be replacing tires and have been pondering the 255/85 size.....

Any problems with rubbing etc with no lift?

Looking Good!

ROAM

Thanks, I believe that stock is reliable. I learned not to go too far with my Jeep.

Yes they do rub. Hard. But only on the front mud flaps when hitting a bump. I will remove the mud flaps if I need to, but so far its not enough to make me pull out the screwdriver. I may let the tires eat them and be done with it. I am considering adding the ICON add a leaf setup to the rears and then raising the front to match.

The dark gray is gonna show the scratches pretty good though! Looking forward to seeing your progress.

I challenge your use of the future tense! Someone asked me if I had been in an accident with all the scratches. It's just arizona pinstripes.
 

ETAV8R

Founder of D.E.R.P.
LOL had I known my future overlanding interest when I got my MGM I would have gotten the white instead. I've got tons of Nevada Pinstripes thanks to my offroad journeys. If your truck is brand new I'd suggest either removing the front flaps altogether or trimming them. If you have had the truck for a while taking them off will leave a slight line in the paint where the flaps rub. I trimmed mine long ago:
http://www.tacomaworld.com/forum/2nd-gen-tacomas/7495-mud-flaps-5.html#post711985
http://www.tacomaworld.com/forum/2nd-gen-tacomas/61879-how-trimming-front-mud-flaps.html

Welcome to the portal and Semper Fidelis!
 
Last edited:

Andy@AAV

Old Marine
New equation: ICON+ARB= STOCK!!!!!

J/K, nice truck.


OK, so its stock-ish... :)

I got my dual battery setup installed today.

http://www.expeditionportal.com/for...attery-system-installed?p=1017829#post1017829

Overall, it wasn't that hard. Just a pain to get everything put in. The hard part was getting the battery tray done, especially since I pulled a muscle in my lower back working on it. Add in a nice head cold and trip back east and the install took 2 months. Its nice to have it done, but for what I have in it I could have just picked up a Goal Zero Adventure Kit http://www.goalzero.com/shop/p/64/Extreme-350-Adventure-Kit/1:3/ and had unlimited power. Hmm, now that I think about it I still have some credit limit left...
 

Forum statistics

Threads
188,398
Messages
2,904,151
Members
230,274
Latest member
mbauerus1
Top