My Home-Made Camper Top

Heifer Boy

Adventurer
This is a very delayed write up as I actually built this camper box back in 2008.

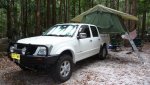
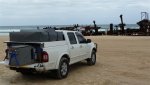
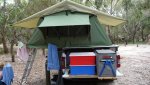
The goal was to make a camper top to fit the tub of our Dual Cab Ute. It had to fit all the stuff required for an Outback 4WD trip like a fridge, water, gas, camping and recovery gear and it was to be fitted with a roof top tent (RTT) as we were well over setting up tents and beds every night. It had to be secure and dry but had to meet one other criteria it had to be removable. We only have one vehicle, live in a small terrace house in the middle of Sydney, have no off street parking or driveway and we have loads of stuff. It was a big ask but many sleepless nights later and I had a design I could build (and store) in our limited space that would meet our needs.

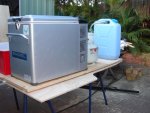
The big challenge was fitting the Engel fridge. Removing the back seat wasn't an option so it had to be in the tub. It is higher than the depth of the tub so the canopy needed to be about 140mm high to fit it. I also didn't want to have roof racks or have the tent sticking above the roof line of the cab for fuel economy reasons so this height was about the limit I could go. Internal drawer slides etc. were fairly easy to do but all the storage boxes had to be removable so we could pack/store it all in the house before putting it in the tub out on the street. No big drawers here, just drawer slides with the boxes and fridge strapped down.

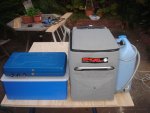
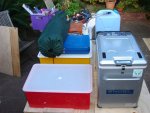
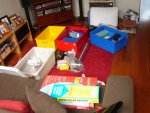
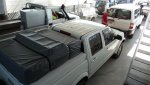
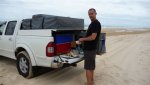
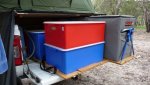
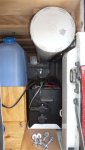
The RH drawer slide would house the fridge, LPG gas bottle and 2x jerry cans with the second battery tucked in to the side. The LH drawer slide would have 2x med boxes containing cooking stuff and food, 1x large box with camping gear/food and 1x large box with camping/4WD spares. On top of these would be the camp chairs, tarps and tucked into the side the 3rd jerry can with hose and tap.

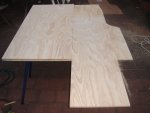
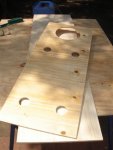
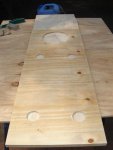
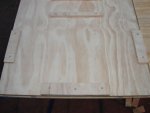
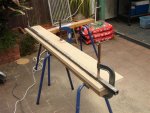
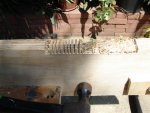
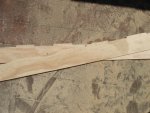
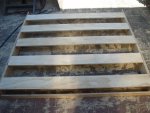
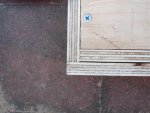
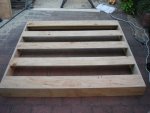
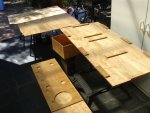
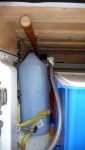
So I started with cutting a false floor for the tub which eventually got bolted permanently in place. You can see in the photos that it was contoured very closely to the shape of the tub to maximise space. 10mm made big a difference in this build!! It was finished in a marine grade varnish so would last the weather fine when the canopy was removed. It had a small 'wing' on one side which became the position for the second battery for the fridge although there is a jerry can in the photo. The jerry ended up on the other side.

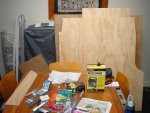
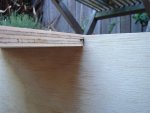
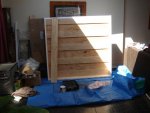
The 2 slides were then sorted out with the width of the fridge being the deciding factor on width of the storage boxes. These were bought to fit the remaining space.
 

Attachments

  • 101_0781.jpg
    101_0781.jpg
    570.4 KB · Views: 110
  • 101_0783.JPG
    101_0783.JPG
    59.8 KB · Views: 77

Heifer Boy

Adventurer
On the RH slide I laminated on a 9mm piece of ply that had cut-outs for the fridge feet and gas bottle to sit in and space for a jerry can holder for the other 2 jerrys. Eye bolts were later added to strap these down.
 

Attachments

  • 101_0815.JPG
    101_0815.JPG
    35.9 KB · Views: 59
  • 101_0814.JPG
    101_0814.JPG
    31.9 KB · Views: 54

Heifer Boy

Adventurer
The LH slide was fitted with blocks to hold the boxes firm and saddles to run straps through to tie everything down. With no vertical walls I couldn't just jam everything in as I would be able to slide the drawers in and out freely. It all had to be strapped on.
 

Attachments

  • 101_0816.JPG
    101_0816.JPG
    65.6 KB · Views: 54
  • 101_0818.JPG
    101_0818.JPG
    70.5 KB · Views: 54
  • 101_0819.JPG
    101_0819.JPG
    75.3 KB · Views: 47
  • 101_0821.JPG
    101_0821.JPG
    40.3 KB · Views: 50

Heifer Boy

Adventurer
Did I mention we live in a small terrace house? No garage and small courtyard meant nearly everything had to be packed away each night in case of rain and the wood moved inside!! Luckily I have a very understanding partner who loves camping as much as I do. This build went on for about a month!! You can see the RTT is in the dining room too.
 

Attachments

  • 101_0824.JPG
    101_0824.JPG
    59.7 KB · Views: 56
  • 101_0825.JPG
    101_0825.JPG
    64.2 KB · Views: 52

Heifer Boy

Adventurer
Next was the canopy itself. Basically laminated 12mm ply built like a bed base Glued and screwed with various joints for strength 3 sided with 4th being a small door hinged on top over the tailgate so everything could slide in an out. Getting the laminated pieces the same sizes exactly was an issue and after cutting I used belt sanders and router to get a flush edge. I kind of built this as a frame of 12mm ply and then glued and screwed the top and sides to it screwing from the inside only. It is pretty flimsy at this stage.
 

Attachments

  • 101_0822.JPG
    101_0822.JPG
    75 KB · Views: 49
  • 101_0829.JPG
    101_0829.JPG
    59.8 KB · Views: 46
  • 101_0830.JPG
    101_0830.JPG
    65 KB · Views: 43
  • 101_0831.JPG
    101_0831.JPG
    61.7 KB · Views: 55

Heifer Boy

Adventurer
With the front and sides attached it firmed up a lot. Everything was glued with construction adhesive and gal wood screws. Big mistake but more on that later.
 

Attachments

  • 101_0836.JPG
    101_0836.JPG
    52 KB · Views: 46
  • 101_0835.JPG
    101_0835.JPG
    57.8 KB · Views: 45
  • 101_0834.JPG
    101_0834.JPG
    58.1 KB · Views: 44

Heifer Boy

Adventurer
Everything got a few coats of varnish which of course took days to dry between coats and sanding. You can see the small box in the photos. This is my jerry can holder and fits on the back of the fridge slide. With it I can carry 60 litres total but this box can be unbolted if I'm not heading for the outback. The storage boxes can then be spread around a bit too. The canopy got painted white and this was done in the dining room again so it didn't get dusty or dirty. I did sand it down outside though.
 

Attachments

  • 101_0887.JPG
    101_0887.JPG
    57.4 KB · Views: 47
  • 101_0888.JPG
    101_0888.JPG
    48.2 KB · Views: 43

Heifer Boy

Adventurer
I folded up some sheet metal to make a battery tray and bracket to fit over one of the wheel arches but then of course I couldn't get to the battery. So I just used the tray and bolted it to the right-hand wing of the false floor. Much easier.
 

Attachments

  • 101_0890.JPG
    101_0890.JPG
    68.3 KB · Views: 41
  • 101_0891.JPG
    101_0891.JPG
    67.7 KB · Views: 41

Heifer Boy

Adventurer
A few more details were added. The drawer slide ran on HDPM plastic runners I got cut and screwed to the bottom of the slides. A bit of silicon spray helps these but they work really well anyway. It's OK to strap everything to the drawer slides but something has to stop these from leaping around inside the tub when hammering across the desert. I screwed some alloy angle to the front on the tub and the back of the slides just fit under them perfectly A few wing nut bolts hold the front down. Everything is sized to fit the tub perfectly so they don't move backwards and forwards. I've done some pretty hardcore tracks and never had anything move or break. Simple is often best.

One place I couldn't get to or use was above each wheel arch. The only access is from the tailgate and with no walls I couldn't just stuff things in there. So on the RH side I attached a 6 inch PVC pipe and we carried all the awning poles, pegs, sand pegs and hammer in that. On the LH side I attached the long handled shovel (cut down to fit). The RTT just bolted though the top as it's on it's own support rails anyway and it folds out the passenger side of the ute. Self adhesive foam tape was used around the canopy and it was bolted to the tub with simple flat brackets.

After a test weekend out in the Blue Mountains, the first big trip was up the coast to Fraser Island for a month. Here's some shots of the set up in action.
 

Attachments

  • 100_00180.JPG
    100_00180.JPG
    40.2 KB · Views: 101
  • 100_00119.JPG
    100_00119.JPG
    68.6 KB · Views: 114
  • 100_00111.JPG
    100_00111.JPG
    51.2 KB · Views: 124
  • 100_00182.JPG
    100_00182.JPG
    37.6 KB · Views: 138
  • 100_00296.JPG
    100_00296.JPG
    41.7 KB · Views: 105
  • 100_00337.JPG
    100_00337.JPG
    54 KB · Views: 79
  • 100_00338.JPG
    100_00338.JPG
    26.9 KB · Views: 86
  • 100_00339.JPG
    100_00339.JPG
    29.4 KB · Views: 79
  • 100_00340.JPG
    100_00340.JPG
    67.1 KB · Views: 112

Heifer Boy

Adventurer
I made this canopy in October 2008 and since then it has been on numerous 4WD trips including Lake Lyell, Zig Zag, Yerranderie, Wauchope, South Coast and some month long epics to Fraser Island, Victorian Highlands and The Simpson Desert It's worked very well and I couldn't have been happier with it...but...a couple of things have come up over this time.

Good
1 - The concept. Love it. It is a great idea that works very well. Simple to build, simple to use, compact and lightweight. You don't need to tow a ton of camper to get out there and most of us take far to much stuff as well. Simplify!!!
2 - Love the RTT, love the fridge and 2nd battery, love the compact design. Our fuel economy hardly changed and we have got under 10 litres per 100km fully loaded on some open roads.
3 – The modularity. We were able to store everything in a big cupboard in out house and the RTT came off and rolled into our backyard on a dolly. Excellent result for the city.

Bad
1 - You can't dust proof a ute tailgate!! There are many discussions on this and I've tried many 'solutions' with varying success. OK but not great.
2 - Don't build campers out of construction adhesive!! It's crap with vibrations and just falls apart. I used hundreds of screws during construction and this held it together and then edged the canopy with alloy angle, screws and PU glue. OK but not great. Eventually water seeped in and it started leaking quite badly.
3 – it's tiresome undoing all the straps just to get one thing out of a box and then having to do them all up again. This was necessary for dust proofing though so see my first point. Also we had to because of living in a terrace and unpacking/storing everything so unavoidable.

So the main issues were dust, waterproofness and a bit of usability. It might have had one trip left in it so I've destroyed the old canopy in the name of research and designed another. The screws removed, some of the laminations just popped apart with little effort. Other bits held on well but ALL of the joints failed at the glue. There were no wood failures. Lesson, DON'T USE CONSTRUCTION ADHESIVE!!!

So it was pretty good but it could/will be better. Keep an eye out for the “New Improved Camper Box Ver 2.0” thread. I'll post as I build this time around.

Cheers,
HB
 

4xdog

Explorer
Very nice. It sounds like a great solution to your needs, and a lot of us will be watching ver 2 eagerly. Thanks for posting it!
 

pods8

Explorer
Other bits held on well but ALL of the joints failed at the glue. There were no wood failures. Lesson, DON'T USE CONSTRUCTION ADHESIVE!!!

Definitely go with a better adhesive but also keep in mind a right angle joint is a very high stress concentration for even the best adhesives. A fillet of adhesive in your 90deg corners will lower the stresses on the adhesive by spreading out the load into more adhesive and wood.
 

Heifer Boy

Adventurer
Definitely go with a better adhesive but also keep in mind a right angle joint is a very high stress concentration for even the best adhesives. A fillet of adhesive in your 90deg corners will lower the stresses on the adhesive by spreading out the load into more adhesive and wood.

That's the plan. I've reading a lot of boat building forums and sites and have been experimenting wth epoxies and fibreglass. Incredibly strong joints. Ver 2.0 will be a whole lot better.

I actually bought the plywood yesterday so keep an eye out for the build post once I get going.
 

IdahoIV

New member
This is a great camper top! I'm looking to build something very similar to this in the near future. I am excited to see version 2!
 

Forum statistics

Threads
188,507
Messages
2,906,021
Members
230,547
Latest member
FiscAnd
Top