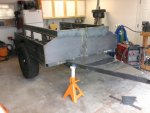
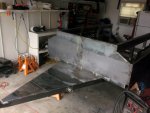
OK so I just started welding because a good friend gave a welder. I built a bumper for my Jeep and mount for my hi-lift. Then I started on the trailer. I killed that welder and bought a used Lincoln 255. Everything I have ever built before (always for my Jeep) was always welded by another friend that had years of welding experience and his own shop. He retired and I had to stand on my own two feet, so here I am. The problem with this trailer that I have built is that I have made it too heavy. I just plan and simple used to heavy of material and made it too big. I guess it's hard to build one trailer to do everything and still be light and small. The idea was originally to build a trailer big enough for a large tent on top but able to still follow the Jeep. Then came the idea of hauling dirt bikes with the tailgate closed. Yet another idea was to have it on 37" tires the same as the jeep to use one common spare. So... after all these different idea's here we are. Oh and everything built for a jeep is always 1/4" to 5/16" thick so to me that's an off road standard. Not the case with a trailer. What I didn't take into account is the strength of the parts working together once assembled. Things like control arms on a jeep that are 5/16" thick work alone when hit by a rock, but the side of your trailer can use the frame and panels welded together to have a combined strength equal to a single thicker piece of material. I made this mistake of the side boxes of my trailer. I built the side box frames out of 1" X 1" .120 then skinned it with .120 plate. Yeah it's not going anywhere. Right now I'm at about 900lbs and figure it will be close to 1300#'s or 1400#'s when I am done. Here is a list of materials I used:
3500lb axle hubs
2" X 2" X .250 wall square tube for axle
2" X 3" X .120 rectangle tube for frame and bed cross bracing
2" X 3" X .188 rectangle tube for tongue
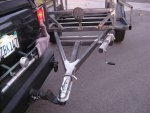
2.5" X 2.5" X .250 square tube for receiver for the hitch and cross brace on tongue
2" X 2" X .095 square tube for the box sides and additional bed cross bracing
1" X 1" X .120 square tube for side box frame
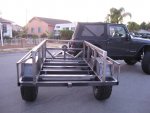
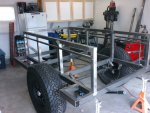
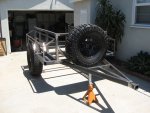
Box size is 46" X 86" X 21.5"(7ft inside the box with the tailgate closed) This size was originally used because I wanted to be able to use a tonneau cover from a step side ford ranger. This changed because I went longer with the trailer in order to fit a motorcycle in the bed with the tailgate closed. The depth of the box is 1/2 inch taller than a few container's I have that I will use when camping.
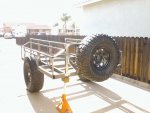
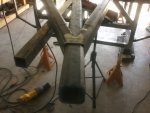
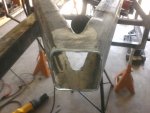
The tongue was originally built to hold a 37" tire inset between the frame rail of the tongue. Because of tongue weight the spare will be built onto the tailgate/swingout tire carrier. I notched out the front of the box half way and ran the main tongue rails back to the side frame rails. I also added a doubler plate at the frame where it is notched. I found a web site about tongue strength and mine is about double of what I need. I figured better to be stronger off road than not.
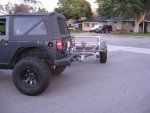
Tires are BFG AT 37 X 12.5 X 17
Wheels are 17 X 8 w/4.5" back spacing
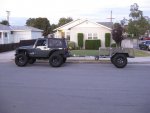
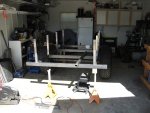
The trailer has the same track width as my JK with the current spacers on the JK.
The tongue is 5' long from the front of the box so I can do at least a full 90 degree turn and get into the rear of the Jeep when camping without unhooking the JK.
Each side box is the full length of the trailer and 11" wide. I have yet to build the lids for these but the idea is to be able to transport fishing poles full assembled and rifles, shoves ect. Just a nice sealed and locked area for these items.
I originally found this design on a Jeep forum and really really liked it. I noticed that it has been done before and turned out great by another member here. The plan is to use a roll-up cover for the bed and mount a RTT on top. I also have shocks for it and I am currently using small 1600# trailer springs. I think these are not going to last long and airbags will be in the near future. So far I have learned a bunch and WOW so much I would do differently. First thing is use much lighter material and make the box smaller.
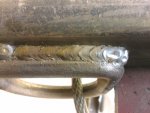
Well remember I am new to welding and I end up doing a lot of grinding and re welding. I'm getting better but still learning.
3500lb axle hubs
2" X 2" X .250 wall square tube for axle
2" X 3" X .120 rectangle tube for frame and bed cross bracing
2" X 3" X .188 rectangle tube for tongue
2.5" X 2.5" X .250 square tube for receiver for the hitch and cross brace on tongue
2" X 2" X .095 square tube for the box sides and additional bed cross bracing
1" X 1" X .120 square tube for side box frame
Box size is 46" X 86" X 21.5"(7ft inside the box with the tailgate closed) This size was originally used because I wanted to be able to use a tonneau cover from a step side ford ranger. This changed because I went longer with the trailer in order to fit a motorcycle in the bed with the tailgate closed. The depth of the box is 1/2 inch taller than a few container's I have that I will use when camping.
The tongue was originally built to hold a 37" tire inset between the frame rail of the tongue. Because of tongue weight the spare will be built onto the tailgate/swingout tire carrier. I notched out the front of the box half way and ran the main tongue rails back to the side frame rails. I also added a doubler plate at the frame where it is notched. I found a web site about tongue strength and mine is about double of what I need. I figured better to be stronger off road than not.
Tires are BFG AT 37 X 12.5 X 17
Wheels are 17 X 8 w/4.5" back spacing
The trailer has the same track width as my JK with the current spacers on the JK.
The tongue is 5' long from the front of the box so I can do at least a full 90 degree turn and get into the rear of the Jeep when camping without unhooking the JK.
Each side box is the full length of the trailer and 11" wide. I have yet to build the lids for these but the idea is to be able to transport fishing poles full assembled and rifles, shoves ect. Just a nice sealed and locked area for these items.
I originally found this design on a Jeep forum and really really liked it. I noticed that it has been done before and turned out great by another member here. The plan is to use a roll-up cover for the bed and mount a RTT on top. I also have shocks for it and I am currently using small 1600# trailer springs. I think these are not going to last long and airbags will be in the near future. So far I have learned a bunch and WOW so much I would do differently. First thing is use much lighter material and make the box smaller.
Well remember I am new to welding and I end up doing a lot of grinding and re welding. I'm getting better but still learning.
Attachments

Last edited: