Oztent frame repair ideas

Paul 3

Adventurer, Overland Certified OC0011
Let me start by saying that this is in no way intended as a Oztent bash session. Without going into the pro's and con's of the Oztent all I will say is that IMO it is a great tent. The damage to this tent occurred during a "perfect wind storm" during the OT Alumni trip to Baja and those that were there can attest to the weather that fateful day.

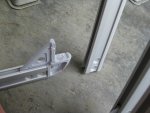
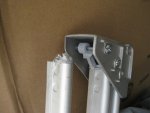
So, my predicament. Three of the frame joints were broken. The new USA Oztent supplier was quick to send out the replacement joints, but as I attempt to make the repair it's clear that the repair instructions are not going to be as simple as they sounded over the phone.

I've tried to simply pull the broken joint ends out of the aluminum frame rail with no luck. Pulling, twisting or bending with anymore force is sure to do further damage to the frame rails. Drilling the ends out has met with a similar lack of success. The joints are pressed in so tight that any part not actually "drilled away" is left firmly in place.

I'm also thinking of the new joint installation. Even if able to remove the old joints, you can see in the picture that each frame rail end is dimple pressed onto the plastic joint. The force to press new joints past the dimpling is more than likely going to cause me to bend one of the aluminum frame rails.

I consider myself a pretty handy guy, but this one is beyond me. Hoping for a few good ideas before I press to have the entire frame replaced or worse yet have to shell out the money to buy a new frame, which I don't know is even an option as of yet.

Paul
 

Attachments

  • corner resized.jpg
    corner resized.jpg
    140.4 KB · Views: 173
  • bottom corner resized.jpg
    bottom corner resized.jpg
    105.5 KB · Views: 158

Brian McVickers

Administrator
Staff member
Paul,
You could try melting or chipping/carving the plastic out.

Although you will still have an issue with getting the new ones in.

Perhaps the new joints could be heated to be a bit softer and then pressed in and then reinforced with through bolts or rivets into holes drilled whtere the dimples are.


Hope all is well!

Brian
 

IZZYDUSIT

Adventurer
Funny, I was going to post the same question here as I experienced the same problem with broken joints with my OZTENT REV3.
I have already replaced the frame once at a discounted price,since the frame broke at shipping when I bought it,and I made the mistake of not opening the packages immediately when it arrived. Shipping warranty and responsibility has expired, and to make a long story short, Aaron from Bright Path, the OZTENT distributor then, worked with me on the replacement frame. I have used the tent several times since, without a problem, and enjoyed it .Three weeks ago, a couple of joints broke on this new frame as my son tried to help me deploy the tent and apparently pulled the joint to direction it was not supposed too!
No fault of tent design, however yes, when I've tried to salvage some of the joints from the old frame, I realized it going to be a huge problem replacing the joints since I had to utilize high speed cutter to cut the back side of the channel and then us a drift and a good hammer to extract the replacement joints! the next question is how to extract the broken pieces without damaging the entire frame rails !?
With that in mind, I think it makes the product less of an "expedition worthy" since there is no easy repair/service provisions, especially when you are away, on remote location. As with regular tent, there is always a repair sleeves available for your poles in case of breakage. Here, I cut plastic water bottles in half, and put them over the broken joints so they will not puncture the tent material, and some good 'ol duct tape...

Another suggestion I have is don't leave the the on your vehicle roof rack over a month as the sun completely destroyed the webbed handles on the tent cover-all 4 handles just fell apart on light contact- that I couldn't blame my son for.:(
I will wait to see if anyone has an idea of a fix.
 

UK4X4

Expedition Leader
They do look like they are pressed in and held in place with the dimples.

depending on wether the dimples were done before or after they inserted the plastic parts means you have two methods...neither very easy

removing the old, cut flush with end of tubing and drill out as much as you can, hook and pull out the bits, pry loose from the side using a screwdriver or use a dremel if required, dentists or oring picks will be good to pull out the crap
on 1 test piece

then look at the size/ width of the new pieces and trial fit to see if they will pop in and past the dimples..

If they don't then you have too move to plan B

Drill out the dimples, pull out the pastic bits- insert new ones and then either rivit or bolt them in place, the others you can go striaght to drilling and removal process

Going by the view of the size of the dimples, you would need to find some aluminum manual rivits, if the bolt and nut heads show to be too proud

like these and a hammer !

http://www.hansonrivet.com/w08.htm
 

double moo

Adventurer
I did three of mine last year... my son opened it funny and snapped 3 of four on one side. Once I received the new ones I grabbed what I could get a hold of with vice grips then tapped the grips with a hammer and the pieces popped right out. On the one piece that was broke flush - I just used a drift and pounded it further into the frame rail then popped the new one in. I figured the extra couple grams of weight weren't going to hurt me! All told It took less than 10 minutes to replace the three. I need to get a couple to have on hand as spares.
 

IZZYDUSIT

Adventurer
I did three of mine last year... my son opened it funny and snapped 3 of four on one side. Once I received the new ones I grabbed what I could get a hold of with vice grips then tapped the grips with a hammer and the pieces popped right out. On the one piece that was broke flush - I just used a drift and pounded it further into the frame rail then popped the new one in. I figured the extra couple grams of weight weren't going to hurt me! All told It took less than 10 minutes to replace the three. I need to get a couple to have on hand as spares.

Thanks, I'll have to try the driving in method. How about installing the new one in? did they set into the dimples and stayed?

For some reason, I have tried to drift drive the broken pieces OUT and the wouldn't budge..
BTW, where did you source the new pieces now that Aaron is out of the Oztent picture? Prices?
Again, thanks!
 

Paul 3

Adventurer, Overland Certified OC0011
Once I received the new ones I grabbed what I could get a hold of with vice grips then tapped the grips with a hammer and the pieces popped right out. On the one piece that was broke flush - I just used a drift and pounded it further into the frame rail then popped the new one in. I figured the extra couple grams of weight weren't going to hurt me! All told It took less than 10 minutes to replace the three. I need to get a couple to have on hand as spares.
All but one broke flush. Have not tried the vice grip/hammer technique but it's worth a try. How did you overcome the dimples. I was hoping to avoid drilling them out but as tightly as the joints are pressed in I'm not sure that's possible. I did attempt to pound one of the broken joints further into the rail, but met with no success which I attributed to the dimples. I'm starting to think that my headache will be greatly reduced by simply drilling the dimples out.

BTW, where did you source the new pieces now that Aaron is out of the Oztent picture? Prices?
Again, thanks!
http://us.oztent.com/Contact-Us.asp Took a couple of attempts to reach via phone, but they were really helpful once I got in touch with them. Randy had the pieces I needed sent out within a day or two.

Paul
 

rusty_tlc

Explorer
I would gently spread the rail with a wedge then try to remove the old plastic part. After the part was out I'd use a clamp to re-size the rail, actually over bend it slightly, before installing the new part.
 

Paul 3

Adventurer, Overland Certified OC0011
Double moo you are the man. I wouldn't have thought the vice grip/hammer technique would have worked and I did need to get a helping hand, but I'll be darned if I didn't get each one out in a matter of minutes with no damage to the frame. Tapped the new pieces into place with minimal drama and the tent is once again fully operational.

I'll be testing it in Yellowstone next week on the way up to BC for some good fishing.

Cheers,

Paul
 

flashpete

New member
Similar Problem

My wife and I use an Oztent RV2 as a "sitting room" while we sleep on an inflatable bed in our Toyota Tarago (or Previa). Last week a night of torrential rain led to one hinge snapping. This seemed to produce a chain reaction, with a further three breaking. Having tried unsuccessfully to remove the old ones, I found this website.

When the new hinges arrive next week I'll try the solutions suggested and report on success or otherwise.

I have also asked Oztent for advice, so I'll report on this as well

Happy camping!
 
Last edited:

flashpete

New member
I contacted Oztent, and following is their reply:

"The best way to change the hinge is not to remove the old one but to hack saw the plastic of the hinge where it enters the aluminium extrusion. Then with a screw driver or punch, hit the plastic still within the extrusion, further in, freeing up the hole for the new hinge.

"The new hinge will then push into place (with some pressure).

"If you have a further problem, you may call our service section on 02 97574466 and speak to Steve and he can assist."

Regards
Wayne Hill
Customer Service Manager
Oztent Australia Pty Ltd
www.oztent.com | service@oztent.com

Phone: 0297574466 | Fax: 0297572299
1273 The Horsley Drive, Wetherill Park, NSW 2164.


Well, this simply didn't work.

Fortunately I had read an earlier suggestion on this site and deployed a pair of vice grips and a rubber mallet.

Job done!
 

OzG

New member
resurrecting this old thread....
To remove the broken hinge I drilled a hole through the meatiest part of the plastic, threaded a bolt into it and tapped the hinge out with a hammer. Deploy an old piece of timber under the hinge while drilling to protect the tent floor.

The broken off piece inside the other rail, I I managed to drill it out, but be cautious - I shaved a little aluminum, but it's still operational.
 

altaboy

Observer
That's why I only have tens with straight(ish) dac poles. No funky corner brackets, can use fiberglass tent poles in a pinch.
 

Forum statistics

Threads
188,133
Messages
2,902,553
Members
229,582
Latest member
JSKepler
Top