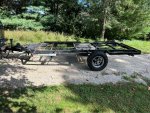
Popup frame?

I am wanting to build out a camper with some basic off-road durability (pulling it with a Mazda CX-9) and there is a local sale of the frame from a newer (2020) popup that had been damaged and is now just the frame. Is this a decent place to start a build? It has better wheels/tires/axles than I see on most other trailers apart form the full timbren setup and it seems like a nice 6x10 base to build up from. Planning on a 1.5" tube body with aluminum sides, etc. as far as the build goes. Just wanting to make sure I'm not missing something using a popup frame rather than repurposing something like a utility trailer.
 

Attachments

  • 310492149_10226606390603704_1574022299193039414_n.jpg
    310492149_10226606390603704_1574022299193039414_n.jpg
    242.7 KB · Views: 62
.
Looks large but it looks like good clearance and it looks straight. New is always good. How many $$$ ??
The frame should have a sticker saying what it can weigh,,, Unless that was on the camper body.... you really should check your plans match the weight rating of the trailer. You might NEED the sticker to buy license plates and insure it..... EDIT yes, the stickers are there..... Do the math.

Most factory built RV trailers are well engineered and built very light... very few of us can match that level of engineering for a super light camper. If you go ahead the weight rating will be the challenge.

You mention 1.5" tubular frame.... why not 1" which will save 50% on the weight of the tube alone. My 5x10 cargo trailer with 100K miles on it has 1" square tube walls and roof 24" on center.

But do the drawings, list ALL the materials, add up the weight then list and add the weight of EVERYTHING you plan loading.

Looks like it has a water tank ????

Very cool using yer Zip Code for location.
Thanks for input. They are asking 1500, but I assume there's some negotiating to do there. I'm thinking 1000. With the current prices for everything right now, I can't imagine building anything for less. What thickness did you go with for the 1x1? I was originally thinking 1x1, but saw someone build from thinner 1.5 and weight was about a wash.
 
In case anyone cares, went and picked it up. $1250. Ended up taking it because the popup was originally the first river enthusiast package, Dexter 3500# axle, nicer tires, came with the frame mounted belly water tank, fold out stairs (most of the little annoying things that can add up). Now it's time to mock it up and get to building.


Ozarker

Well-known member
..... Do the math........
You mention 1.5" tubular frame.... why not 1" which will save 50% on the weight of the tube alone......

Same gauge, that only saves 33% of the weight, :rolleyes: ?

I think the buyer got a decent deal, material, supplies and labor to build it would most likely exceed that price. There may be an issue of any difference between a clean title or salvaged title.
 
Appreciate the feedback, planning on putting about a 4' tall squaredrop-esque body on it. Planning on a floor twin with fold down bunk above it if needed as well as a full/queen bed inside. Also planning to mount a rack for RTT or storage up top. Kitchen out the back. My wife had the idea of creating some storage on one side open to the outside and closed from the inside for storage of the "outside" stuff. Tiki torches, chairs, firepit tripod, etc. so i'll get to mocking everything up.

As far as titles go - we are in Indiana and it is about the easiest state to title anything in, so it should be no issue.
 

Ozarker

Well-known member
Looking at that frame that should be a good foundation. That outrigger framing from the main frame would be a good base for interior storage on one side and exterior on the other.

I don't remember a Labor Day weekend in my area when it didn't rain for most of one day, many a few hours everyday. In your build consider the type of weather you'll encounter.

I would insist on a rear pop up area for standing or at least demi-standing to get dressed. There are several designs, having a roof that tilts up isn't hard to build. I'd use a good canvas, insulated canvas would be nicer, in bear country I might go with hard sides that could be attached outside the canvas, or a lifting hard sided wall.

Consider how, during bad weather you will take care of the 3 S's, xxxx, shower, shave, and how to prepare bad weather meals.

You could also have a flat open deck on that trailer, then slide the camper on and off. I don't know if you have uses for a utility trailer to haul bulky items.
 
Finally got around to getting started after cleaning up the frame, getting the axles straight, tires rotated, everything all good. I extended the rear out an extra 9 inches to line up with the rear bumper area and reinforced the corners of the outrigger sections and got one wall semi constructed. Hopefully getting the other walls and roof welded up here in the next week or two.

Questions:
Exterior - 1/2" treated ply screwed to the 1x1 with adhesive as well (thinking 5200 at the moment, but open to other ideas). After plywood is up I will cover in 2-3 coats of resin, then a layer of fiberglass and then another layer of resin.

Interior - 1" pink foam followed by 1/4 ply and a layer of pretend shiplap made of 6" strips of the same ply.

Roof Rack - Planning on mounting a 10 ft section of unistrut down both sides of the roof and everything can be mounted to that once it is on. I'm not sure the best way to mount this without water intrusion so any suggestions would be greatly appreciated.
 

Attachments

  • 1 wall.jpg
    1 wall.jpg
    1 MB · Views: 17

PCO6

Adventurer
Roof Rack - Planning on mounting a 10 ft section of unistrut down both sides of the roof and everything can be mounted to that once it is on. I'm not sure the best way to mount this without water intrusion so any suggestions would be greatly appreciated.

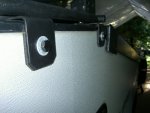
I built a small rack for one of my trailers and chose to attach it through the walls vs. the roof. I did not want drill holes through the roof. These mounts were easy to seal and the walls also provide good load bearing. I'm building a trailer now that will have a full length rack (7' or so) and will be doing something similar.

Your trailer is looking good! (y)


19-07-15 4.JPGPICT1878.JPG
 

Wm Hill

Member
Why not something like 3/4" T&G Pine..... One layer..... wood not plywood..... wood does not flex like plywood and most important add up the weight. I'll bet 3/4" Pine is lighter than 1/2" of plywood.

Likely a faster less expensive choice too. There is also the choice of 5/16 Pine T&G planking. MASIVELY lighter.

My latest plan for my build is to go with T&G pine instead of sheeting walls. I want 9' of body and the T&G will be easier than splicing in that extra foot. Locally the only 9' stuff I could find is ZIP system stuff, and it's heavy, ugly, and expensive. The extra foot increases the price by $22/sheet.
 

Ozarker

Well-known member
@billiebob

You must be a hardier soul than I.

No, my standing room must be inside, I like to get dressed or undressed in a warm area, not standing outside in that snow covered woods.. I also like a warm potty seat, or at least not an ice cold one outside, after the business is done it can be put outside if needed.

As to wood, pine is much lighter than the ply mentioned, looks much better too, I think. If you want a light wood that looks nice and smells good, go with cedar. More expensive than white pine but worth the difference.
 

honda250xtitan

Active member
Finally got around to getting started after cleaning up the frame, getting the axles straight, tires rotated, everything all good. I extended the rear out an extra 9 inches to line up with the rear bumper area and reinforced the corners of the outrigger sections and got one wall semi constructed. Hopefully getting the other walls and roof welded up here in the next week or two.

Questions:
Exterior - 1/2" treated ply screwed to the 1x1 with adhesive as well (thinking 5200 at the moment, but open to other ideas). After plywood is up I will cover in 2-3 coats of resin, then a layer of fiberglass and then another layer of resin.

Interior - 1" pink foam followed by 1/4 ply and a layer of pretend shiplap made of 6" strips of the same ply.

Roof Rack - Planning on mounting a 10 ft section of unistrut down both sides of the roof and everything can be mounted to that once it is on. I'm not sure the best way to mount this without water intrusion so any suggestions would be greatly appreciated.

sounds good to me. you're gonna just screw the unistrut to the plywood/1x1? run some rtv gasket maker clear on it. otherwise butyl is fantastic as a sealant. it doesnt dry like silicon sealants do, and its what is used to seal our windshields in. seal the penetrations, and then run a bead of silicon around the unistrut to keep water from getting under it and rotting the wood? painters tape will give you a clean edge when caulking.
 

Ozarker

Well-known member
...... butyl is fantastic as a sealant. it doesnt dry like silicon sealants do......... seal the penetrations, and then run a bead of silicon around the unistrut to keep water from getting under it and rotting ........
Well, that's what she told me, a bead of butyl around the rim would seal the orifice so there would be no other intrusion. Yet, nine months after that hot tub party experiment child support was ordered. I'm sticking with silicon even if it cracks over time, it can always be reapplied.
 

honda250xtitan

Active member
Well, that's what she told me, a bead of butyl around the rim would seal the orifice so there would be no other intrusion. Yet, nine months after that hot tub party experiment child support was ordered. I'm sticking with silicon even if it cracks over time, it can always be reapplied.

ha...i use silicon on the 4runner roof rack, never any leaks.
 

Forum statistics

Threads
188,020
Messages
2,901,228
Members
229,411
Latest member
IvaBru
Top