Range Rover L322 Overland Build

Overlanding 4WD

New member
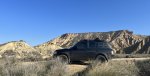
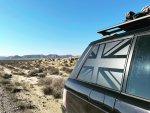
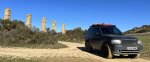
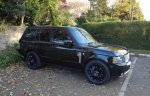
2010 L322 Range Rover Autobiography Black. 135K Miles, I’m the 3rd owner, came with FSH, and it’s a beaut.

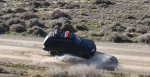
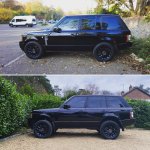
Been in for some service items, CV boots, a leaking turbo pipe, worn ball joint, full service, get the rusty and rotten side steps off, along with the front integrated mud flaps. The wheels have been replaced with Black L405 1065 style, with Cooper Discoverer AT 275/55/20’s, which may or may not get switched out to 18” in the future, will see how it performs on 20’s.

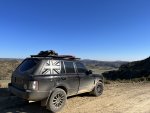
I‘ve installed an“Easy lift suspension module, 10 min job, which gives me 5 extra ride heights, the added factory raised heights, changed via the Gap Tool, raises to 4” in extend mode, all controlled via an app, one cool function, it has an auto level function, which will help when the RTT is on for trips.

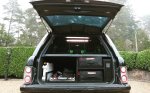
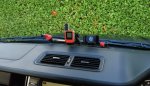
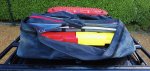
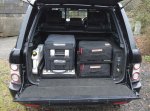
Few things that need doing, removing the cheap stick on wind deflectors, ??‍♂️ I know, they are terrible, clean the leather interior, yes it has the headliner hand stitched in leather, it’s in really good condition but needs a good clean and the leather fed. All incandescent bulbs have been replaced with LED’s, and a new set of front mud flaps, without the side step cut out. Install the full rear dog guard / cage, and start to plan out how the fridge slide, dual ARB compressor and Redarc BMS Manager 30 will fit in the rear loadspace. Then it‘s on to deblingIing it, remove the plastic chrome and silver trim items, and replace said items with black versions, easy to do. Before and after attached.


Cheers

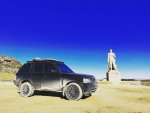
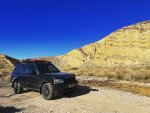
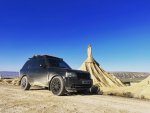
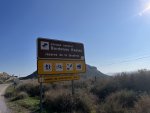
I’ll be documenting this build on YouTube, as well as here. The plan is to take a 2 week trip to the Spanish Pyrenees in Jan, already booked, so subscribe and watch the build

You tube channel
 

Attachments

  • E418BCB9-B838-4154-9F8B-566D57407B64.jpeg
    E418BCB9-B838-4154-9F8B-566D57407B64.jpeg
    685.1 KB · Views: 48
  • 6F77F142-DFA6-4546-9741-C9F462A55137.jpeg
    6F77F142-DFA6-4546-9741-C9F462A55137.jpeg
    3.3 MB · Views: 45
  • 1DAD21DD-3DB8-4603-BFB3-10E518B68913.png
    1DAD21DD-3DB8-4603-BFB3-10E518B68913.png
    1.3 MB · Views: 47
  • 164C51B6-D4A1-4C4A-9178-6151023C8F54.jpeg
    164C51B6-D4A1-4C4A-9178-6151023C8F54.jpeg
    699.7 KB · Views: 51
  • FAA69F83-40E2-4686-86E1-3B6A51388277.jpeg
    FAA69F83-40E2-4686-86E1-3B6A51388277.jpeg
    1.7 MB · Views: 52

Overlanding 4WD

New member
The Range Rover has a new rear frame made out of 25m box alloy tubing, this now houses my Dometic CFX35 fridge on a DFGoffroad slide, hides all the electrics, a 1000W Redarc inverter and Dual ARB compressor, which are behind carpeted MDF panels at the back.

Power is fed from the rear tool well, below the fuse board, into a Optima yellow top, and a 175AMP Anderson plug to a distribution board.

I have 4 dual USB plugs, 2 50 amp Anderson plusg that provide solar input to the redarc BCDC charger, and one out to provide power to my iKamper mini, when that goes on top.

At the back of the frame is where I have hidden the inverter and compressor. Redarc manager 30 will go in, and depending on if I go for more lights, and hook up a heat exchanger for a shower, Redarc Redvision instead of switches, fuses and the pos / new distribution blocks I have in there now.

For now, everything works!

Four Step22 bags stack 2 plus, that holds stove, tools, cutlery and some recovery gear. On the dog guard, I have molle bags that simply hook on the cage, along with the obligatory fire extinguisher ??

Overlanding 4WD You Tube Channel
 

Attachments

  • BA79F41C-04C0-476D-8944-DD9D9E9DBE00.jpeg
    BA79F41C-04C0-476D-8944-DD9D9E9DBE00.jpeg
    3.6 MB · Views: 25
  • DF37D476-03AB-4504-95CF-8C3599F6DC08.jpeg
    DF37D476-03AB-4504-95CF-8C3599F6DC08.jpeg
    685.1 KB · Views: 23

Overlanding 4WD

New member
Test run Spain….. 100Km over 150km’s on gravel, sand, mud, water, ice, and lose rock, up a dry river.

Vehicle performed without any issues, some small plastic trim damage on the front spoiler, caused by ice breaking through a stream.

Places visited - Bardenes Reales, Layana to Luna, Teruel and Aguero to Luna.
 

Attachments

  • C5362AEB-876C-4353-A50E-AFC09648A321.jpeg
    C5362AEB-876C-4353-A50E-AFC09648A321.jpeg
    424.1 KB · Views: 28
  • E7C581F2-6088-4684-902B-20E6656E7EEF.jpeg
    E7C581F2-6088-4684-902B-20E6656E7EEF.jpeg
    592.8 KB · Views: 28
  • BF54ACB8-628B-457A-94C7-62D60A1A5D82.jpeg
    BF54ACB8-628B-457A-94C7-62D60A1A5D82.jpeg
    368.5 KB · Views: 24
  • E6484186-DEE4-4E68-B53B-363F35EC7010.jpeg
    E6484186-DEE4-4E68-B53B-363F35EC7010.jpeg
    3.2 MB · Views: 22
  • A558E0FB-D5CC-4B7A-BA1A-AAEE49E36E9F.jpeg
    A558E0FB-D5CC-4B7A-BA1A-AAEE49E36E9F.jpeg
    886.7 KB · Views: 22
  • DD811667-3AB5-4253-A4A8-BA220553728B.jpeg
    DD811667-3AB5-4253-A4A8-BA220553728B.jpeg
    2.8 MB · Views: 24
  • C98A9CF9-EEE9-4536-B466-482683F7CF0B.jpeg
    C98A9CF9-EEE9-4536-B466-482683F7CF0B.jpeg
    3.8 MB · Views: 29
  • AA09F30E-BC58-44F7-9219-F12C80498D41.jpeg
    AA09F30E-BC58-44F7-9219-F12C80498D41.jpeg
    262.7 KB · Views: 24
  • 785C1787-FB81-43A5-8F15-AE0BF75540D0.jpeg
    785C1787-FB81-43A5-8F15-AE0BF75540D0.jpeg
    451.9 KB · Views: 23
  • 9F368A15-9C73-4CA9-BD80-448ED730F8EC.jpeg
    9F368A15-9C73-4CA9-BD80-448ED730F8EC.jpeg
    2.5 MB · Views: 23

Overlanding 4WD

New member
Now I’m back from my Spanish shakedown test, there is a long list of modifications that need to be done before going off again.

First on the list is to fix the noisy Air Suspension compressor in the loadpace, this needs to be done before it fails, and as it seems to be getting louder, now is a good time to switch it out

I seem to have a dropped cell on my house battery, so while everything is out for a new EAS compressor, I’ll sort that out, test it and replace if necessary.

I have ordered a Redarc Redvision system, that will need to be installed on my power distribution board and retire the compressor, fridge, shower pump to the 30 amp circuits, and lights and USB’s to the 10 amp circuits, you can control the Inverter off Redvision, so that needs an RJ12 cable.

I’m exploring running power on to the roof rack, but need to take a closer look at how to run the cables up there.

The plastic trim items broken crossing the ice, are a cheap simple fix

I have ordered a set of ARB Solis Spot lights, flood pattern, I have a genine spot light mounting kit that needs to be fitted to mount the lights

I want to switch out the rear view mirror to an AutoVox Pro V5 until, which basically provides a rear view camera outside the Vehicle for better rear viewing. Simple plugs and play, hopefully. This will then allow me to stack up gear higher in the rear loadspace, and to worry about restricting my view.

I’ve ordered the seat fan / blower motor to finally fix my drivers side seat warmer, and a few lower doors seals on the rear doors both sides, the clips have broken off and need replacing, after power washing the mud off the rear wheel arches.

Lastly, while the black glass rattle can is out, painting the front fog light surrounds, I’m going to paint the gear selector surround. Mine is aluminium, it‘s scratched, so a light rubbing down, primer, a few coats of gloss back, should bring it back to life.

My 67D series’s 55 rail has been excellent over the bumps and rocks, holding my device secure, but running my phone up there, with wikilocs on, does drain down the battery, so I want to explore running USB power up from the fuse box behind the glovebox, and through a heater vent to come out behind the rail. It’s screwed into the dash with self tapping screws and is very secure.

You can get these super long USB cables with magnetic ends you can switch out, iPhone / Apple, USB C etc, which would only require running one USB cable up there and keep things neat. I’m not a fan of cables being draped over the dash, especially in such an pleasing dash / console layout and design as the L322.

All that should keep things busy, and the pending sales of the Defender will see me scavenge things off that, RTT mount, rotopax mount fro example, these will just move straight over to the L322 rack.

Which brings me to the last item, moving my iKamper mini from the Defender, to the L322. Still not sure what side I’m going to have it installed, opening, learning towards the drivers , and having my glind heat exchanger shower / curtain on the passenger side. Again, going to play with where I’ll put it, towards the back, middle or front, or how I will reconfigure where my rotopax and Maxtrax mounts will end up.

More later.

Video of the Navi-plus, 67D rail and roof rack items
 

Attachments

  • 41748CFF-BE67-4422-AA4E-55681A988F91.jpeg
    41748CFF-BE67-4422-AA4E-55681A988F91.jpeg
    3.6 MB · Views: 22
  • 2CDCE48D-EC32-40A4-B53E-A3602EA8A690.jpeg
    2CDCE48D-EC32-40A4-B53E-A3602EA8A690.jpeg
    492.7 KB · Views: 22
  • CA33DA83-BAFA-4AA0-8D60-A5120750BC7C.jpeg
    CA33DA83-BAFA-4AA0-8D60-A5120750BC7C.jpeg
    583.3 KB · Views: 21
Last edited:

Forum statistics

Threads
188,463
Messages
2,905,341
Members
230,428
Latest member
jacob_lashell
Top