Bryota
New member
I had been running a ScanGauge II (SGII) in my Taco for some time now but I didn't care for the look of the black plastic fastened to the top of the steering column with Velcro™. I had some free time recently so I decided to play around with it a bit.
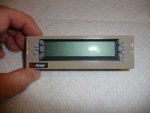
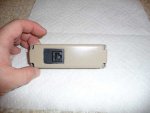
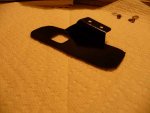
First, I wanted to paint the SGII a color that was more consistent with the interior of my truck. I was fortunate enough to have some spray paint left over from another project that is about as close to the trim color that I believe I can get. (For those of you that are interested, the color is Valspar Brand “Urban Tan” # 65042) I masked off the functional areas and plugged the two RJ45 ports with foam. The humidity was high so the result is not as good as I would have hoped, but it will do.
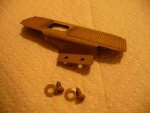
After several mounting location trials I found that my preferred location for viewing was near the plastic map light bezel just above the rear view mirror, but this location presented a few challenges. 1) The OBD-to-RJ45 data cable that is supplied with the unit is too short. 2) I had to come up with a mounting solution that would support the unit and angle it slightly toward me while not blocking rearward visibility through the mirror. And, 3) I did not want to completely lose the effectiveness of the driver and passenger map lights.
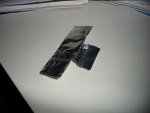
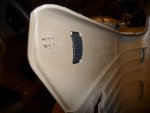
In order to prototype a mounting bracket I folded up a piece of aluminum foil into a configuration pliable enough to manipulate as needed.
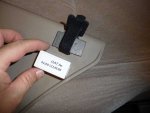
I had called Linear Logic to inquire about a longer data cable. I was told that they have the cable manufactured for them at a standard length and that longer cables were not available. I resorted to a 7-foot Cat5e Ethernet cable and a Cat5e coupler.
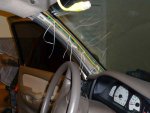
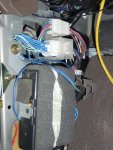
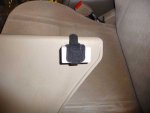
I routed the cable behind the headliner, down the “A” pillar and through the tight squeeze between the dash and doorframe. I mounted the coupler to the top of driver’s side kick panel by cutting two small slots in the panel and using a Velcro strap with a small piece of foam rubber to tighten the fit.
The rest of the pictures sum up the installation. So far all is working quite well.
First, I wanted to paint the SGII a color that was more consistent with the interior of my truck. I was fortunate enough to have some spray paint left over from another project that is about as close to the trim color that I believe I can get. (For those of you that are interested, the color is Valspar Brand “Urban Tan” # 65042) I masked off the functional areas and plugged the two RJ45 ports with foam. The humidity was high so the result is not as good as I would have hoped, but it will do.
After several mounting location trials I found that my preferred location for viewing was near the plastic map light bezel just above the rear view mirror, but this location presented a few challenges. 1) The OBD-to-RJ45 data cable that is supplied with the unit is too short. 2) I had to come up with a mounting solution that would support the unit and angle it slightly toward me while not blocking rearward visibility through the mirror. And, 3) I did not want to completely lose the effectiveness of the driver and passenger map lights.
In order to prototype a mounting bracket I folded up a piece of aluminum foil into a configuration pliable enough to manipulate as needed.
I had called Linear Logic to inquire about a longer data cable. I was told that they have the cable manufactured for them at a standard length and that longer cables were not available. I resorted to a 7-foot Cat5e Ethernet cable and a Cat5e coupler.
I routed the cable behind the headliner, down the “A” pillar and through the tight squeeze between the dash and doorframe. I mounted the coupler to the top of driver’s side kick panel by cutting two small slots in the panel and using a Velcro strap with a small piece of foam rubber to tighten the fit.
The rest of the pictures sum up the installation. So far all is working quite well.
Attachments
-
 SGII-Frnt.jpg19.2 KB · Views: 44
 -
 SGII-Rr.jpg18.2 KB · Views: 32
 -
 Foil.jpg13.1 KB · Views: 26
 -
 Bracket-Painted.jpg19.7 KB · Views: 29
 -
 Bracket-Back.jpg18.6 KB · Views: 21
 -
 Cat5e-Upper.jpg24.6 KB · Views: 34
 -
 Cat5e-Lower.jpg42.6 KB · Views: 34
 -
 Coupler.jpg21.3 KB · Views: 45
 -
 Coupler-Mount1.jpg13.6 KB · Views: 30
 -
 Coupler-Mount2.jpg14.7 KB · Views: 35