JeepExpeditions.org
Observer
A few weeks ago we started work on a home built off-road trailer that in it's basic form can be built in a weekend in your backyard, driveway or garage.
The biggest thing we've found keeping many "weekend off-road warriors" from investing in a trailer was cost.
The goal was to build a trailer that would get the job done for the moderate off-road adventure and do that for under $2500. Well optioned out including roof top tent we think the price would still wind up under $5000 or about half or less of what a comparable commercially available trailer would cost.
With a total of 9 total hours of work time into the trailer, it is almost complete. Here is the story of the build over several postings:
THE JEEP EXPEDITIONS HOME BUILT TRAILER
The affordable alternative to expensive off-road trailers
You've seen them in magazines, you've seen them on the trails. Custom Off-Road Trailers. You check them out and then the sticker shock set in, the entry level bare bones no frills trailer starts right around $5000. The one you saw on the trail probably set the owner back $8000 to $16,000 with the average price landing somewhere in the $10,000 to $12,000 range for nicely optioned trailer.
So much for that dream, right? Wrong, we think that we have figured out how anyone can own a basic, but very nice off-road trailer for under $2500. Add some popular options as you get the time and money and you'll end up with a full featured rig for less than half the cost of a commercially built trailer.
It starts with an idea, you put that idea on paper and you take it from there. The "box" part of the trailer will be bought as you see it. Already built in a shop that specializes in quality custom aluminum trailer boxes. You've spent half your budget and the project is half done before you've broken a sweat.
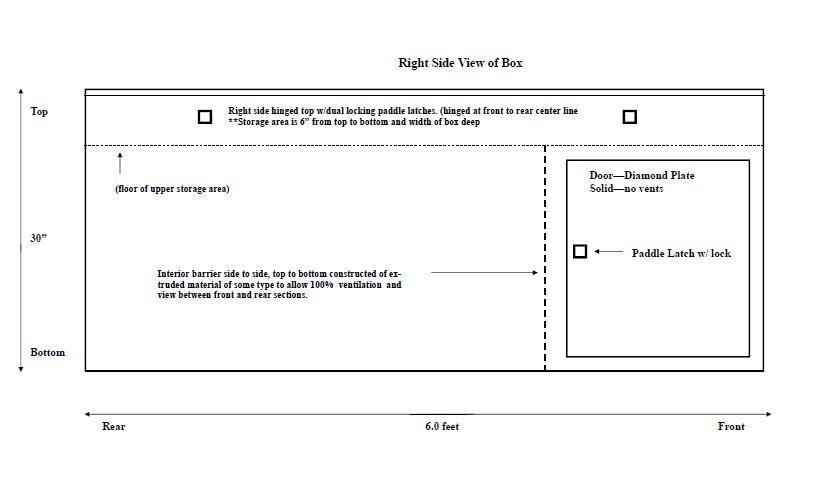
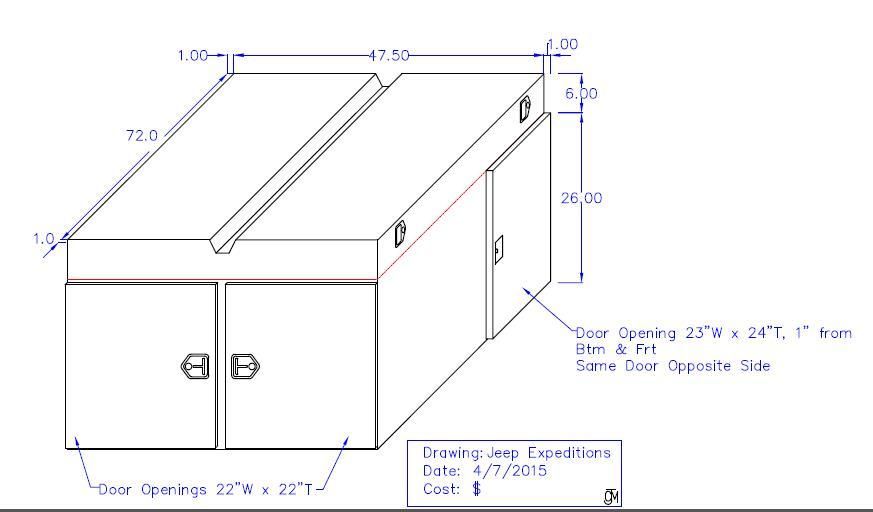
Ok, so here are our final drawings along with the blueprint from the manufacturer of the box.
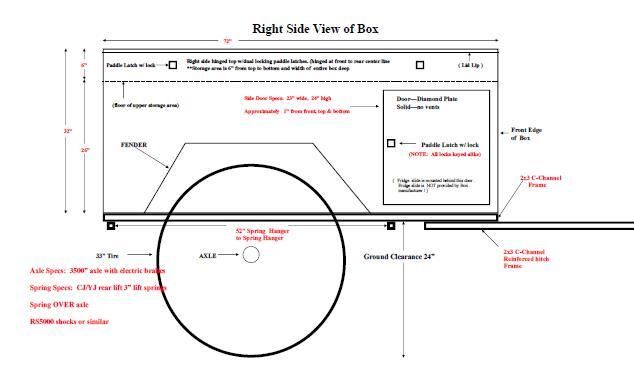
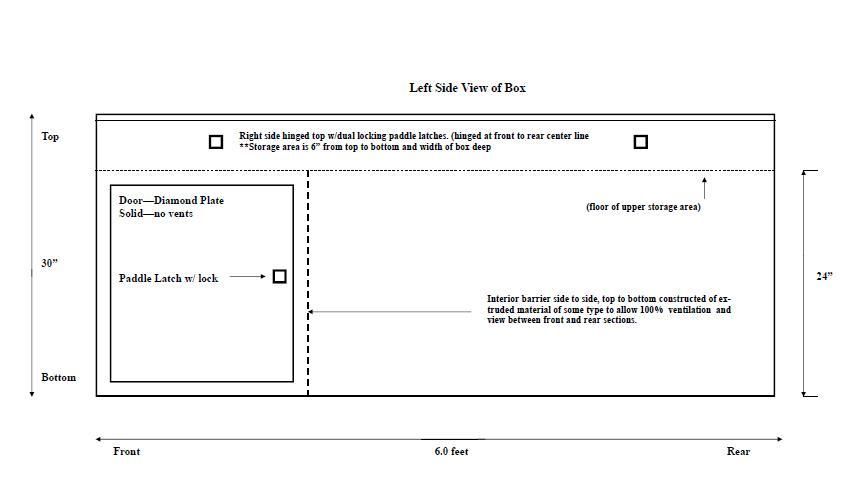
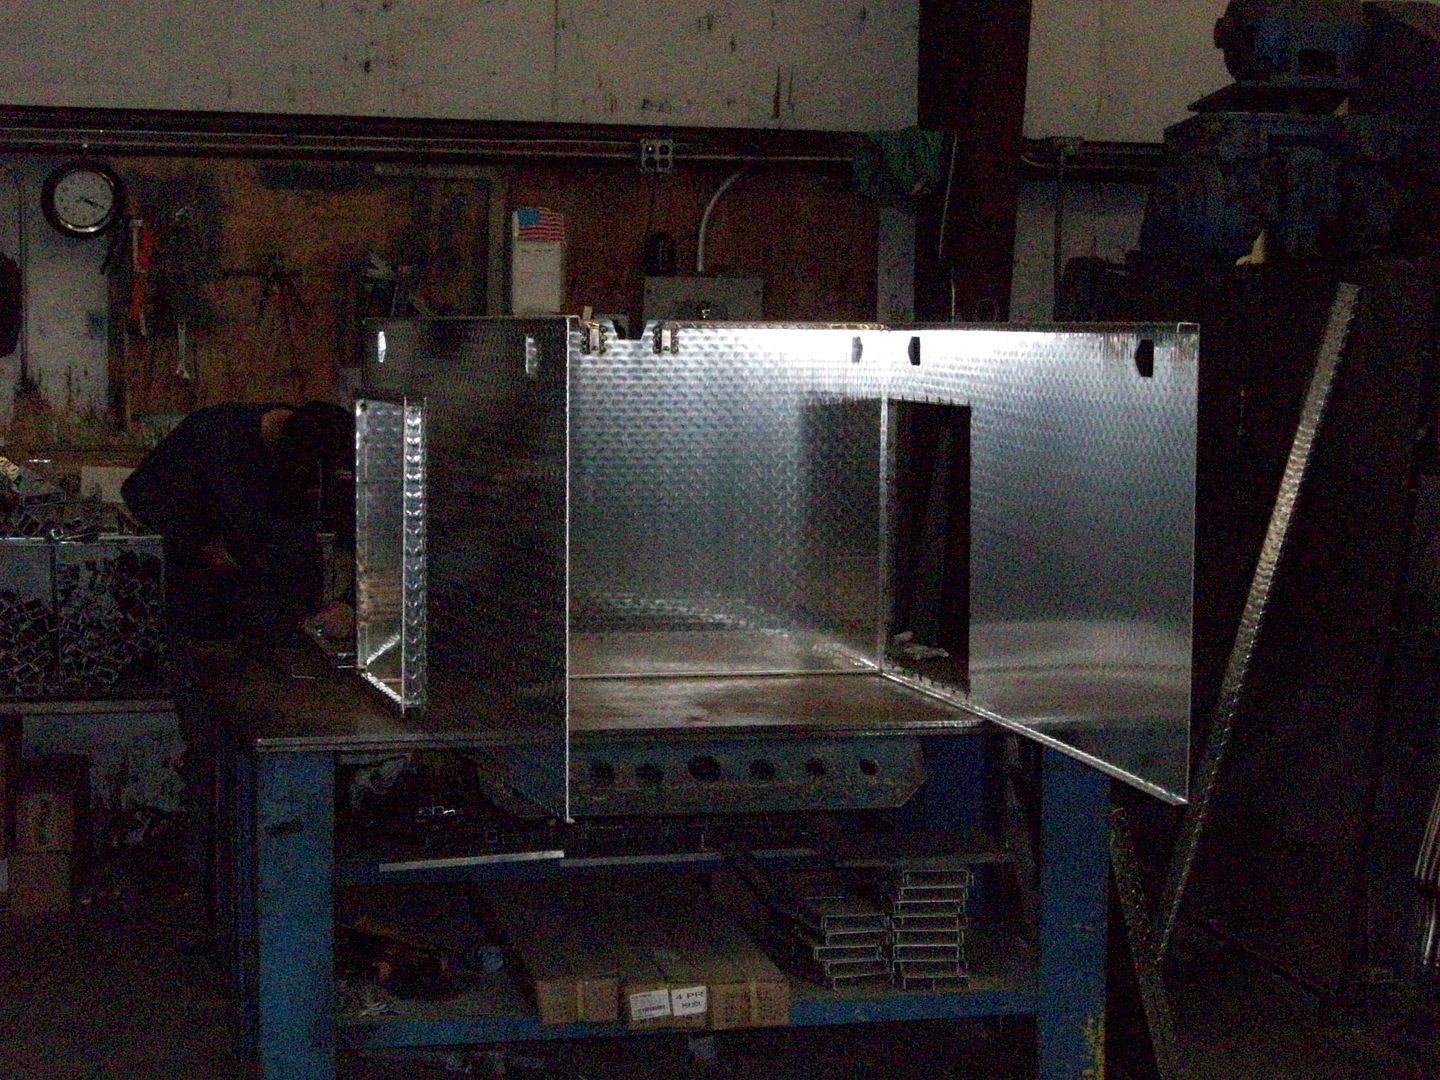
The door on both sides up in the front is for our Tembo Tusk jumbo fridge slide. The fridge will slide out on the right side, the left side door will be to access batteries/electronics.
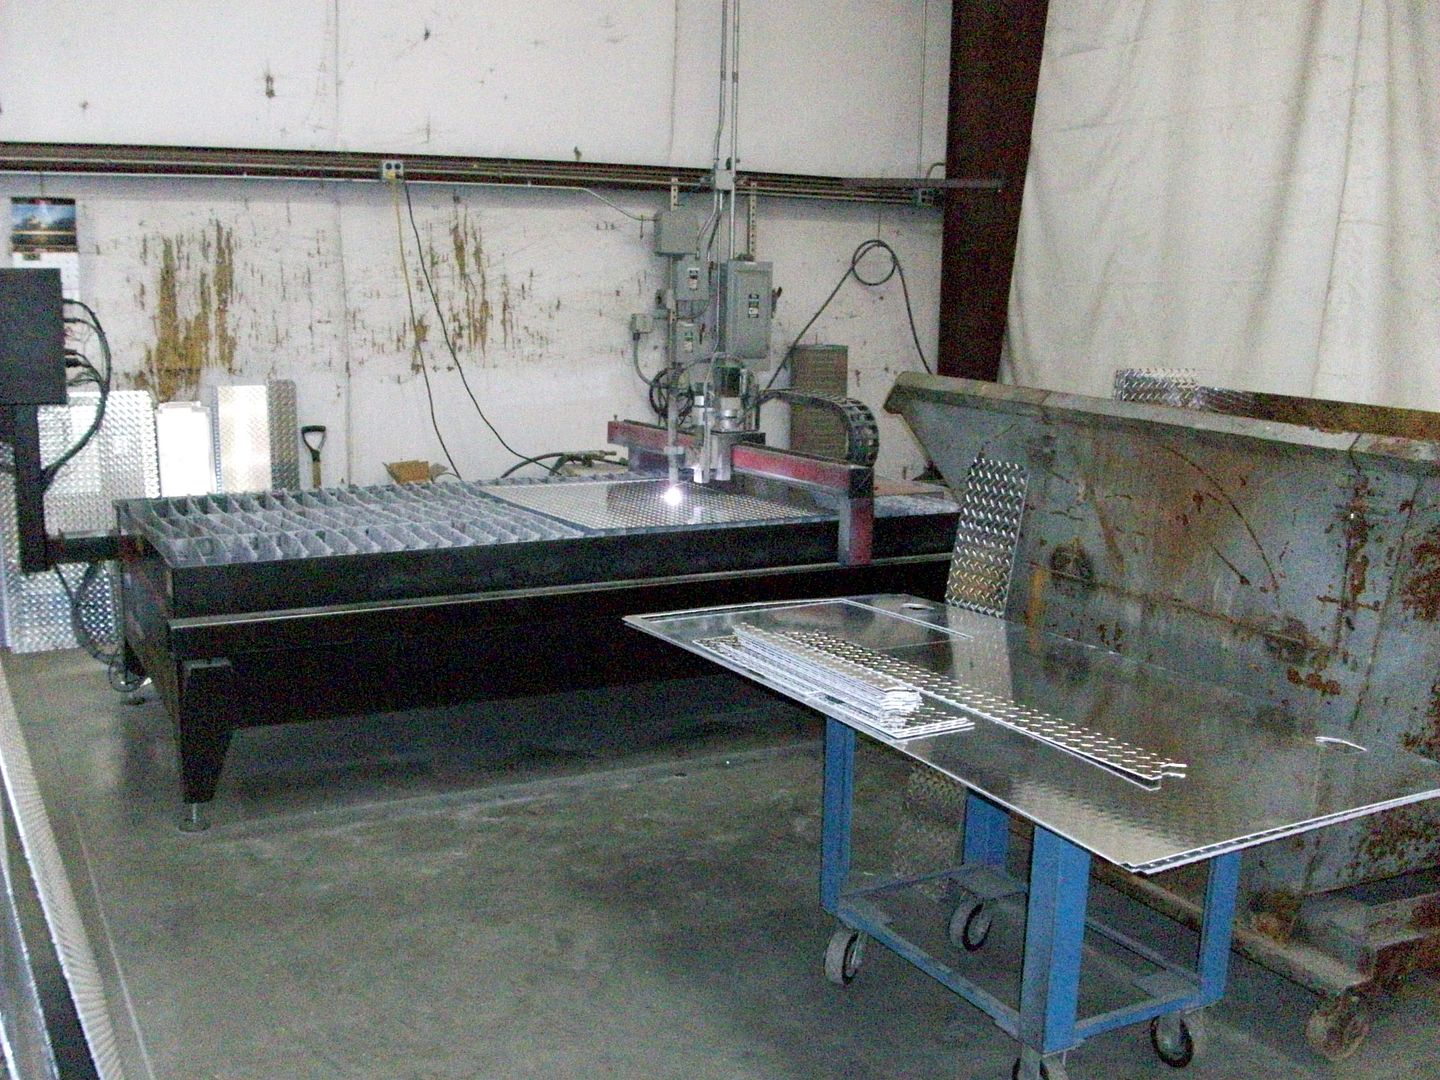
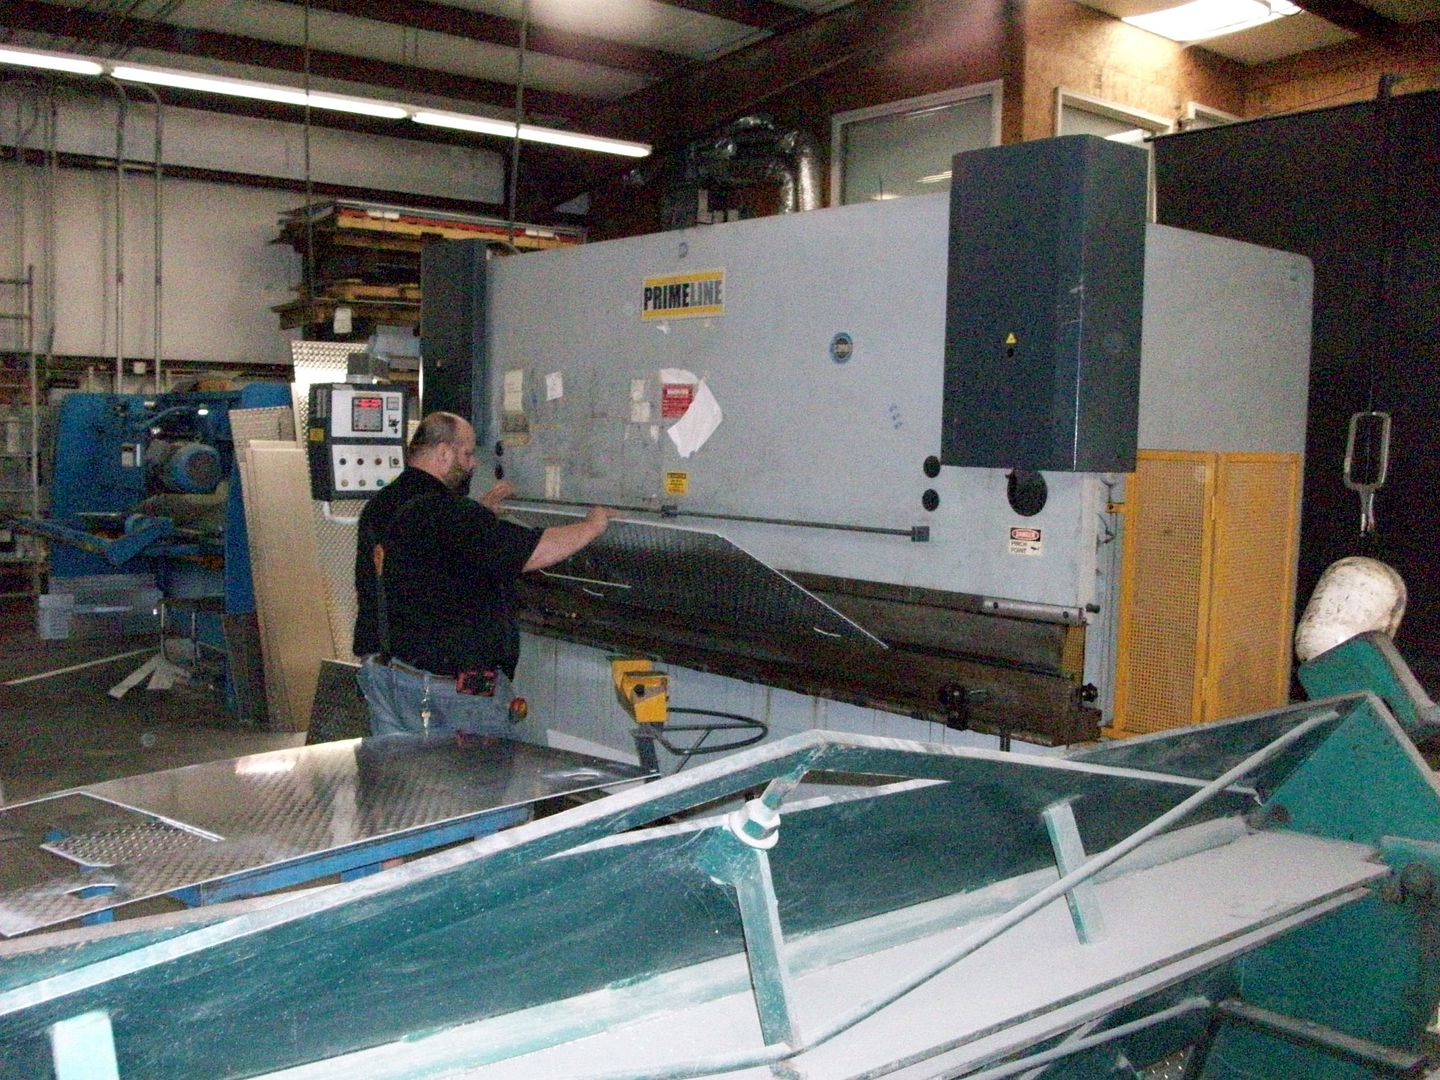
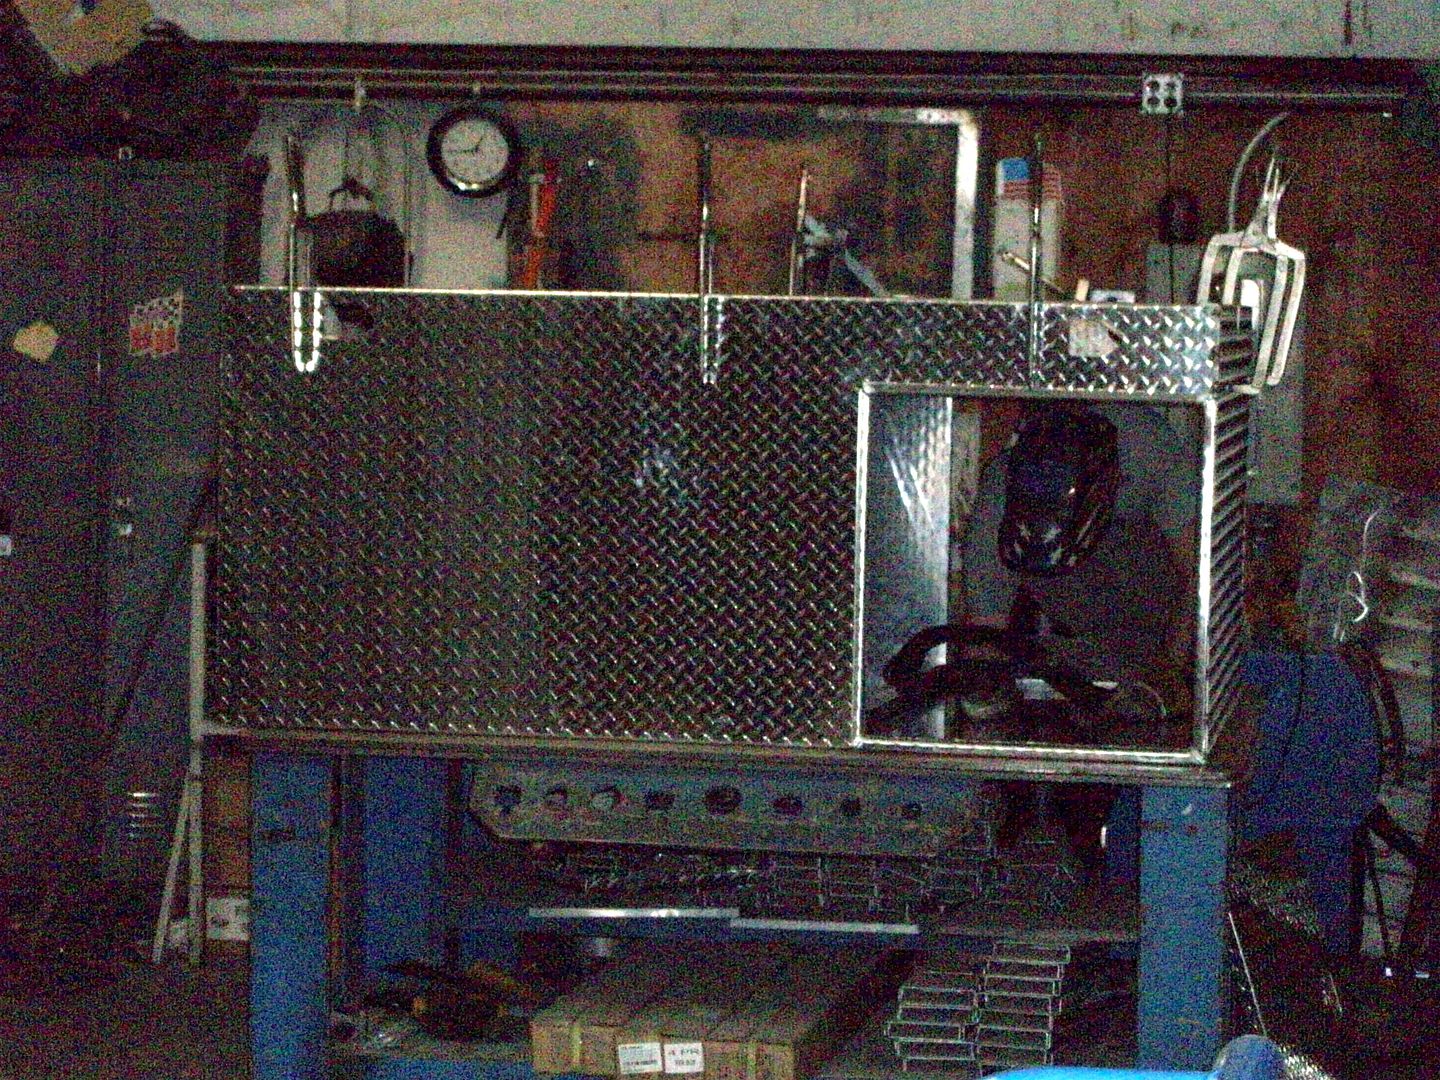
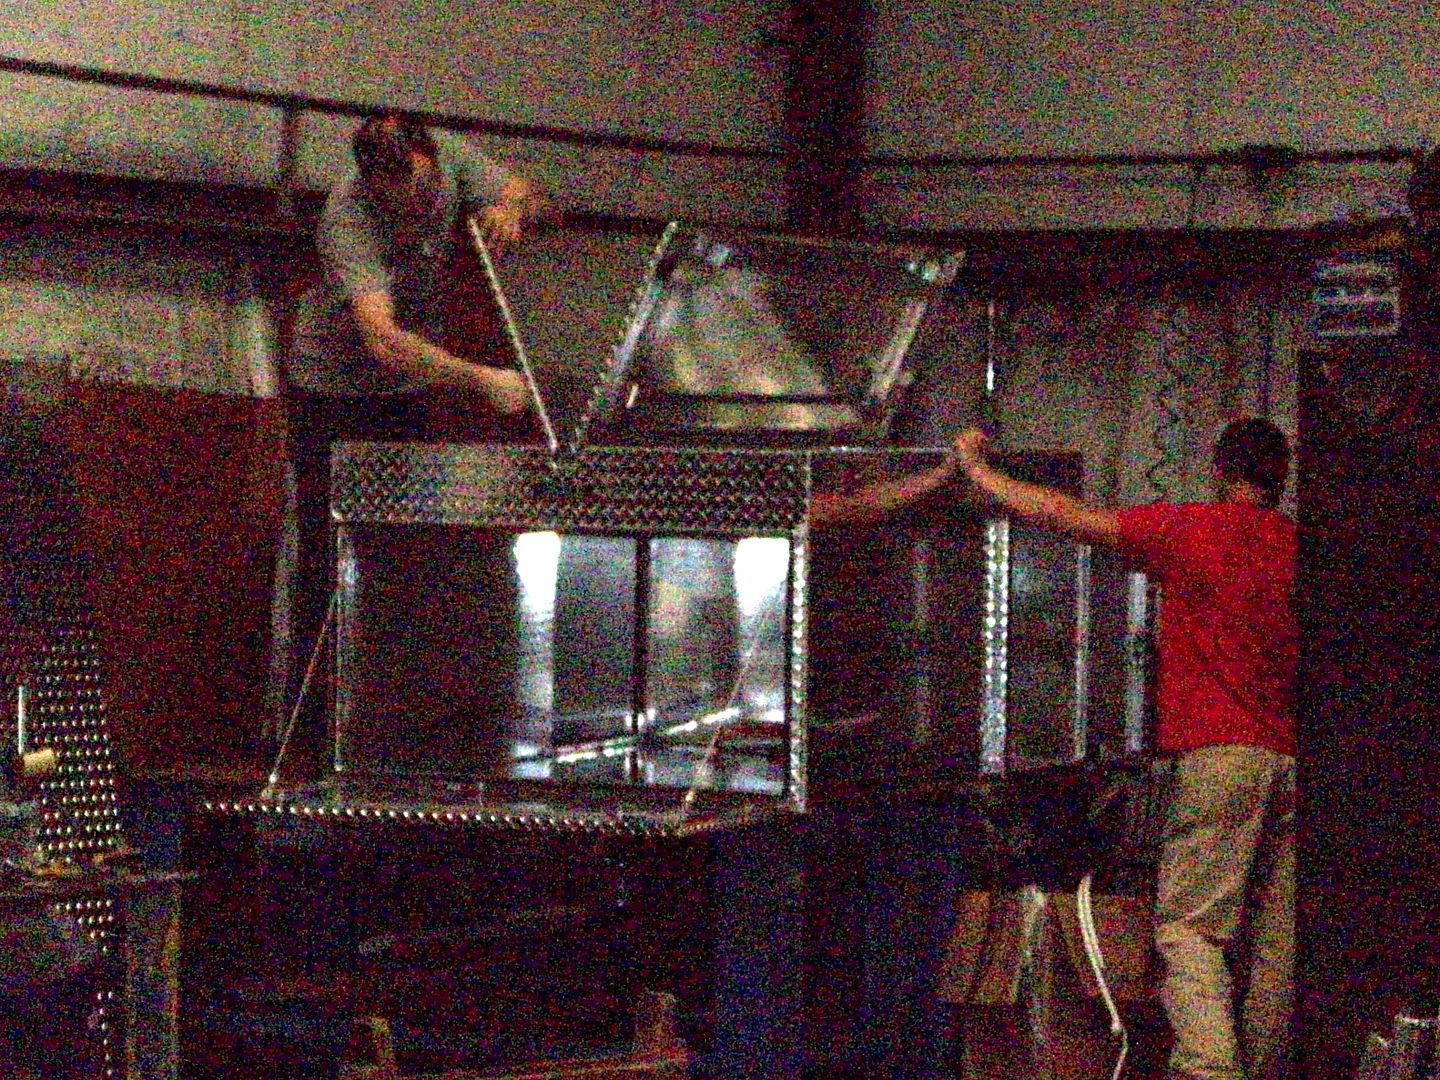
To give you an idea how the top left and right side lids will open, here are a few pictures of that set up on a different box and our actual box under construction in the factory. As you might have noticed we made a last minute change to the plans for the rear doors, we made them one big one acting as a tailgate. This will make loading and unloading much easier than the two smaller doors originally planned for the back.
Now all you need is a frame to put the box on.
STAGE #1 - The Trailer Frame
Option #1 - Pre-cut Trailer Kit
There are a few thoughts on how to go about a frame. The first one is what a number of Jeepers have already tried with success is a pre-fab kit available from a number of sources online. It has a 1980 lb GVWR and a 2000 lb axle making it just about right for our project.

Because of the load capacity, price and simplicity of a pre-cut, bolt together kit, we've decided on this to be the back bone of our trailer project. The kit can be assembled and completed in a day or two at the most. We already know that the suspension of the trailer kit, while rated for 2000 lbs for pavement use, will not make the grade for moderate off-roading. The axle should be OK as long as you aren't doing anything extreme with it. For the short term, we are going to keep the 2000# axle and see how it works. The long term plan will be to replace it with a 3500# axle with electric brakes.
Because we cannot find an acceptable kit for our 4x6 size trailer we need to cut two feet off each of the frame rails to make our 4x8 trailer the perfect 4x6 size for off-roading. This can be done easily with a hack saw, reciprocating saw or a cut off wheel. You're basically eliminating the front cross member and an approximate shortening of each of the side rails. The extra cross member that will be left over we'll use to further beef up the trailer.
Once our frame rails are cut we are ready to assemble the trailer frame. Once the basic frame and tongue components are bolted together we make our first modification to beef up our build. We will run the equivilent of a 2" receiver tube from the front of the tongue to the rear of the trailer. This can be bolted to all the cross members with 7/16" inch grade 8 bolts or you could use similar strength rectangular u-bolts. This will allow us to use a detachable front coupler to hinder theft and to allow receiver mounted accessories like a "Bumper Dumper" or a bike rack on the rear.
Next we will beef up the frame with angle iron from spring mount to spring mount. The original kit used angle iron to beef up the frame with their springs, we are going a step further. The length of the angle iron depends on the length of your springs our CJ7 springs are about 46" long so we are going to use a 48" piece of angle iron on each side. Once the angle iron is bolted on, it is time to attach your springs. We are using 6 leaf CJ7 rear springs that we ordered from Omix-ADA. We also ordered the spring install kit from them which includes shackles, mounts, bushings and bolts. I guess we could have gone out to a junk yard and picked up some 40 year old springs but how would they hold up? We still would need all the brackets and bushings so it just makes sense to buy new and Omix-ADA had everything we needed in stock and it all has a 5 year guarantee.
With the springs installed we turn to the axle, bolt it up to the springs and turn the traler right side up to install some wheels. We are going with 17" wheels and tires to match the ones on our tow rig. While this is not necessary, about half the guys I know with off-road trailers match their wheels and tires. In any case you need to sell the wheels and tires that came with the kit and use a minimum of 15" wheels with 31" tires for off-road use. You can move the kit fenders higher and mount on the sides of the box to accomodate the larger tires or get new larger diamond plate fenders at most any trailer supply house.
On the 6th day you go to DMV to get it titled.
The whole idea behind this project was to build an affordable trailer that would give you good long term service for moderate off-roading. Since most if not all of the trips and trails that Jeep Expeditions plans are stock Wrangler friendly, this trailer build will be perfect for our guys from Mohave to Moab, Canyon De Chelly to Death Valley and everywhere in between. Keep in mind that this trailer can be built in your driveway in just a few days with tools you already have. No welding is necessary or needed. But if you want to really stiffen things up, a few strategic weld beads will make things really solid. Remember when you bolt the box to the frame you are essentially going to make the box a part of the frame which will stiffen it all the more.
Using a kit is the perfect option for the driveway mechanic who doesn't have or want to spend $5000 on a trailer.
Option #2 - Build Your Own Frame
-OR- You can build your own frame? This will be the preferred method for those who have the skills or resources to weld up their own trailer. It certainly will be a much stronger trailer than a kit trailer and will stand up to more abuse off-road. If you have welding skills or know someone that does this could be your best bet using 2x3 C-channel steel for the frame and cross members with 2x3 boxed steel for the tongue. You can then choose your spring and axle set up but again, our suggestion would be to use a 3500 lb axle with electric brakes if you go this route since you will have to buy an axle anyway. We'll even make it easier for you by posting up what we feel is the shopping list for the steel you will need to do it this way. The cost of the kit and the cost for steel are about the same so what you do is up to you.
You'll still need an axle, tires, wheels and suspension. The same that you would use on the kit trailer. We'll recommend certain parts, give you accurate parts lists and provide you with sources where you can get these materials.
The Next Step
The trailer build will start here with build postings starting around the end of April. We will be adding some options to our trailer like a water tank mounted between the frame rails. I am hoping to be able to find a tank in a size to make this happen. The ideal tank would hold 11 to 20 gallons.
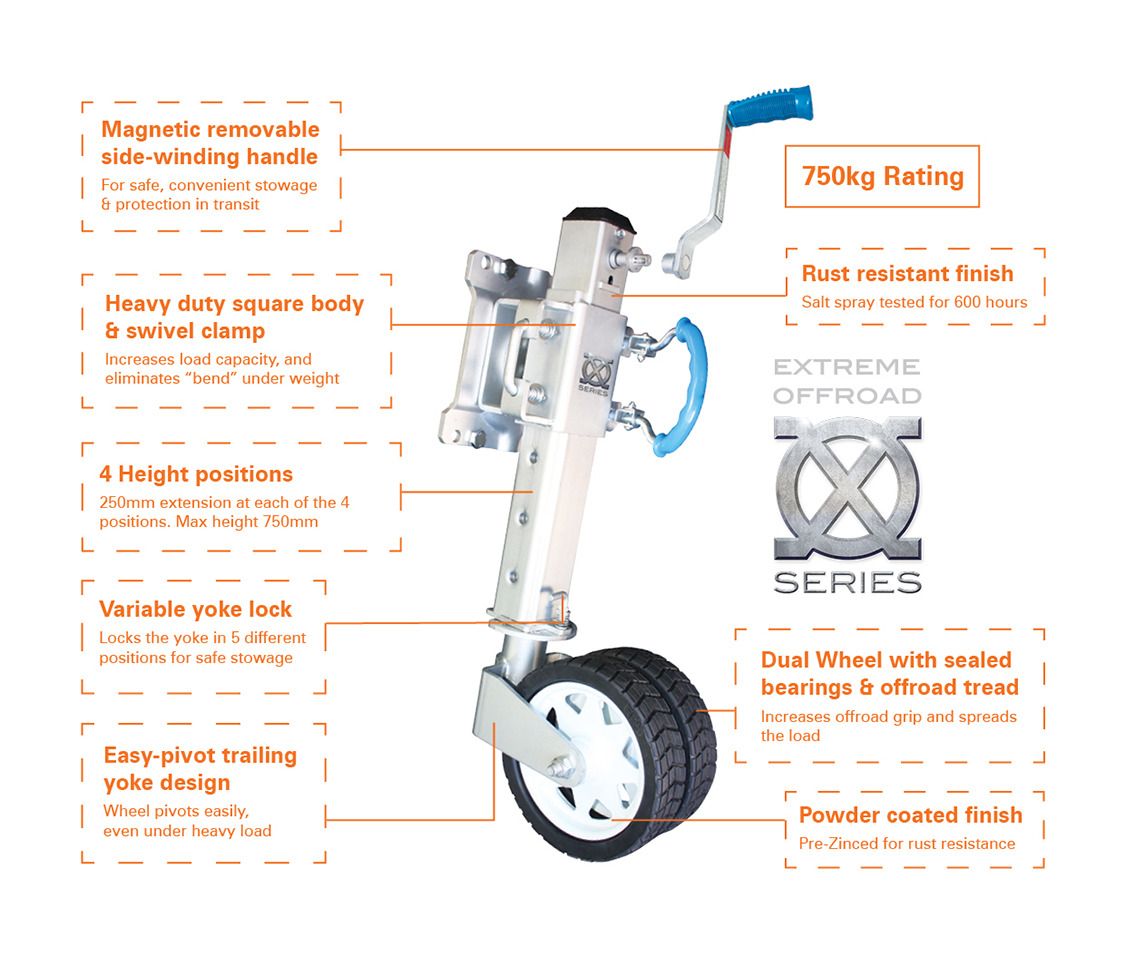
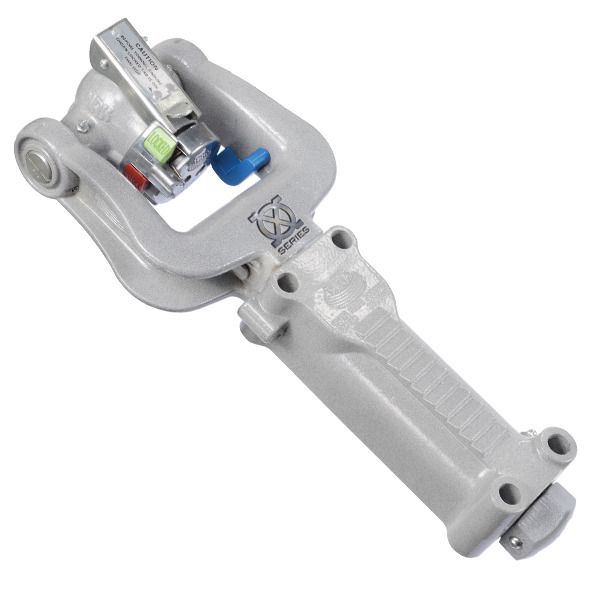
We are going to add a trailer jack made specifically for off-road trailers and a new style articulating coupler, both from ARK Corporation. Their products are well known by Australian off-roaders and are now being imported to the USA. Initial review by Jeep Expeditions convinced us to make these products a part of this project.
Over time we will add more options to give you ideas on how to add roof top tents, rear tire carriers, fold out shelves for cooking prep, tongue accessories such as Jerry can storage, propane bottle mounting and more. Some of these optional additions will be added sooner than later.
Our trailer kit will be started before the end of April, 2015 and the box should arrive about the 4th week of April. We hope to have this completed in order to show it at our booth in Flagstaff at the Overland Expo in May.
The next part is construction of the frame..............................
The biggest thing we've found keeping many "weekend off-road warriors" from investing in a trailer was cost.
The goal was to build a trailer that would get the job done for the moderate off-road adventure and do that for under $2500. Well optioned out including roof top tent we think the price would still wind up under $5000 or about half or less of what a comparable commercially available trailer would cost.
With a total of 9 total hours of work time into the trailer, it is almost complete. Here is the story of the build over several postings:
THE JEEP EXPEDITIONS HOME BUILT TRAILER
The affordable alternative to expensive off-road trailers
You've seen them in magazines, you've seen them on the trails. Custom Off-Road Trailers. You check them out and then the sticker shock set in, the entry level bare bones no frills trailer starts right around $5000. The one you saw on the trail probably set the owner back $8000 to $16,000 with the average price landing somewhere in the $10,000 to $12,000 range for nicely optioned trailer.
So much for that dream, right? Wrong, we think that we have figured out how anyone can own a basic, but very nice off-road trailer for under $2500. Add some popular options as you get the time and money and you'll end up with a full featured rig for less than half the cost of a commercially built trailer.
It starts with an idea, you put that idea on paper and you take it from there. The "box" part of the trailer will be bought as you see it. Already built in a shop that specializes in quality custom aluminum trailer boxes. You've spent half your budget and the project is half done before you've broken a sweat.
Ok, so here are our final drawings along with the blueprint from the manufacturer of the box.


The door on both sides up in the front is for our Tembo Tusk jumbo fridge slide. The fridge will slide out on the right side, the left side door will be to access batteries/electronics.
To give you an idea how the top left and right side lids will open, here are a few pictures of that set up on a different box and our actual box under construction in the factory. As you might have noticed we made a last minute change to the plans for the rear doors, we made them one big one acting as a tailgate. This will make loading and unloading much easier than the two smaller doors originally planned for the back.


Now all you need is a frame to put the box on.
STAGE #1 - The Trailer Frame
Option #1 - Pre-cut Trailer Kit
There are a few thoughts on how to go about a frame. The first one is what a number of Jeepers have already tried with success is a pre-fab kit available from a number of sources online. It has a 1980 lb GVWR and a 2000 lb axle making it just about right for our project.

Because of the load capacity, price and simplicity of a pre-cut, bolt together kit, we've decided on this to be the back bone of our trailer project. The kit can be assembled and completed in a day or two at the most. We already know that the suspension of the trailer kit, while rated for 2000 lbs for pavement use, will not make the grade for moderate off-roading. The axle should be OK as long as you aren't doing anything extreme with it. For the short term, we are going to keep the 2000# axle and see how it works. The long term plan will be to replace it with a 3500# axle with electric brakes.
Because we cannot find an acceptable kit for our 4x6 size trailer we need to cut two feet off each of the frame rails to make our 4x8 trailer the perfect 4x6 size for off-roading. This can be done easily with a hack saw, reciprocating saw or a cut off wheel. You're basically eliminating the front cross member and an approximate shortening of each of the side rails. The extra cross member that will be left over we'll use to further beef up the trailer.
Once our frame rails are cut we are ready to assemble the trailer frame. Once the basic frame and tongue components are bolted together we make our first modification to beef up our build. We will run the equivilent of a 2" receiver tube from the front of the tongue to the rear of the trailer. This can be bolted to all the cross members with 7/16" inch grade 8 bolts or you could use similar strength rectangular u-bolts. This will allow us to use a detachable front coupler to hinder theft and to allow receiver mounted accessories like a "Bumper Dumper" or a bike rack on the rear.
Next we will beef up the frame with angle iron from spring mount to spring mount. The original kit used angle iron to beef up the frame with their springs, we are going a step further. The length of the angle iron depends on the length of your springs our CJ7 springs are about 46" long so we are going to use a 48" piece of angle iron on each side. Once the angle iron is bolted on, it is time to attach your springs. We are using 6 leaf CJ7 rear springs that we ordered from Omix-ADA. We also ordered the spring install kit from them which includes shackles, mounts, bushings and bolts. I guess we could have gone out to a junk yard and picked up some 40 year old springs but how would they hold up? We still would need all the brackets and bushings so it just makes sense to buy new and Omix-ADA had everything we needed in stock and it all has a 5 year guarantee.
With the springs installed we turn to the axle, bolt it up to the springs and turn the traler right side up to install some wheels. We are going with 17" wheels and tires to match the ones on our tow rig. While this is not necessary, about half the guys I know with off-road trailers match their wheels and tires. In any case you need to sell the wheels and tires that came with the kit and use a minimum of 15" wheels with 31" tires for off-road use. You can move the kit fenders higher and mount on the sides of the box to accomodate the larger tires or get new larger diamond plate fenders at most any trailer supply house.
On the 6th day you go to DMV to get it titled.
The whole idea behind this project was to build an affordable trailer that would give you good long term service for moderate off-roading. Since most if not all of the trips and trails that Jeep Expeditions plans are stock Wrangler friendly, this trailer build will be perfect for our guys from Mohave to Moab, Canyon De Chelly to Death Valley and everywhere in between. Keep in mind that this trailer can be built in your driveway in just a few days with tools you already have. No welding is necessary or needed. But if you want to really stiffen things up, a few strategic weld beads will make things really solid. Remember when you bolt the box to the frame you are essentially going to make the box a part of the frame which will stiffen it all the more.
Using a kit is the perfect option for the driveway mechanic who doesn't have or want to spend $5000 on a trailer.
Option #2 - Build Your Own Frame
-OR- You can build your own frame? This will be the preferred method for those who have the skills or resources to weld up their own trailer. It certainly will be a much stronger trailer than a kit trailer and will stand up to more abuse off-road. If you have welding skills or know someone that does this could be your best bet using 2x3 C-channel steel for the frame and cross members with 2x3 boxed steel for the tongue. You can then choose your spring and axle set up but again, our suggestion would be to use a 3500 lb axle with electric brakes if you go this route since you will have to buy an axle anyway. We'll even make it easier for you by posting up what we feel is the shopping list for the steel you will need to do it this way. The cost of the kit and the cost for steel are about the same so what you do is up to you.
You'll still need an axle, tires, wheels and suspension. The same that you would use on the kit trailer. We'll recommend certain parts, give you accurate parts lists and provide you with sources where you can get these materials.
The Next Step
The trailer build will start here with build postings starting around the end of April. We will be adding some options to our trailer like a water tank mounted between the frame rails. I am hoping to be able to find a tank in a size to make this happen. The ideal tank would hold 11 to 20 gallons.
We are going to add a trailer jack made specifically for off-road trailers and a new style articulating coupler, both from ARK Corporation. Their products are well known by Australian off-roaders and are now being imported to the USA. Initial review by Jeep Expeditions convinced us to make these products a part of this project.


Over time we will add more options to give you ideas on how to add roof top tents, rear tire carriers, fold out shelves for cooking prep, tongue accessories such as Jerry can storage, propane bottle mounting and more. Some of these optional additions will be added sooner than later.
Our trailer kit will be started before the end of April, 2015 and the box should arrive about the 4th week of April. We hope to have this completed in order to show it at our booth in Flagstaff at the Overland Expo in May.
The next part is construction of the frame..............................
Last edited:


")


