KevinMLee
Wannabe
Yes I know the title is a bit geeky, but I'm in a geeky kind of mood. Let me get straight to the point. I searched ALL over the web, and almost no where is there any photos of a snorkel install preparation. Meaning, all the threads and instructions show how to install the snorkel, but nothing about removing the factory intake manifold.
In this thread, I'm going to share my experience with the beginning and a few things that I did differently. I'm NOT going to cover the install, since there are a million "install" threads out there on the web.
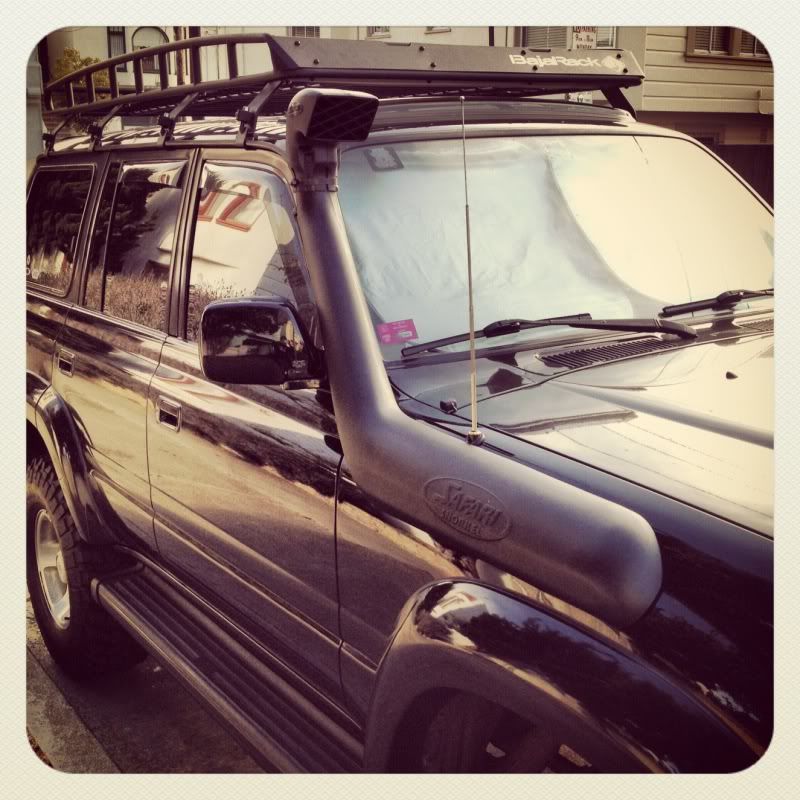
**Clarification, There are two models of Safari Snorkel (SS81HF), the original Aussie style and the remolded USA style. The Aussie style doesn't have the antenna on the right hand side, they don't have an issue with their snorkel hitting it. However, the USA DOES have the antenna on the right side so that posed a problem. So, a lot of installers remedied this with a torch and 1" pipe. However, the new snorkel models have been remolded to sit lower and therefore avoid the antenna completely. THERE IS NO DIVET IN THE NEW VERSION OF THE SNORKEL, IT JUST SITS LOWER.**
The instructions that come with the snorkel just tell you to remove the "Air Cleaner", indicator lights, and not much else. Heres what I did.
We will refer to the photo below as the "First Picture" for easy reference.
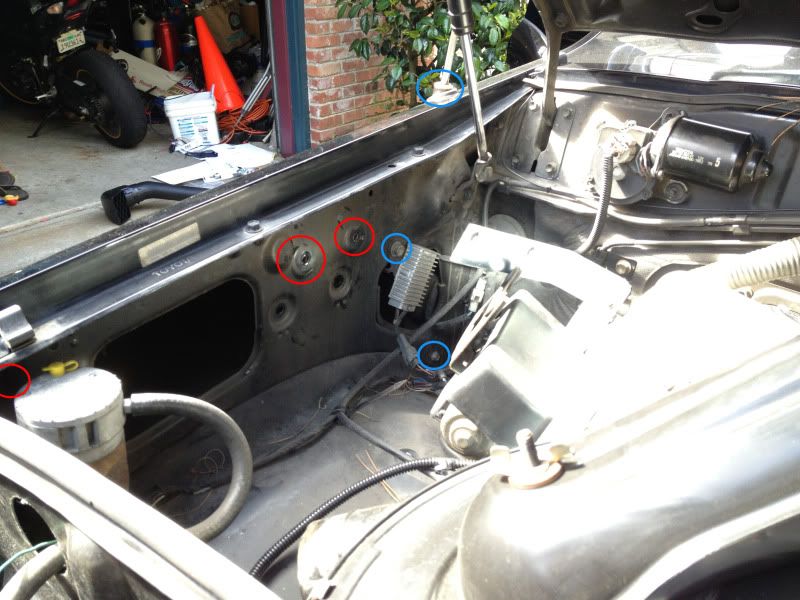
I went ahead and removed practically everything on that side.
-The Air Filter Canister was easily removed with 3 bolts around the base of the canister.
-The Air Hose that connects to the MAP and Throttle body (its the big huge hose that come out of the tope of the Air Filter Canister).
-The Cruise Control module which also has 3 bolts; 2 on the side and 1 on the base that connects to the fender.
-Removal of the stock signal light and side marker/indicator light
-Finally, I went ahead and removed the Antenna with the 3 blue circles in the "First Picture". This made it way too easy to get to the furthest bolts. Without this removed, it's near impossible to get to the last two furthest bolts.
With everything shoved out of the way, It was time to remove the original intake manifold in the panel.
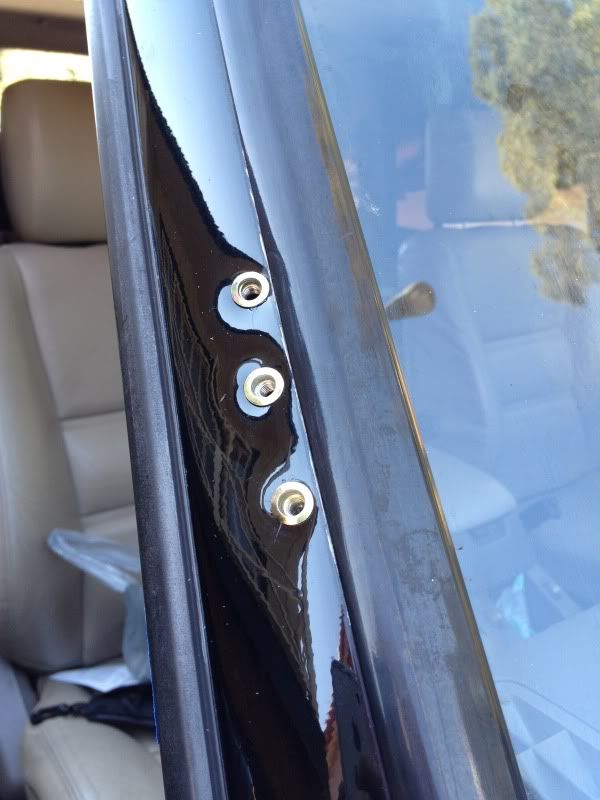
To remove the manifold, it seriously is only 3 screws. You'll need a 10mm something (socket, wrench, etc) to remove. In the "First Photo", the red circles indicate the screw locations. The below 2 photos indicate in red circles where the screw locations are.
Right of the Air Hole
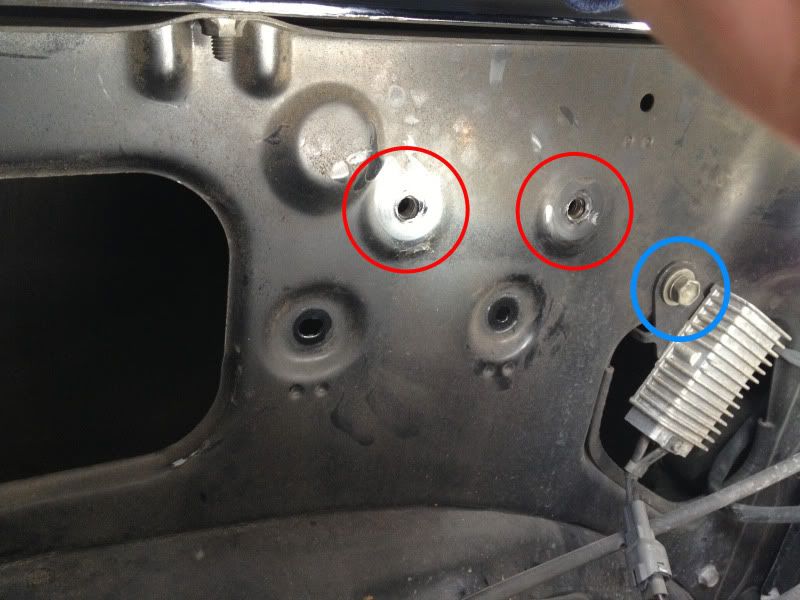
Left of the Air Hole
This photo shows the original intake manifold and it's screw locations. Note the red circles. Also, the intake manifold comes out in two parts and will come out through the Air Hole and NOT the Side Marker hole (it simply will not fit). There isn't a screw holding the two halves together, in fact they just kinda fall apart when the screw nuts are pulled off.
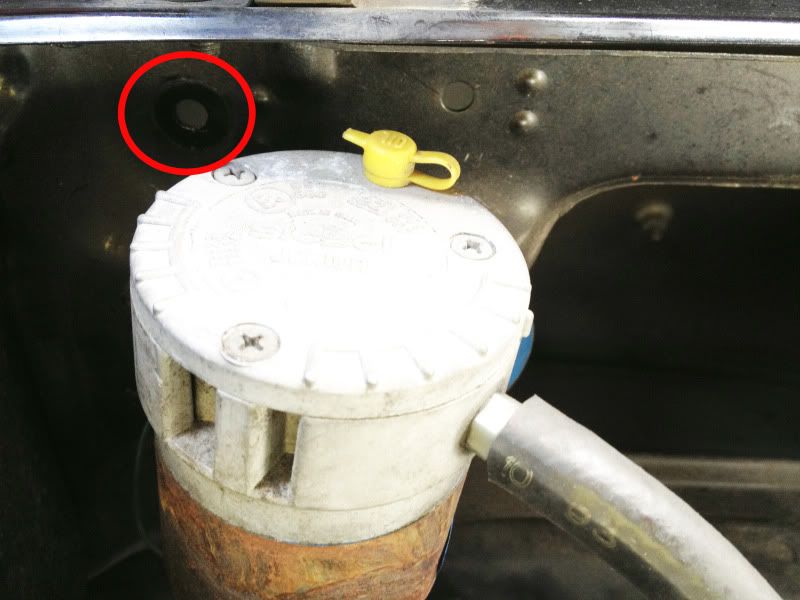
*tip: To get those large washers from falling into the fender abyss, I used 2" masking tape to temporarily hold them in place. I was generous with the tape as that was what I bought the roll for.
Here's something I did a little different. The instructions require that you use these 3 plastic tab anchors on the pillar next to your door. This is to hold the support bracket for the upper half of the snorkel. What I did differently is that I used RiviNuts aka Rivet Nuts, and chucked the plastic tabs away. Not only are these stronger, but they are also way cleaner. Here's what you'll need:
-RiviNut or Rivet Nut Tool (I prefer the plier handle type), doesn't need to be expensive since you'll only use it a few times
-At least 5, #10-32 Rivet Nuts Zinc Steel (or SS if you can find em)
-Stainless Steel 2x 10-32x3/4" Pan Head Screws
-Stainless Steel 1x 10-32x1/2" Pan Head Screws
-Stainless Steel washers and lock washers
-Step-Up Drill Bit, if you haven't already used it for your snorkel install
-242 LocTite or PermaTite
After aligning everything right and making the proper markings, make your holes and rivet it up. Now this snorkel is SOLID... Nothing is going to whip this off the car.
As cool as the RiviNuts are, I can't take all the credit for this idea. I borrowed the idea from George's 4wd site.
http://www.george4wd.taskled.com/snorkel.html
Also, a site that helped me was LCOOL.org's snorkel install here
http://www.lcool.org/trips/lcool_aus_act_SnorkelDay/snorkelinstalla.htm
If you're like me, and want to get the right stuff and the best, I used Breeze SS Constant Torque Clamps CT400L. Not only are these wider (which puts less stress on the rubber), but these will allow for the rubber to expand and contract so the hold stays consistent and not "eat" into the rubber.
http://www.caphardwaresupply.com/in...id=220&zenid=836e2a1b7252d9e8aef272bd5dc113da
And RiviNuts can be found here. NutsandBolts.com are a great bunch of folks.
http://www.nutsandbolts.com/rivets-rivet-nuts-c-249_441.html
Note: The template is almost perfect. You should DEFINITELY trust the template, but do a dry fit and see which screws are NOT going in. Safari Snorkel's instructions allow for bigger holes for more room for error. I would suggest starting small and making only some of the holes larger as needed.
OR
You can start with the big hole (the HUGE Hole saw hole) and use a bit of bright paint on the screw ends to figure out where the screws are hitting. which is an idea.
Personally, I went with the first one. Those washers are HUGE and its solid no matter how big you cut those screw holes.
In this thread, I'm going to share my experience with the beginning and a few things that I did differently. I'm NOT going to cover the install, since there are a million "install" threads out there on the web.
**Clarification, There are two models of Safari Snorkel (SS81HF), the original Aussie style and the remolded USA style. The Aussie style doesn't have the antenna on the right hand side, they don't have an issue with their snorkel hitting it. However, the USA DOES have the antenna on the right side so that posed a problem. So, a lot of installers remedied this with a torch and 1" pipe. However, the new snorkel models have been remolded to sit lower and therefore avoid the antenna completely. THERE IS NO DIVET IN THE NEW VERSION OF THE SNORKEL, IT JUST SITS LOWER.**
The instructions that come with the snorkel just tell you to remove the "Air Cleaner", indicator lights, and not much else. Heres what I did.
We will refer to the photo below as the "First Picture" for easy reference.
I went ahead and removed practically everything on that side.
-The Air Filter Canister was easily removed with 3 bolts around the base of the canister.
-The Air Hose that connects to the MAP and Throttle body (its the big huge hose that come out of the tope of the Air Filter Canister).
-The Cruise Control module which also has 3 bolts; 2 on the side and 1 on the base that connects to the fender.
-Removal of the stock signal light and side marker/indicator light
-Finally, I went ahead and removed the Antenna with the 3 blue circles in the "First Picture". This made it way too easy to get to the furthest bolts. Without this removed, it's near impossible to get to the last two furthest bolts.
With everything shoved out of the way, It was time to remove the original intake manifold in the panel.
To remove the manifold, it seriously is only 3 screws. You'll need a 10mm something (socket, wrench, etc) to remove. In the "First Photo", the red circles indicate the screw locations. The below 2 photos indicate in red circles where the screw locations are.
Right of the Air Hole
Left of the Air Hole
This photo shows the original intake manifold and it's screw locations. Note the red circles. Also, the intake manifold comes out in two parts and will come out through the Air Hole and NOT the Side Marker hole (it simply will not fit). There isn't a screw holding the two halves together, in fact they just kinda fall apart when the screw nuts are pulled off.
*tip: To get those large washers from falling into the fender abyss, I used 2" masking tape to temporarily hold them in place. I was generous with the tape as that was what I bought the roll for.
Here's something I did a little different. The instructions require that you use these 3 plastic tab anchors on the pillar next to your door. This is to hold the support bracket for the upper half of the snorkel. What I did differently is that I used RiviNuts aka Rivet Nuts, and chucked the plastic tabs away. Not only are these stronger, but they are also way cleaner. Here's what you'll need:
-RiviNut or Rivet Nut Tool (I prefer the plier handle type), doesn't need to be expensive since you'll only use it a few times
-At least 5, #10-32 Rivet Nuts Zinc Steel (or SS if you can find em)
-Stainless Steel 2x 10-32x3/4" Pan Head Screws
-Stainless Steel 1x 10-32x1/2" Pan Head Screws
-Stainless Steel washers and lock washers
-Step-Up Drill Bit, if you haven't already used it for your snorkel install
-242 LocTite or PermaTite
After aligning everything right and making the proper markings, make your holes and rivet it up. Now this snorkel is SOLID... Nothing is going to whip this off the car.
As cool as the RiviNuts are, I can't take all the credit for this idea. I borrowed the idea from George's 4wd site.
http://www.george4wd.taskled.com/snorkel.html
Also, a site that helped me was LCOOL.org's snorkel install here
http://www.lcool.org/trips/lcool_aus_act_SnorkelDay/snorkelinstalla.htm
If you're like me, and want to get the right stuff and the best, I used Breeze SS Constant Torque Clamps CT400L. Not only are these wider (which puts less stress on the rubber), but these will allow for the rubber to expand and contract so the hold stays consistent and not "eat" into the rubber.
http://www.caphardwaresupply.com/in...id=220&zenid=836e2a1b7252d9e8aef272bd5dc113da
And RiviNuts can be found here. NutsandBolts.com are a great bunch of folks.
http://www.nutsandbolts.com/rivets-rivet-nuts-c-249_441.html
Note: The template is almost perfect. You should DEFINITELY trust the template, but do a dry fit and see which screws are NOT going in. Safari Snorkel's instructions allow for bigger holes for more room for error. I would suggest starting small and making only some of the holes larger as needed.
OR
You can start with the big hole (the HUGE Hole saw hole) and use a bit of bright paint on the screw ends to figure out where the screws are hitting. which is an idea.
Personally, I went with the first one. Those washers are HUGE and its solid no matter how big you cut those screw holes.