Weekend Home - A Build Thread

Evergreen12

Observer
So I'll try to make the intro short as possible. My wife and I are no strangers to off-roading or camping, we both grew up doing both with our families. Our kids are getting older which is leaving us more time for ourselves and we've been increasingly spending that time combining our two favorite hobbies which led us to Expedition Portal. Well, that's not entirely true, I actually discovered the site because a friend of mine was building a vehicle for a customer which was being documented here. Anyway, I'm glad I found this place as we've been getting lots of good ideas and learning a lot since we discovered the site. We bought a brand new JKU Sahara in 2014 (my wife wanted the Rubicon) and we enjoyed it for two years till it started to become apparent that the places we really wanted to go were outside of it's abilities and we found ourselves really pushing those abilities almost weekly. We decided that the best route was to just trade in the Sahara on the Rubicon that Kellie always wanted anyway. This all brings us to the present. We picked up Kellie's new Rubicon Hard Rock fittingly on her birthday in March.

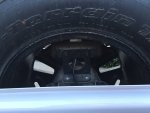
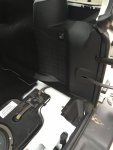
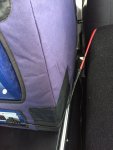
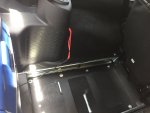
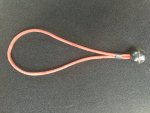
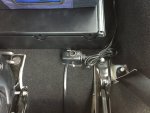
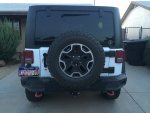
First order of business was to relocate the third brake light as neither of us could stand it obstructing the view through the rear window. I'd made this same mod to the Sahara and felt that not only did I need to do it to the Rubicon as well, but it couldn't wait, so I did it the day we brought it home. It's a little difficult to see the light back in there but I can assure you it's very visible when lit, I should have probably had someone step on the brake.
 

Attachments

  • IMG_2042.jpg
    IMG_2042.jpg
    532.9 KB · Views: 54
  • IMG_2043.jpg
    IMG_2043.jpg
    514.2 KB · Views: 54

Evergreen12

Observer
So we picked up the Jeep on a Saturday and took it home long enough for me to take care of the third brake light and then we were off to see how it did off-road. It was apparent immediately that Kellie was right all along, we should have just bit the bullet and got the Rubicon the first time. Forget about capability, this thing just rides night and day better off-road than the Sahara ever thought to. We jokingly now refer to it as the trail "Cadillac". Now I've done plenty of wheeling, I'm actually building a 65' FJ40 rockcrawler, but this thing is just simply amazing off-road for a stock vehicle.

Suspension, tires, etc. will have to wait till later but we did go ahead and add a Teraflex Budget Boost for now just to get rid of the raked look and add a little bit of clearance. We had the same boost on the Sahara and it had performed great. No pics of the install, but here's a pic of us out on one of our first trips. We live out in the desert and are pretty much surrounded by countless miles of roads and washes to explore quite literally right at the end of our street.
 

Attachments

  • IMG_2004.jpg
    IMG_2004.jpg
    597.3 KB · Views: 42

Evergreen12

Observer
We'd been using Rubbermaid totes for organization for a while and while not optimal we had a good system down for where things go and who did what when setting up and breaking down camp. Our goal is to get to the point where we can pretty much leave spur of the moment and go explore/camp. After a lot of research we decided to go with the Stage 1 drawer and combo slide from Adventure Trailers in Prescott, AZ. This worked out perfect for us as AT is just a little over an hours drive for us. Kellie drove up to Prescott and picked up the goods on her day off. While there she got to meet everyone and she couldn't rave enough about how great their team was to work with. I had set everything up with them over the phone and when she got there they even remembered her name having never met or spoken with her. Good people there! Anyway, once again, I'm terrible about taking pics while installing stuff but here are some both before and after I got the interior panels all trimmed back up and installed. During my research I noticed that it seemed most people leave the trim panels out. I'm not sure if it's because they don't want to take the time to try to get them reinstalled or just assume they won't fit back in there. I can assure you they will without too much trimming actually. I took measurements from the drawer to the edge of the slide, and vice versa. Next up I removed the slide, installed the driver's side trim panel, and then measured off of the drawer to mark where the edge of the combo slide would be on the panel. I trimmed the panels with a peanut grinder and a cutoff wheel, lastly I sanded the edges up to leave a nice clean edge. I won't lie, this process will take some time and your patience will pay off. I simply repeated the process for the passenger side. My OCD is very happy now. Lastly, a sharp eye will notice a black piece under the back of the drawer. I fabricated a support spanning the full width of the drawer from 1-1/2"x1/8" angle iron. I made a template and cut the bottom edge to match the contour of the body exactly. I painted it satin black, finished the bottom edge with a piece of car door edge trim and bolted it to the drawer using blind nuts so as not to interfere with the drawers operation. We love the drawer so much that I think down the road we're going to see about adding another one on top of the stage 1 and eliminating the Action Packer.
 

Attachments

  • Stage 1 & Combo Slide.jpg
    Stage 1 & Combo Slide.jpg
    524.5 KB · Views: 55
  • IMG_2038.jpg
    IMG_2038.jpg
    512.5 KB · Views: 55
  • IMG_2037.jpg
    IMG_2037.jpg
    513.3 KB · Views: 55
  • IMG_2041.jpg
    IMG_2041.jpg
    547.6 KB · Views: 54
  • IMG_2040.jpg
    IMG_2040.jpg
    563.6 KB · Views: 56
  • IMG_2039.jpg
    IMG_2039.jpg
    528 KB · Views: 60

Evergreen12

Observer
Nice work evergreen and welcome to the portal btw.

Thank you for the warm welcome! It occurred to me that I might be able provide some valuable info for someone else doing a similar install. I remember searching for ideas of where to locate the power outlet for the fridge. Here's a pic of where I installed ours. Be careful of what's underneath when you locate it if you elect to go this route. I also thought I'd include some pics of what I came up with for keeping the cord out of the way. The bungy cord is routed through the seatbelt bracket under the plastic cover, I attached the other end to the fridge cord with a zip tie. There is just the very slightest amount of tension on the cord when the fridge is locked back in place, when you slide the fridge out it just keeps the cord out of the way. Works perfectly.
 

Attachments

  • IMG_2048.jpg
    IMG_2048.jpg
    553.2 KB · Views: 31
  • IMG_2050.jpg
    IMG_2050.jpg
    523.7 KB · Views: 29
  • IMG_2049.jpg
    IMG_2049.jpg
    591.5 KB · Views: 27
  • IMG_2047.jpg
    IMG_2047.jpg
    556.8 KB · Views: 28

Evergreen12

Observer
I removed the grill from the sub and left it in place. The drawer has spacers under it at the rear locations where it's bolted down which gives clearance for the sub. The combo slide is probably setting on top of the fins molded into the left side of the sub enclosure.
 

Evergreen12

Observer
The new license plate arrived yesterday so I wasted no time getting it installed, it's the little things right? On a side note, can anyone shed some light on why Jeep can't seem to build the license plate holder with the holes/pegs in the correct locations? I had to trim the ends of the plate and "adjust" the holes to mount it. Had to do the exact same thing on the Sahara we had too. No biggie obviously, just seems funny that installing a license plate should involve power tools.
 

Attachments

  • IMG_2053.jpg
    IMG_2053.jpg
    531.8 KB · Views: 18

Evergreen12

Observer
Well not much to add as far as mods go, I did get the LED light strip installed on the bottom edge of the rear hatch glass. Unfortunately I didn't get any pictures of that but I will. What we did do is get out and enjoy the Jeep for some family camping up in the cooler weather of Crown King for the holiday weekend. Everyone had a great time. We did manage to kill the battery at one point but I'm not entirely sure whether it was the fridge or if I left a light on overnight. Anyway, the dual battery setup has officially moved up on the list of priorities as I'm now constantly concerned about the battery. This was the first trip where we really got to use the kitchen setup in back and it all worked out great. Our main issue currently is water. We just haven't come up with a great solution for carrying a decent amount of water while keeping the back seat open for passengers. I'm currently looking for a tank to fit under the Jeep and not having much luck, it looks like we may have to get it custom made as the only one I'd seen in the correct size is no longer available. Once I get my hands on a tank I'll work on a mounting configuration with a skid-plate. This will be a long project but worth it.
 

Attachments

  • Crown King.jpg
    Crown King.jpg
    474.8 KB · Views: 18
  • Kitchen.jpg
    Kitchen.jpg
    370.2 KB · Views: 24

Comanche Scott

Expedition Leader
Great build going!

Great looking rig!

Dan Grec did a water tank install on his Wrangler, and I am planning something similar, except your and my Wrangler has a resonator in the way.
You can see his setup here:
http://www.expeditionportal.com/forum/threads/143869-Two-year-circumnaviagtion-of-Africa-in-my-2007-JKUR-The-Road-Chose-Me?p=2080212#post2080212
Thinking about having a stainless tank bent up, and I'll do the welding, bracket build.
That won't be for a while. Currently i carry a 5 gallon Front Runner Jerry Can on the rear carrier, and a 6 gallon water container in the Jeep.
The front runner is nice because it has a tap at the bottom. :)
They have a lot of different possibilities, like the 10 gallon tank that goes in front of the rear seats.
http://www.frontrunneroutfitters.com/water-solutions.html
 

Evergreen12

Observer
I'd been kicking around the idea of a tank mounted underneath the Jeep for a while when I came across Dan's write up. I read through the whole thing several times and that was what sold me on moving forward. I was kicking around the idea of a custom stainless tank as well. I like that route as it would allow the installation of some internal baffles to help keep the sloshing and weight transfer to a minimum. Whichever direction you end up going I'll have to follow along. I'm not sure how long it'll be till I get started on that project. In the meantime we've been making due with a combination of some MSR bladders and a six gallon Poly can on the rear floorboard.
 

Comanche Scott

Expedition Leader
I moved the evap canister already, so the space is open and waiting. I just have too many other irons in the fire currently.
Looking forward to following along on your build. :beer:
 

Evergreen12

Observer
Did you fab up your own bracket to relocate the evap or pick up one of the ready-made ones?

I moved the evap canister already, so the space is open and waiting. I just have too many other irons in the fire currently.
Looking forward to following along on your build. :beer:
 

MagicMtnDan

2020 JT Rubicon Launch Edition & 2021 F350 6.7L
Well not much to add as far as mods go, I did get the LED light strip installed on the bottom edge of the rear hatch glass. Unfortunately I didn't get any pictures of that but I will. What we did do is get out and enjoy the Jeep for some family camping up in the cooler weather of Crown King for the holiday weekend. Everyone had a great time. We did manage to kill the battery at one point but I'm not entirely sure whether it was the fridge or if I left a light on overnight. Anyway, the dual battery setup has officially moved up on the list of priorities as I'm now constantly concerned about the battery. This was the first trip where we really got to use the kitchen setup in back and it all worked out great. Our main issue currently is water. We just haven't come up with a great solution for carrying a decent amount of water while keeping the back seat open for passengers. I'm currently looking for a tank to fit under the Jeep and not having much luck, it looks like we may have to get it custom made as the only one I'd seen in the correct size is no longer available. Once I get my hands on a tank I'll work on a mounting configuration with a skid-plate. This will be a long project but worth it.


What size (capacity) tank are you looking at installing under the JKUR? And what are the ideal dimensions of the water tank? I have some ideas on where to get it.
 

Forum statistics

Threads
187,625
Messages
2,895,988
Members
228,596
Latest member
donaldsonmp3
Top