Our "new" Tiger...

HMR

Rendezvous Conspiracy
Tiger interior idea...

It's been a year since we sold our Tiger and we still get asked about it often. I was speaking with a handful of people earlier this month at Overland Expo about the XL model and, as usual, it became clear: we miss our Tiger!

In the meantime, we've been working on a fun project. I'm posting it here because it's Tiger related. Had we kept our Tiger, one of our long term goals was to completely strip the interior down to an empty shell and redo it using a much sturdier yet lighter weight design like many of the custom "overland" campers we've seen from Europe. Problem was, we had no idea how to do it. After much study and tinkering in the garage we worked up enough courage to give it a shot on our new camper. We chose a Sprinter van to use as our chassis.

The original interior:
i-HPcTpSw-M.jpg


Stripped:
i-F6w5tFB-L.jpg


And after a long weekend in the workshop:
i-8452X2w-L.jpg

:sombrero:

Okay, it took a little longer than a weekend but the point is, I think this would make for an awesome Tiger upgrade. The materials used make the cabinets completely squeak free on bumpy roads (the side and rear doors, however, continue to test my engineering skills...) and the strength to weight ratio is an order of magnitude better than the stock Provan setup. (Note- The Provan setup is actually pretty good compared to many of the other manufacturers).

Sink cabinet:
i-2bT3MvP-M.jpg


Fridge cabinet:
i-QWvRsH2-M.jpg


Now I just need to figure out how to shoehorn the Sprinter's amazing motor into an AWD XL... :drool:
 

HMR

Rendezvous Conspiracy
Very nice. Can you give a quick run down on the materials and general construction methods?
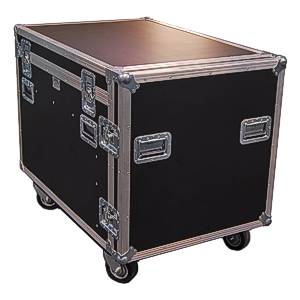
The basic idea: I've been using road cases to haul music equipment around since I was in high school. While studying the European campers, it occurred to me that they're using the same materials. Makes sense since the stuff is nearly indestructible. We basically built multiple road cases and bolted them into the chassis.

Road case:
supertourcase.jpg


The important stuff:
-All wood panels are marine grade plywood.
-All joints are glued AND screwed. We used 3M Marine Adhesive (Europeans use the similar SikaFlex adhesive) on all the major joints. As a result, the surrounding wood will splinter before the joint separates. There is not a single metal "L" bracket anywhere in the camper. Sportsmobile, Provan, FWC, etc. still use "L" brackets to hold the cabinets together. The higher-end campers don't.

Here's an example of "L" brackets in a brand new FWC:
attachment.php


-90% of exposed fasteners are stainless steel (one type of specialty screw we used was unavailable in SS).
-All connections to chassis are either 1/4" stainless steel or Grade 5 hardware.
-All connections to chassis are rubber mounted. There is no metal to metal contact anywhere between fasteners and chassis.
-All surfaces, except the floor, are covered with ABS plastic. All edges are protected with aluminum extrusions. Corners are steel.
-All surfaces are virtually waterproof.

Additional notes: My woodworking skills and tools are those of the average weekend warrior. The point of sharing this interior idea is to show that with some patience and sourcing quality materials, the average person can improve upon the run of the mill, marginal quality RV interiors offered by many of the popular "Expedition" camper builders. Also, our Sprinter, obviously, is not an "off road" camper. However, in the past few months of traveling throughout the Western U.S. it's seen a fair amount of eyeball-rattling dirt roads. So far we haven't developed a single squeak from the cabinetry or found any loose screws (other than the one behind the steering wheel). I'd love to be able to build something similar in a Tiger someday. IMO, the Tiger floorplan is still the best in the business. Redoing the interior with these materials/techniques would be an awesome combo.

i-4N4nj8Q-M.jpg
 

suntinez

Explorer
VERY nice, and not surprising coming from you :)

Happy to see some inside pics, sorry I missed re-connecting with you at OVX. Hope to see it in person someday.
 

ersatzknarf

lost, but making time
It's great that you brought up this topic.

There are some DIY road/flight case websites out there. Here are some addresses I found if anyone is interested :

http://www.penn-elcom.com/home/

http://www.reliablehardware.com/

http://www.do-it-yourselfroadcases.com/

http://cameltraders.com/shopping?page=shop.browse&category_id=16

http://www.flightcase-parts.com/

The last two addresses I just found now, as I was having a look by google, since two of the DIY websites I had found are gone now :(

Penn-Elcom is a big source for a lot of places, I learned. Also, I am not affiliated with any of them, of course !

I was considering going this direction, but then waffled back to birch ply. Your comments about the L-brackets have me thinking again.
Would like to have your thoughts about the "sharpness" of the extrusion edges, as well as any comments about the corner pieces, please.
We bring our dogs along and I was concerned about them coming up against those hard surfaces. Thanks.
 
Last edited:

Stroverlander

Adventurer
The cabinets and layout look great, definitely nice work and appreciate the info on building materials. I have started a preliminary draft for my Astro van interior layout and this is very helpful.

ersatzknarf, I'd be interested in the links to the DIY websites, tia.
 

ersatzknarf

lost, but making time
Hi Stroverlander. I added them to my previous post. Thanks for your interest. I am interested to see if others pick up on this method. I learned a lot about it from the German "Carmaeleon" website, but cannot seem to get to the home page as there seems to be a problem (virus) on there now... ?

This page is still working : http://www.carmaeleon.com/LR_110_HT.html

They also have a page that talks about the different kinds of materials that can be used and what they recommend : http://www.carmaeleon.de/Materialinfo.htm

English : http://translate.google.com/transla...au+material&hl=en&biw=1280&bih=823&prmd=imvns

Hope this helps.
 

HMR

Rendezvous Conspiracy
ersatzknarf said:
Would like to have your thoughts about the "sharpness" of the extrusion edges, as well as any comments about the corner pieces, please.
We bring our dogs along and I was concerned about them coming up against those hard surfaces. Thanks.
We also bring our dogs everywhere so having a dog friendly interior is very important. There are both square-edge and round-edge extrusions available. We used both but the majority of what you see is square edge and it's not a problem for the dogs. The corner pieces are round. Where you have to be careful are the extrusions I used for the cabinet doors and it's only an issue if you decide to trim all the doors like we did. If so, some of the edges can be very sharp and would definitely be an issue if a dog (or person) ran into an open cabinet door.

Here's a pic showing a sharp edge:
i-sJd4z94-M.jpg


I am interested to see if others pick up on this method.
A well known builder here on Expo toured the van recently and ended up using some of the same techniques/materials in his latest camper. We've also had numerous people request to take pics of every square inch of the interior. I have a feeling we'll be seeing similar builds in the future. ;)
 

HMR

Rendezvous Conspiracy
It's great that you brought up this topic.

There are some DIY road/flight case websites out there. Here are some addresses I found if anyone is interested :
We ordered a variety of extrusions from different vendors before we started on the interior. We then spent a LOT of time experimenting with different techniques/materials in the garage. Of the vendors, Reliable and DIY are both great to work with. If I had to choose only one, I'd go with DIY. Their customer service is excellent and they're very experienced with actually using the products they sell. Reliable and DIY carry slightly different versions of some products so look carefully at what they offer before ordering.

ersatzknarf said:
Penn-Elcom is a big source for a lot of places, I learned. Also, I am not affiliated with any of them, of course !
Penn-Elcom is the manufacturer. Much of what you see in the European builds is produced by Penn-Elcom. Unfortunately, some of the really cool extrusions aren't available anywhere in the U.S. and require a minimum order of 1,000 linear feet to get it imported. We ran into that issue several times and had to use other material instead.

Also, none of this build happened fast. I was kidding, obviously, with my "long weekend" comment above. Between experimenting in the garage and actually getting the interior 95% complete (as it stands now) took 7+ months and >500hrs. of labor. The initial learning curve with the adhesives, extrusions, ABS, etc. was steep. We also installed 3 separate layers of insulation/noise damper, the AUX electrical system, plumbing, custom windows and a roof vent (we had to cut holes in the sheet metal for windows and vent). Now that we're familiar with the process, we could probably reduce the time by 50% but it's still a big job. It was also pretty fun!
 

HMR

Rendezvous Conspiracy
VERY nice, and not surprising coming from you :)

Happy to see some inside pics, sorry I missed re-connecting with you at OVX. Hope to see it in person someday.
Thanks Linda. We owe you the credit for starting the Expo/Tiger fan club. Your new XL looks great.
 

ersatzknarf

lost, but making time
Hi HMR !
Wow. I cannot thank you enough for your comments and all of the great information. Thanks for your understanding about the dogs, too. I must admit I was a bit wary of plunging into going this route and the span of your "long weekend" shows that there is a learning curve for sure. However, the recommendation of DIY (and Reliable) and that it can even be done here in the US says a lot (it's too bad that Penn-Elcom does not have some of their product available here). However, you've certainly got something started here (I hope) and if a shop picks up the ball, maybe they will be able to get to that minimum order level and we'll start to see some of those "unobtanium" extrusions ;)

Finally, I must say I am very intrigued to know more about the "well known builder here on Expo (who) toured the van recently and ended up using some of the same techniques/materials in his latest camper." :D
 

HMR

Rendezvous Conspiracy
Hi HMR !
Wow. I cannot thank you enough for your comments and all of the great information. Thanks for your understanding about the dogs, too. I must admit I was a bit wary of plunging into going this route and the span of your "long weekend" shows that there is a learning curve for sure. However, the recommendation of DIY (and Reliable) and that it can even be done here in the US says a lot (it's too bad that Penn-Elcom does not have some of their product available here). However, you've certainly got something started here (I hope) and if a shop picks up the ball, maybe they will be able to get to that minimum order level and we'll start to see some of those "unobtanium" extrusions ;)
No problem. Another thing to keep in mind: compared to the other equipment involved in building a camper, the road case materials are CHEAP. It was nice to find high quality components and good customer service for such a low price while dealing with the road case suppliers. I always get a kick out of seeing what a place like Adventure Trailers charges for "home builder" accessories vs. what you'll pay for the same stuff at a normal supplier. Example: "Aircraft Grade Adjustable Track" at Adventure Trailers vs. the same thing at McMaster-Carr. The road case suppliers, thankfully, don't include the "Expo Tax". ;)

ersatzknarf said:
Finally, I must say I am very intrigued to know more about the "well known builder here on Expo (who) toured the van recently and ended up using some of the same techniques/materials in his latest camper." :D
Paul Jensen was kind enough to spend some time with me in Oregon and give me a tour of the amazing Earthroamer Jeep he converted. He also crawled around our Sprinter, took photos and asked intelligent questions. On his latest build, he ended up using the same flooring/aluminum extrusion combo as our Sprinter. Paul's woodworking is in a whole different universe than mine. It would be a shame to cover up his finishes/veneers with the ABS. It would be fun to see his version of something like this with the wood exposed:
i-j9JGj2p-M.jpg
 

ersatzknarf

lost, but making time
No problem. Another thing to keep in mind: compared to the other equipment involved in building a camper, the road case materials are CHEAP. It was nice to find high quality components and good customer service for such a low price while dealing with the road case suppliers. <snip> The road case suppliers, thankfully, don't include the "Expo Tax". ;)

Well, those are some very good points to keep in mind (cost, quality and service) and it makes this method even more appealing !

Paul Jensen was kind enough to spend some time with me in Oregon and give me a tour of the amazing Earthroamer Jeep he converted. He also crawled around our Sprinter, took photos and asked intelligent questions. On his latest build, he ended up using the same flooring/aluminum extrusion combo as our Sprinter. Paul's woodworking is in a whole different universe than mine. It would be a shame to cover up his finishes/veneers with the ABS. It would be fun to see his version of something like this with the wood exposed:

I was secretly hoping it might be Paul ;)
That he adopted your method says tons, too.

LOL ! I have that same collection of Custom Campers' G (Wolf) "Sanität" ("garbage truck") camper photos :D
I think that design is an incredible camper box set-up.

All this has me rethinking going with Baltic Birch with AFM Safecoat finish and using Road Case extrusion construction...
If we could get the extrusions that allow those recessed doors/drawers like in the Custom Camper photo, that would be something !
 

HMR

Rendezvous Conspiracy
If we could get the extrusions that allow those recessed doors/drawers like in the Custom Camper photo, that would be something !
Oh how I tried! I REALLY wanted that extrusion.

For those of you following along, this was my solution to getting that recessed look. Note the closed drawer below the open one:
i-vZ2BR58-M.jpg


I had to wait several weeks for that drawer trim to arrive in the U.S. (it's available, just took some time to get it). I almost went with an overlay due to the wait. Glad we waited. It turned out better than expected. FWIW- We were going to do every drawer and cabinet in this style. It was WAY too labor intensive. Those two drawers, alone, probably took 20+ hours. Figuring out how to line up the drawer face for a perfect fit when shut required working in 1/32" margins on all 4 sides. Too tight for a novice woodworker like myself.
 

Forum statistics

Threads
186,159
Messages
2,882,662
Members
225,984
Latest member
taunger
Top