How would you build a simple yet capable FZJ80?

MoGas

Central Scrutinizer
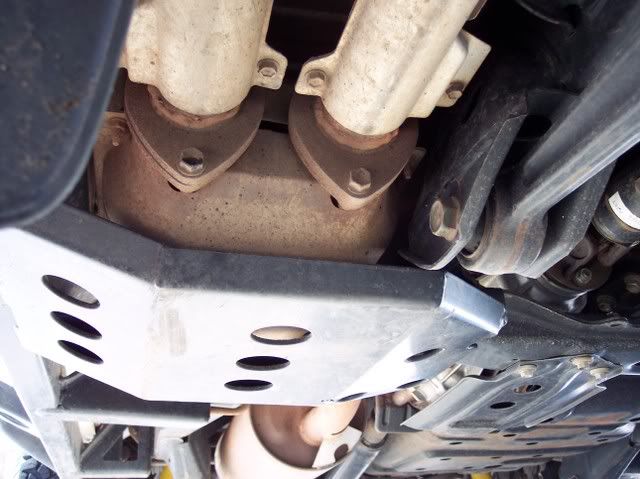
This is how my Hanna's work with the cat protection.
Snapshots186.jpg


After I took the flares off, I just inserted nylon finishing plugs and painted them with factory touch up paint. You can't tell unless you are really looking. I also put a dab of silicone on the plugs before I put them in to maintain watertight integrity. I need to put paint on them every 8-10 months. If I really cared, I'd have prepped the surface of the plugs better. The plugs already are textured, so I didn't bother sanding them at all.
 

blupaddler

Conspirator
Simple is good.
The big question is how capable do you want?

The 80 series is one of the most capable vehicles out of the box. You can do a majority of trails with just A/T's and some sliders. Meaning you only need a basic OME lift, sliders and new tires.


I used Aluminum tape on the inside of my fenders when I removed the flares. It depends if you are going to Linex, Rhino or whatever the flares or keep it factory paint.
If you are going to keep the factory paint, then I would just weld the holes. (I don't know how to weld... yet)


The cat protection works out well for the hanging down issue. You don't really want to move them up any higher since most 80's passenger floor boards get warm from the cats.


The Metaltech bumper is a good one to imitate. I like the lines and coverage. I would like to see how much it weighs too. I remember hearing the ARB weighs in around 110 pounds or something.


If you aren't going to be doing any hardcore rock-crawling I don't think it would be necessary to cut/remove the rear cross member. You could easily fab up some tubing to protect the rear corners and overhang. It could easily bolt into the sides of the rear cross member, which is just below the rear tailgate). Take a look at Hanna quality and their tube side protection on the rears.


Also, make sure you check out
http://forum.ih8mud.com/
http://www.sleeoffroad.com/newbie/newbie100.htm

Both excellent areas of information. Slee's newbie guide is a must read.

Good luck.
 
Last edited:

michaels

Explorer
i'd do this:

small lift
35s
4.88s
lockers
sliders
front and rear bumpers
2 hella 4Ks
superwinch
fridge
storage/patform bed system
done.

not too complicated.
 

Box Rocket

Well-known member
i'd do this:

small lift
35s
4.88s
lockers
sliders
front and rear bumpers
2 hella 4Ks
superwinch
fridge
storage/patform bed system
done.

not too complicated.

not too complicated if you have $$$ to throw at it. But that isn't a cheap list.
 

ntsqd

Heretic Car Camper
Is it blasphemy to say that just knocking the flares off might be enough?

Any additional weight hung on it will detract from it's mileage and from it's payload.

Don't get me wrong, I think mods - particularly home fabricated mods - are cool, but there is understated elegance in "less is more."
 

Hltoppr

El Gringo Spectacular!
I built my rig for about $3000, including tires and the second hand roof tent/OME springs etc. I updated some photos in the thread and bumped it.

Never found I needed lockers. If I got stuck, which I only did once...I just pulled winch cable and was out no problemo.

-H-
 

Metcalf

Expedition Leader
Here is what I am leaning toward...

-93-94 with lockers if I can find it
-De-flare it with the push in hole covers painted to match somewhat.
-255/85/16 Toyo MTs on stock wheels ( or 285/75/17 on FJC steel wheels? )
-machine a 1-2" spacer for the front springs to level it
-Simple tube bumper like I posted above
-Smittybilt 10K with sythetic line tucked in the above bumper.
-Simple single tube rocker protection with a bolt on Cat guard
-Wrap around rear tube bumper/hitch ( may or may not cut crossmember )
-Spare tire in the cargo area standing up

That's it. The only thing that is going to cost any real money is the winch ($550) and the tires ($1200). The tube/plate will only be like $100, if I can't find scrap at work.

I also need to figure out something compact and cheap for on-board-air. Is there anywhere you can hide a small hard mounted compressor on the 80s?

That should about do it to get a good start. It should be pretty dang light with the simple and light tube armor. The approach and departure angles with the tube bumpers should make up for the smaller tires.

With a little careful driving I don't really see too many trails that it shouldn't be able to do in my area ( colorado, moab, etc ). This isn't suppose to do the super extreme stuff, but I would like to to be able to do a trail like the poison spider/golden spike/gold bar rim loop without too many issues.

I am sure there will be other things I want to add once I get going, but I just want something that is 'jump in and go' simple and reliable.

We are right in the middle of a big snow storm here in Colorado and it would have been nice to have something like this today. My dodge did great, but I don't even think the Jetta would have got out of the driveway :)
 

Box Rocket

Well-known member
Simple and cheap on board air. This is mine. Tank was a beverage tank for a home brewery in a earlier life. Picked it up for $40. Spent $25 for a used regulator and a bit more for a decent hose and fittings. 20lb CO2 tank usually lasts me a full year between fillups. Used modified third row seat bracket and large fire extinguisher bracket. Adjustable regulator in case I have a need to run air tools.

_MG_1242.jpg
 

blupaddler

Conspirator
You'll be better off adding springs and shocks rather than a spacer. Or add a space if you just don't want the stink bug effect.

OME makes a replacement or factory lift which basically is just the factory rate coils and shocks, no lift. Doing this will drastically improve handling, especially considering any 80 you end up with will more than likely need new springs and shocks anyways...
:coffee:
 

shahram

Adventurer
If I were in the mood to build up a(nother) simple yet capable 80 series for expedition, it'd be more about what I take out than what I add. After conducting typical maintenance, I'd start unbolting stuff left and right...

Stuff to remove:

Take out 2nd and 3rd row seats, place in garage or closet...unless you need the passenger space. This will allow plenty of space for camping gear and, if need be, the occasional night slept in the back of the Cruiser.

Remove side-steps, mud flaps, and flares...they are unnecessary, and only hang up on obstacles.

Do the insanely easy, insanely cheap spare tire tuck mod to get that spare tucked up nice, in lieu of a rear "tyre jockey", which usually come from Australia, and come with a price.

Stuff to add:

Off-road tires (in a popular A/T or M/T, depending on your preference) in 285/75/16. That's 33" of meat, no lift required, which should provide plenty of traction, a little added clearance, and be common enough to replace anywhere at anytime.

Recovery gear. Strap, shovel, etc. Extra fluids, some basic tools, jump starter, tire kit, air compressor, etc.

Camping gear. Sleep gear, kitchen, cooler full of food and beer, clothes, etc.

Bins to put it all in, and good straps to strap them all down.

Replace broken and/or tired components with better ones as the need arises.

Gas. 87 octane.

Stuff not to add:

Roof rack, roof top tent, off-road lighting, loads of armor, off-road trailer, refrigerator, laptop mount, dual battery system, giant lift, giant tires, drawer systems, or any of the other power-sapping, heavy, overly complex, stupidly expensive mods that, for all intents and purposes, take away from the experience. Buy as little as possible. Stay as far below GVWR as you possibly can while still remaining fairly comfortable, and you'll be fine.

Your simple build won't win any hearts at the Caviar and Canvas Overbuilt Overlander's club meeting, but less gear means you'll have less complications, and more time for other, more important things, like kickin' back, drinkin' beer and talkin' story over a camp fire.

And more money to buy better beer.
 

Navman

Adventurer
Stuff not to add:

Roof rack, roof top tent, off-road lighting, loads of armor, off-road trailer, refrigerator, laptop mount, dual battery system, giant lift, giant tires, drawer systems, or any of the other power-sapping, heavy, overly complex, stupidly expensive mods that, for all intents and purposes, take away from the experience. Buy as little as possible. Stay as far below GVWR as you possibly can while still remaining fairly comfortable, and you'll be fine.

Your simple build won't win any hearts at the Caviar and Canvas Overbuilt Overlander's club meeting, but less gear means you'll have less complications, and more time for other, more important things, like kickin' back, drinkin' beer and talkin' story over a camp fire.

And more money to buy better beer.

Too funny - I think half of the forum is still in shock at this one. No RTT or refrigerator???

I totally agree with you.
 

CSG

Explorer
Isn't an 80 pretty damn capable out of the box? What's the point of all the mods other than to look cool? Are they really necessary for an "expedition" vehicle that will mostly likely never go on an expedition? ;)

I can see removing things that might be hindrances it you're really building a trail runner/rock crawler and upgrading tires to the right tread design but like others have pointed out when you do these major mods you add weight, change COG, and lose MPG.

Now me, I'm a backroader and will leave my LX470 Cruiser stock as it's more than capable as is. Maybe I'll mod it by keeping a small spade in there. You know, for building road. :D
 

jay3253

Adventurer
I agree with the not adding things BUT I have to just to get the wife to go with me. She wants a port-a-potty, a bed and a kitchen. So, she gets a RTT, drawer system and a port-a-potty... I guess I'm whipped or just like having her around.
 

Forum statistics

Threads
190,020
Messages
2,923,204
Members
233,266
Latest member
Clemtiger84
Top