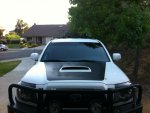
Plastidip Blackout - Proof of Concept
To all entertaining the idea of a plastidip hood blackout... Following attempt #1, here are my thoughts and plans:
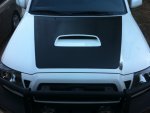
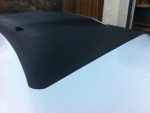
- Due to the amount of real estate involved, the biggest obstacle for me was laying down an adequate coat along the tapelines while still managing to pull the tape prior to setting of the "dip"... As evidenced by the pasenger side "shoulder-line" where the dip pulled up significantly.
- As with any aerosol coating, the key factor to achieving a uniform texture/finish is going to be maintaining a consistent spray distance and proper overlap. To achieve this on round #2 I will be pulling the hood and placing it on horses at waist level.
- I traced several convenient circular items on a "grid" of painters tape placed on a cutting board and cut out several different radii for use in creating the corners. The photo (poor photo) utilized a 5" diameter radius for the front corners and a 3/4" radius in the rear.
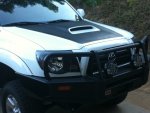
- Following the "shoulder lines" of the sport hood was actually harder than anticipated. I ended up pulling the truck into bright sun, making reference marks with pencil along the ridge, then pulling back into the driveway and taping to my reference marks. I would recommend low-adhesion painters tape as I managed to pull up a good sized piece of hood paint during the process.
- Since my truck sat in the sun all day prior to this attempt, I ran cool water over the hood prior to starting. This helped, however I'm 99% confident in saying that this is an indoor project only (at least in socal).
- It seemed to work best laying down the "middle 90%" of the hood and building the dip up to adequate thickness, then hitting the edges quickly and evenly... thus minimizing the tape exposure time.
- There are a myriad of instructional videos on youtube related to "dipping" everything from rims to hoods to entire cars. Check out dipyourcar.com for examples, links, and info.
In a nutshell, I consider today's attempt a solid proof of concept. If it weren't for the pulling of the dip along one edge, the silver-dollar sized piece of hood paint that came off with the tape(unrelated to the plastidip), and the slight variation in texture, I would be quite happy with the result. Round 2 will be performed at waist level, in the garage, and potentially in 2 stages (ie. work the left side of the hood, pull the tape, then do the right side with adequate overlap to blend the two). Hopefully this will get me closer to the original test panel I sprayed which turned out excellent.
I hope to see some other folks get inspired... $8 for an afternoon with the truck is cheaper than gas...