hour
Observer
Or as low as $125, I just bought another 40 cells at a better price, to build a clone of this pack. I'll take pictures along the way for that one.
I decided I'd had enough of the lead acid world after building quite a few ammo can and toolbox battery projects for charging things at camp. They were heavy and didn't take kindly to being forgotten during the winter, and it was always a drag knowing I shouldn't draw them down more than 50% (at most) if I cared at all about longevity.
I've been familiar with the 18650 3.7v battery for quite some time, but knew that there was no perfect way to assemble a 12v pack for my uses. With three in series your voltage is low, four in series your voltage is high. The major appeal is energy density, but at the tradeoff of safety and inevitable boost or buck contraptions. The other barrier to entry was figuring out how to assemble them.
So I concluded that any battery I built would be using LiFePO4 cells for their safety, and excellent match for all my 12v gear (3.2v, 4 in series). But 18650 cells in this flavor are pretty weak, say 1500mah versus 3000mah from 3.7v sony/lg/panasonic offerings. And all these solderless battery building block kits were 18650 only. Doh.
Then I found batteryblocs.com which has many things to choose from in the 26650 variant. Enough blabbing, here's what I purchased.
(4) 10P batteryblocs to hold a total of 40 26650 cells - $36
(40) K2 26650 3200mah lifepo4 cells / 10.24wh - $85-100
Of course buying the bottom two items results in having several leftovers for future projects, but if you go to a local hobby store you can get single pairs of XT60s and a balance harness.
Why XT60? I like my [insert connector here] A lot of RC stuff uses XT60, including my charger, so it was the path of least resistance.
To support the hobby in general, as I intend to make several more of these in the future, I also purchased:
(1) ISDT Q6 Pro 14 amp charger/balancer - $50
(1) Cellspy8 cell monitor/balancer - $14
and stuff I already owned:
Soldering iron, solder, heat shrink tubing assortment pack, digital multimeter, bench DC power supply, beer
Since I'll be building a clone of this pack in a couple of days and taking photos for a step-by-step, I'll just quickly cover exactly what I did when both packages arrived on my doorstep last night.
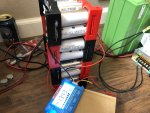
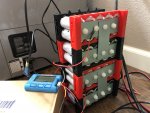
First, I checked all 40 cells with a multimeter. These are new cells and all were at 3.24-3.27 volts, great. I took groups of 10 and built four 10P packs using the Batterybloc kits. These kits include all the ring terminals you need for charge/discharge lead and for connecting to the five wires from the balance harnesses I purchased, so I crimped, soldered, and heat shrunk those as I went along. Then I connected the four packs in series and tightened all the bolts. Plugged in my cellspy8 and voila, a 13.something volt battery. I then replaced the cellspy8 with the ISDT charger/balancer and charged it up.
Total build time: 20 minutes
I have a [not great, not terrible] LiFePO4 BMS/Balance board coming from China which will be here some day. It cost $14, but you can buy cheap ones for $2 each. Just be mindful of the current ratings and user reviews.
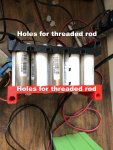
Terrible pics because I haven't mounted the four 10P packs together and didn't want to move it from my test area, aka my living room floor. The batterybloc kits accept threaded rod so that's easy to remedy. If I had a big roll of kapton tape I probably would have just used that.
Battery will be going in a toolbox and I predict another $30 or so on fuse block and panel mount cigarette lighter ports.
I decided I'd had enough of the lead acid world after building quite a few ammo can and toolbox battery projects for charging things at camp. They were heavy and didn't take kindly to being forgotten during the winter, and it was always a drag knowing I shouldn't draw them down more than 50% (at most) if I cared at all about longevity.
I've been familiar with the 18650 3.7v battery for quite some time, but knew that there was no perfect way to assemble a 12v pack for my uses. With three in series your voltage is low, four in series your voltage is high. The major appeal is energy density, but at the tradeoff of safety and inevitable boost or buck contraptions. The other barrier to entry was figuring out how to assemble them.
So I concluded that any battery I built would be using LiFePO4 cells for their safety, and excellent match for all my 12v gear (3.2v, 4 in series). But 18650 cells in this flavor are pretty weak, say 1500mah versus 3000mah from 3.7v sony/lg/panasonic offerings. And all these solderless battery building block kits were 18650 only. Doh.
Then I found batteryblocs.com which has many things to choose from in the 26650 variant. Enough blabbing, here's what I purchased.
(4) 10P batteryblocs to hold a total of 40 26650 cells - $36
(40) K2 26650 3200mah lifepo4 cells / 10.24wh - $85-100
Of course buying the bottom two items results in having several leftovers for future projects, but if you go to a local hobby store you can get single pairs of XT60s and a balance harness.
Why XT60? I like my [insert connector here] A lot of RC stuff uses XT60, including my charger, so it was the path of least resistance.
To support the hobby in general, as I intend to make several more of these in the future, I also purchased:
(1) ISDT Q6 Pro 14 amp charger/balancer - $50
(1) Cellspy8 cell monitor/balancer - $14
and stuff I already owned:
Soldering iron, solder, heat shrink tubing assortment pack, digital multimeter, bench DC power supply, beer
Since I'll be building a clone of this pack in a couple of days and taking photos for a step-by-step, I'll just quickly cover exactly what I did when both packages arrived on my doorstep last night.
First, I checked all 40 cells with a multimeter. These are new cells and all were at 3.24-3.27 volts, great. I took groups of 10 and built four 10P packs using the Batterybloc kits. These kits include all the ring terminals you need for charge/discharge lead and for connecting to the five wires from the balance harnesses I purchased, so I crimped, soldered, and heat shrunk those as I went along. Then I connected the four packs in series and tightened all the bolts. Plugged in my cellspy8 and voila, a 13.something volt battery. I then replaced the cellspy8 with the ISDT charger/balancer and charged it up.
Total build time: 20 minutes
I have a [not great, not terrible] LiFePO4 BMS/Balance board coming from China which will be here some day. It cost $14, but you can buy cheap ones for $2 each. Just be mindful of the current ratings and user reviews.
Terrible pics because I haven't mounted the four 10P packs together and didn't want to move it from my test area, aka my living room floor. The batterybloc kits accept threaded rod so that's easy to remedy. If I had a big roll of kapton tape I probably would have just used that.
Battery will be going in a toolbox and I predict another $30 or so on fuse block and panel mount cigarette lighter ports.
Attachments
Last edited: