The Camp 4x4 Bus - 1973 Suburban 8.1 Swap & Build

camp4x4

Adventurer
Watching your build with interest. I too am building a suburban, although I'm not doing an engine swap. Where did you find the Corroseal and how much was it? I've been thinking about using POR-15, but at $50+ a quart it seems not to budget friendly. Nice work so far on the build.
On a sidenote: your floorboard rust problem is probably coming from the cowl area in front of the windshield. Pretty common on old square bodies. Check up around under your dash corners closely. A pinhole can let enough water in to saturate the insulation under the carpet but not be readily noticeable from above.

Thanks. I got the Corroseal from Amazon, $54 for a gallon which was enough to treat my frame and under body no problem.

Thanks for the tip on the cowl area. I'll be sure to check it out before I start putting things back together.
 

camp4x4

Adventurer
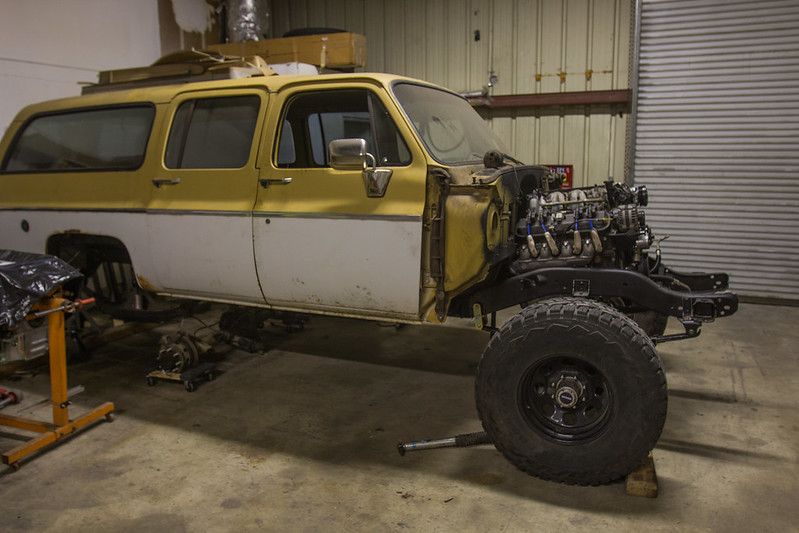
Just a quick update post even though I haven't been doing a whole lot on it lately...

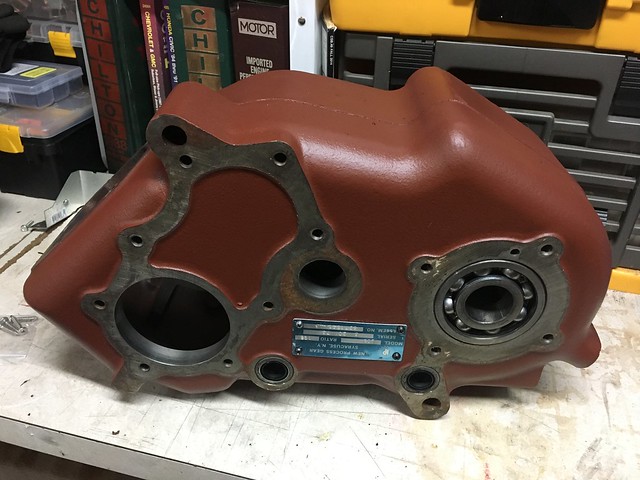
The biggest hold up has been getting the NP205 rebuilt with the bigger bearing and input shaft. I had left it at a place to be machined and rebuilt, but they barely touched it for 3 months. Finally I found the time to get out there (they kept weird hours to boot) and get it back. Got it to another place that got it machine in a matter of days. I've just repainted it with Red Oxide Primer - btw, when did it turn to Brown Oxide Primer? Seriously, this is not the original color it should be but I can't find the proper color ROP anywhere - anyway, now that it's painted I'll be taking it to get rebuilt at the local transmission guy. I know I could DIY it, but I really want the drivetrain to be professionally built front to back. Once I get that built up and put on I can get to work on getting the transmission support in and moving on with other stuff... gas tank, fuel lines, mounting the fuel pump and regulator,

Painted NP205


In other news I keep killing the aux battery in my '87. So, I've decided to install a "shore power" charger that I can keep plugged in when the truck is sitting in the driveway for long periods. I figure it'll also be handy on the rare occasions I'm at a proper campground with power.

Now, there's multiple ways to go about "shower power," but since water-proof is one of my requirements, and there really aren't any of the proper RV-style power systems that can feed appliances AND charge a battery that are ALSO waterproof I was kind of left going the route I went: a NOCO Genius on-board battery charger.

Noco Genius


This guy is going to be installed somewhere in the engine compartment and tie into both my aux and starter batteries. For now I'll just be keeping the power cord tucked away somewhere, but when I transfer it to the '73 I'll probably install an external plug to make it easier to plug in when parked.

The one thing I have to see about is if this thing will freak out with the 12v fridge kicking on and off. I've ready the "smart" chargers don't like charging while the battery is also under load. Will have to see if that's true. If it is then I'll likely try to power the fridge with 110v when the shore power is plugged in, and only rely on the 12v when the shore power is unplugged and thus not charging the batteries.

UPDATE: Though I haven't tested yet, the NOCO rep I chatted with today said the charger won't have any problem with a cycling-load while the charger is plugged in. They recommend nothing more than 1/5 of the rated amps (so 2a in the case of my unit, which is 10a/bank) so that may end up being the problem. The Edgestar fridge I have seems to run about 4a with a 5a start-up spike.
UPDATE, UPDATE: Did some further testing tonight after work. The fridge had been off for a while so it was plenty warm. I plugged in the charger and the fridge, letting the fridge run non-stop on the "Fast Freeze" setting for an hour or so. The charger continued on without a hiccup.

One interesting thing I noticed when I powered on the charger tonight is that after a handful of minutes my voltage sensing battery isolator turned on, meaning it thought the alternator was on. Now, this ties the batteries together in parallel meaning the capacity is increased. So I'll be curious if this has any effect on the charger.

UPDATE: Looking at the charging steps my guess is this only happened for a short period of time while the charger was pushing some high voltage in during the "Opportunity" step.

The model I got has 2x 10a outputs which can each be connected to a battery up to 250ah capacity. What connecting them both to essentially 1x Xah battery will do I'm not sure... might end up calling the company and asking their tech people their input.

Long term the goal is to replace the 50ah "deep cycle" aux battery from Costco with a 250ah AGM, then put a couple 80W semi-flexible solar panels on the hood and have those feed in when out on the trail. I figure 160w should be just enough to power the fridge and float the batteries during the day.

In other news I'm planning a week-long trip for Thanksgiving. My folks are coming out from Chicago and renting a pretty nicely outfitted 4Runner from Pacific Overlander. The plan is to cruise up to Amador and El Dorado counties to do some wine tasting the Monday before, camp off hwy 50 somewhere by Union Reservoir, then cruise up along Lake Tahoe to Johnsville and spend a few days on the back roads between there and La Porte. Obvious weather permitting... so I'm hoping the snow holds off 'til then.

Here's the route I plan to take: https://drive.google.com/open?id=10sxgusCvmQxQltNIgdgM45PYQVI&usp=sharing
 
Last edited:

Doc_

Sammich!
Sweet Burb build! The father a buddy of mine from my Scouting days had a round light Burb like that, it was such a great road tripping car. I'm looking forward to seeing your build progress!
 

Larry

Bigassgas Explorer
Looking good! Still beside myself as to why you would not use a TBI Suburban tank with a TBI sending unit and EP381 fuel pump and call it a day. Would have been less cost and more reliable being all OEM designed parts not to mention quieter too. A proven recipe that has been known to work and work flawlessly
 

camp4x4

Adventurer
Has the build been paused?

Not intentionally. LOL. But yeah, the last few months haven't really given me time to work on it. I also hit a bit of a mental road block with the floor holes. I'm REALLY not feeling up to that task after looking at what it'll take a bit closer.

But... I've recently picked up on this again. January should see me spending a lot more time down there. The NP205 rebuild should get done this weekend, and the '87 is living down there permanently now so I can start swapping parts. A buddy and I are probably gonna do at least one axle Monday afternoon and then from there I'm hoping it'll be off to the races...

I've have continued to pick up parts. I bought a Northwest Fabworks transfer case e-brake kit that I'm very excited about. Also bought a NWF cable shifter and returned the JB Custom Fab cable shifter since it was going to require a ton of fab work to make it fit. The NFW one is far better for my application. It sits perfectly on the trans tunnel without hardly any of it dropping below, so there's no clearance issues with the trans. Very happy about that. I was NOT looking forward to fabricating a mount for the JBFW one.

I've also found that my plan to swap the door guts (power windows, locks, etc) from the '87 to the '73 won't work. So I picked up a set of "universal" power window and lock kits. Hopefully I can find a way to use the stock door switches from the '87 instead of the ugly kit ones.

51ZYrA3jy+L.jpg

Still working on the wiring diagram. It keeps changing as I add more electrical stuff like the windows. Oh well...

I'm also still looking for a rear bumper. Gotta have a swing-out tire carrier at the minimum, and preferably low-profile. If anyone has ideas shoot 'em at me. Otherwise I'm looking at a custom build... :-/
 

FBJR

Adventurer
Was wondering about the build. Mine is on hold as other projects (house) take priority.

I'm keeping the crank windows.
 

camp4x4

Adventurer
I'm back at it!

Dad's in town for 5 days of wrenching. Started by doing some yard work. There's been a growing number of cast off parts tossed into the storage area behind the workshop. Time had come to clear it out and make space for temporary storage of the parts coming off Boom Boom.


After we got some space free we started the disassembly. First the RTT and awning, then the rack. I'm considering using the brown trim panels from the 87 so I kept those around.

Boom Boom Goes Bye Bye


Getting Work Done


Short day planned tomorrow since we have a Super Bowl party at my place in the afternoon. We'll mostly be getting ready for Monday, which will be a pretty long one. I'll be pulling the engine and trans out of the '87 in order to sell on CL, then we'll be moving on to pulling the axles and replacing them with the '73s that are still around. Couple friends showing up after work to help so I'm HOPING we can get all that done. Tuesday we'll wrap up whatever didn't get done Monday and move on to pulling the doors. I decided to take the easy route and do a door swap instead of tearing into the '73s door guts and trying to do the aftermarket power kits. The paint won't match, but I'll address that sooner or later. It'll certainly make things easier in the end.

Super pumped to really be back on the project. :D Always helps keep the motivation high have someone else around.
 

chilliwak

Expedition Leader
Some tasty work being done there Aaron! I love the pics of the job coming together. Cheers, Chilli...:)
 

Forum statistics

Threads
185,794
Messages
2,878,246
Members
225,352
Latest member
ritabooke
Top