You are using an out of date browser. It may not display this or other websites correctly.
You should upgrade or use an alternative browser.
You should upgrade or use an alternative browser.
The Camp 4x4 Bus - 1973 Suburban 8.1 Swap & Build
- Thread starter camp4x4
- Start date
camp4x4
Adventurer
ooooooooooooooooooooooK.... So it's been a bit since I last updated. And really it's been a bit since I last worked on the truck.
Life got a bit in the way the last few weeks. July 4th weekend I was busy with a hike up Mt. Whitney. Pretty epic. https://theta360.com/s/2KRGk75PO5UV0w0pAUwT9fKbI
Finally got things jump started again last night. Buddy came over and did some work, got the rear springs on. I got the engine up on a stand finally to pull the oil pan off and get going on cleaning it and getting accessories on.
Ordered up the Bussmann fuse box, wires, terminals and such to rewire stuff. Got all the AN fittings, hose and such for the fuel system from Summit. Not too many parts missing still so it should be fairly quick work to piece everything together.
In the mean time I'm gonna have to figure out the bolts needed for the Workhorse accessory brackets and get those installed. Also need to pick up the bolts for the bellhousing, and I think I still need to find the fly plate bolts. Can't remember if I ordered those or not.
Also kind of trying to decide if I want to relocate the oil filter or not.
Oh, and I saw this hilarious license plate the other day. Surprised it made it past the DMV.
All Wheel Drive Mother **********!

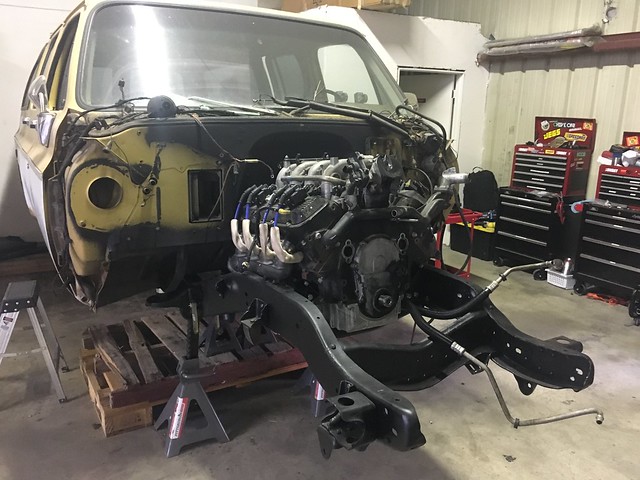
Engine on stand

Needs Cleaning
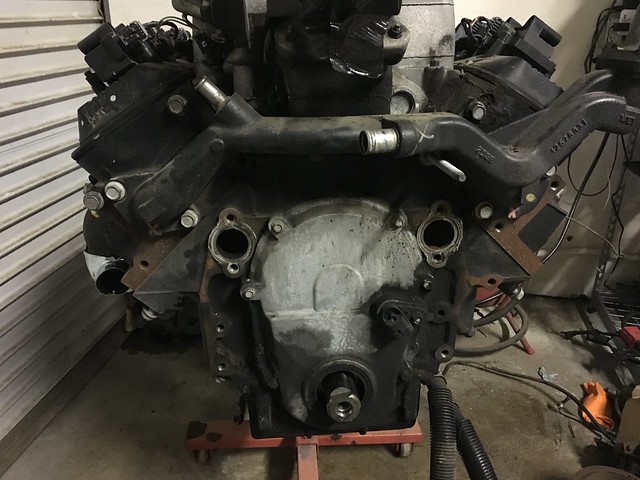
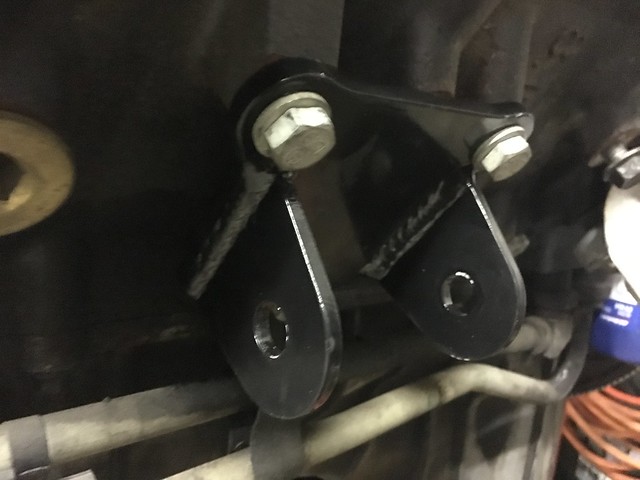
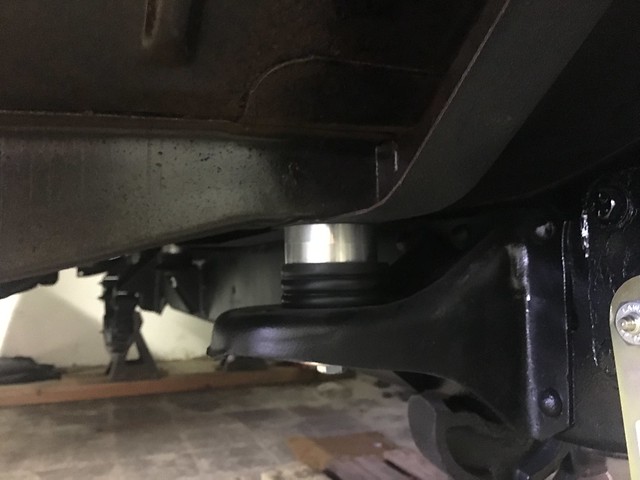
Competition Motor Mount
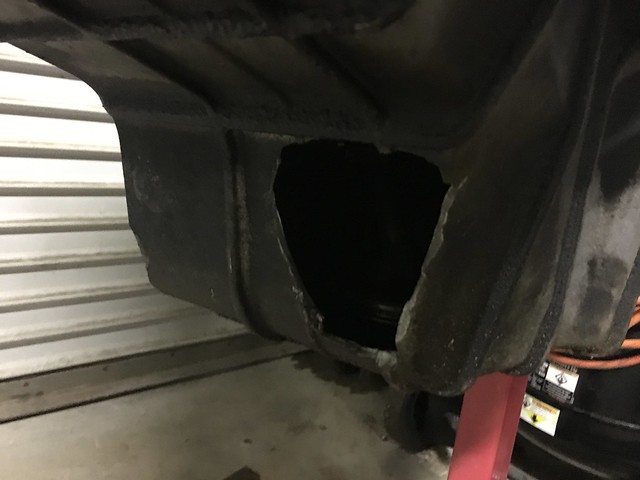
Oil Pan Hole
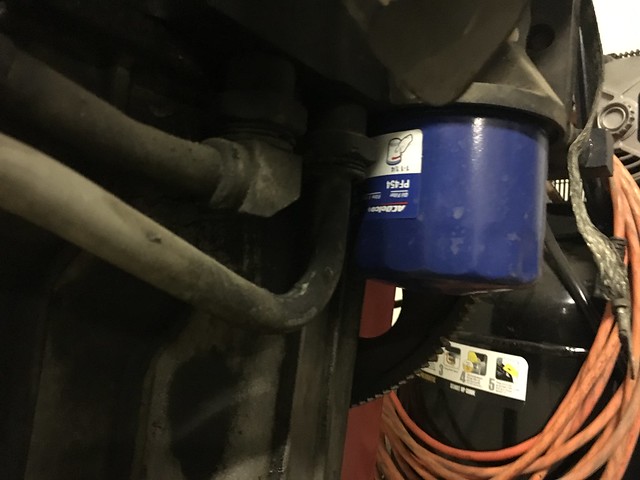
Oil filter and cooler lines
Exhaust Manifold

Life got a bit in the way the last few weeks. July 4th weekend I was busy with a hike up Mt. Whitney. Pretty epic. https://theta360.com/s/2KRGk75PO5UV0w0pAUwT9fKbI
Finally got things jump started again last night. Buddy came over and did some work, got the rear springs on. I got the engine up on a stand finally to pull the oil pan off and get going on cleaning it and getting accessories on.
Ordered up the Bussmann fuse box, wires, terminals and such to rewire stuff. Got all the AN fittings, hose and such for the fuel system from Summit. Not too many parts missing still so it should be fairly quick work to piece everything together.
In the mean time I'm gonna have to figure out the bolts needed for the Workhorse accessory brackets and get those installed. Also need to pick up the bolts for the bellhousing, and I think I still need to find the fly plate bolts. Can't remember if I ordered those or not.
Also kind of trying to decide if I want to relocate the oil filter or not.
Oh, and I saw this hilarious license plate the other day. Surprised it made it past the DMV.
All Wheel Drive Mother **********!
Engine on stand
Needs Cleaning
Competition Motor Mount
Oil Pan Hole
Oil filter and cooler lines
Exhaust Manifold
FBJR
Adventurer
What caused that hole, mishandling I hope?
That water crossover looks like a marine engine, but I guess with the EFI you have to do something.
Stay with the stock oil filter location unless there is an access issue, but get a longer filter for sure!
Been to hot here to do a thing, still over 100 here.
That water crossover looks like a marine engine, but I guess with the EFI you have to do something.
Stay with the stock oil filter location unless there is an access issue, but get a longer filter for sure!
Been to hot here to do a thing, still over 100 here.
El Gordo
EL Gordo
A few have asked for a build thread on my upcoming project, so, here it is. :wings:
I'll also be posting photos regularly on my Instagram account - @Camp4x4
Background
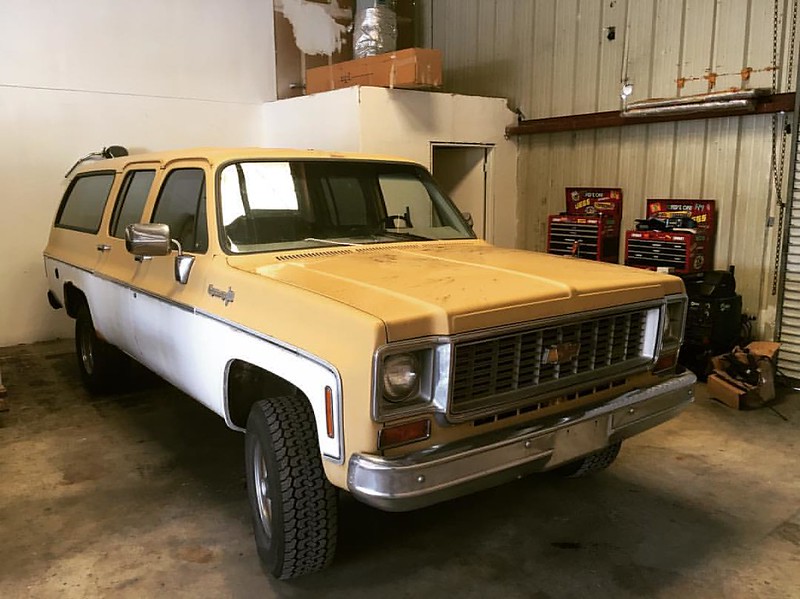
For the last few years I've been building a 1987 Chevy Suburban into a fantastic truck for camping and moderate to extreme off roading. This, is Boom Boom:

For quite a while I've been unhappy with how the 350 TBI handled the big truck, especially when it was full of camping gear. After reading Larry's 8.1L Vortec swap thread on CK5.com I got it in my head that that's what I wanted for Boom Boom. One $500 Chevy 8100 later and I was well on my way. Now, this being California I was well aware that getting such a swap by the CARB refs was going to be tricky. But, it was a challenge I felt would be worth it. After talking to a ref last summer I was confident that I could eventually jump the many, many hurdles they were going to put in my path. Until...
Having secured a motor and a Howell flashed PCM, along with and the VIN that was programmed in to it, I called up the ref's again to get more specifics. Unfortunately they offered not hurdles, but a complete and total wall. I was told that there was a new memo that had been passed down at the beginning of the year, which stated any OBDII engine swaps must be accompanied by an invoice from a dealer stating the PCM had been flashed to OEM specs. The effect of this is that all OBDII swaps into vehicles other than the make and model the PCM originally came from would be impossible.
For those unfamiliar with swaps of OBDII engines, here's the short version of why: there's 2 things that primarily need to get flashed out of a PCM when doing a swap into a vehicle for which the PCM was not original. 1) The Vehicle Anti-Theft System (VATS) - this is the system that reads the chip keys used in newer vehicles. 2) Nuisance codes - these are check engine light inducing problem codes that come on because of things other than an engine problem. These can be things like your tail light is out, or other body related issues. Since the vehicle receiving the swap would have neither the correct key, nor all the various body sensors required to not trigger these nuisance codes, the vehicle wouldn't start, and if it did the check engine light would come on. That's an immediate fail for the refs.
Now, yes, there are VATS bypass boxes, so that's potentially not a deal killer. But the nuisance codes... I have yet to find anything that can emulate the various sensors to bypass those.
"What if you just get the PCM flashed by a dealer, then send it back to Howell to get re-flashed," you ask? Well, if I'm a ref I know that an OBDII swap won't work without those things. So my FIRST question when the truck starts up and doesn't throw a check-engine light is, "how'd you get that to work without re-flashing the PCM (which you're not supposed to do)?" Without a good answer I'd be hosed.
So, I figured, if CARB wants me to keep that crappy old 350TBI in there, fine. I'll just find a truck they don't care about and do the swap in that.
Now, I'm in no position to simply sell Boom Boom as it sits and redo all the work and money I've put into it on another truck, plus I love the square body 'Burbs. So the best thing, I figured, would be to find a truck that I could swap most of the good stuff onto. Since Boom Boom is an '87, that left a 3-year period of Chevy Suburbans that are in both the smog-exempt category and the '73-'91 generation.
The search began pretty much as soon as I found out the bad news from CARB. SearchTempest.org is a fantastic resource if you're trying to search Craigslist across multiple states. I found a few trucks that met most of the criteria: '73-'75, barn doors, minimal rust, hasn't yet been modified a bunch, and under $2,000. But, none totally fit the bill. I came close to pulling the trigger on one, but the rust was just a little too much for being right at the top of my budget.
In the mean time I'd been messaging back and forth with Larry, from the CK5 swap thread, about my whoas. Recently I happened to mention that I'd decided to go the route of finding a good '73-'75 'Burb. He quickly said he may know a guy with one for sale in AZ - one of his wheeling trip buddies - but he was 99% sure it was a tail gate version. Well, its a good thing Larry isn't a gambler, because it turned out that not only was the truck a barn door model, but it had factory AC, totally manageable rust, was a '73 and the guy only wants 1500 for it. Not only that but the interior was immaculate!
Turns out this particular Suburban had been in Larry's friend, Don's, family from day 1, and they've taken terrific care of it through the years. Though he didn't have it listed anyway, I guess word had gotten around that he wouldn't mind parting with it. Good thing for me!
Within a week of talking to Don I was in a dually with a trailer in tow headed to pick up The Bus. 1500 miles later I've got her sitting in the shop ready to get to work! :victory:
The Plan
Of course, as soon as I'd hung up with Don and new I'd be buying the truck I started ordering parts. I'd already amassed a pretty good cache of stuff to go with the 8.1 but I'd sort of stopped buying things when I'd got the bad news from CARB. But now, game on! So, here's the plan:
Engine: 8.1L from a 2006 Chevy Suburban that'd been in a front end collision. Oil pan was cracked but everything else looked good.
Trans: 4L80E - perfect upgrade for the TH400 that I'm used to and that I'm geared/tired for. I picked this up on my way to AZ actually. Rebuilt by ATW in Rancho Cordova with a shift kit and all the good beef-up stuff. Plus an HD torque converter with stock stall.
Axles: I'd just put together a bad *** Dana 60, so that'll come over from Boom Boom, along with the 14 Full Float rear. The Dana 60 has ORD high and crossover plus hydro assist. Both axles are geared at 4.56, and the Dana 60 has a torsen LSD while the 14 still has the stock gov-lock. Discs all around.
Transfer Case: I'll probably just be keeping the NP203 that I expect is in the '73... budget is getting a little tight, so for now I think it'll be fine. Magnum Box and NP205 are probably in the future.
Radiator: 4-Core replacement for a Big Block equipped '80s Chevy. This will of course have an e-fan. I decided to go with a single 16" fan. Still have to figure out the shroud.
Suspension: I'm using ORD's shackle flip in the rear with new, stock height 8+1 HD springs. In the front I picked up some Pro Comp HD lift springs. With the heavy *** big block I wanted to make sure it wasn't under sprung and mushy. I'm equally if not more concerned about on road driving as offroad. If I have to sacrifice a little flex for control on the highway I'm okay with that. The Pro Comps have a spring rate of 526 lbs./in which may be a bit stiff... but we'll see. I'm also using ORD's HD shackles front and rear.
Engine Crossmember / mounts: ORD's high clearance crossmember and HD motor mounts
Transmission Crossmember: I figured I'd match the tube look of the ORD engine crossmember with a tube trans crossmember. I'll have to move this anyway since the 4L80E is quite a bit longer than the TH350 that I think is in the '73 now. Classic Parts Online has a tubular crossmember that seems like it'll be perfect.
Steering Column: I like cruise control, and I like the u-joint only steering shaft options available for the late '80s steering columns, so I'm going to find a used one in good shape from Craigslist or Pick-n-Pull so I can have those niceties. Should swap right in.
Shift linkage: I'm going to try using the Lokar Steering Column Cable Shift Linkage ACA-1804 rather than try and hack up the stock linkage bars.
Speedo cable / VSS: Since I'm not changing up my gauges, but the PCM is going to need a VSS signal out of the transfer case, I'm going to try Dakota Digital's solution: Their cable pass-through pulse generator paired with their Universal Speedometer Signal Interface. The pulse generator should thread on to the t-case, then allow the speedo cable to thread onto the other side of it. In the middle it uses the rotation to generate a VSS signal. From what Dakota Digital told me the PCM is expecting a 24,000 pulse-per-mile signal, while this little guy only does 8,000. That's where the USSI comes in. It acts as a signal multiplier to give the PCM the right number of pulses so everything works right.
8.1 Accessory Brackets: I'm going to be following Larry's advice of switching up the accessory brackets to the Workhorse configuration so I don't have to do any frame chopping. I'm not 100% sure I have all the right ones, and probably won't be until I have them all on but that's the plan. I'll post part numbers as I find out what works.
Gas Pedal: According to Raylar Engineering and Wikipedia the accelerator pedal from a 1994-2000 K2500 6.5 Turbo Diesel will work with the drive-by-wire throttle system. I'm keeping this rather than going cable because I'm not a huge fan of the kind of klugey nature of switching the 8.1 over to a cable throttle body. Though with the pedal assembly being $250 on Rock Auto, and none of these trucks showing up in wrecking yards around me... I'm kind of re-thinking that.
Other stuff: I'm sure I'll be modifying the driveshafts' lengths to patch the new driveline. I'm going to leave the interior alone for now except to put in a proper modern head unit and amp. Eventually, though I hate to do it, I'll be putting in some bucket seats and a center console. The bench is just not safe. Electric door locks, windows, etc are all in the plan for "sometime". And I'll definitely be swapping over the roof rack, RTT, ham radio, CB, antennas, lights and winch bumper.
The goal is to keep Boom Boom operational so I can sell it for something instead of just scrapping it. Hopefully someone will want it... :-/
sweet 'burbs! love the round eyes.
camp4x4
Adventurer
What caused that hole, mishandling I hope?
That water crossover looks like a marine engine, but I guess with the EFI you have to do something.
Stay with the stock oil filter location unless there is an access issue, but get a longer filter for sure!
Been to hot here to do a thing, still over 100 here.
The hole was from the accident the truck was in. Guy I bought it from says it was in a 2006 Chevy Suburban that got totaled. Said it didn't run long after the accident so there shouldn't be any internal damage from running without oil or particles in the oil from the cracked off oil pan pieces. I pulled the pan today and what little oil was still in there did look nice and clean, so I'm confident it at least didn't suck up any fragments and circulate them.
I would expect it's a stock water crossover. From what I read on Larry's thread the Silverado (or in this case Suburban) water crossover is the one you want to put the exit port in the right location.
My main concern now with the oil filter is actually the exhaust manifold. I seems that there might be clearance issues. I went to put it on today and it appeared a to be pointing right at the oil filter. At the very least the exhaust pipe would have to go under the filter, making it very difficult to access.
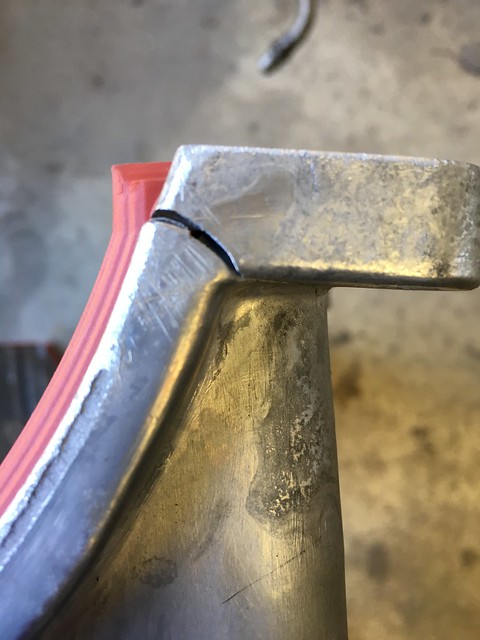
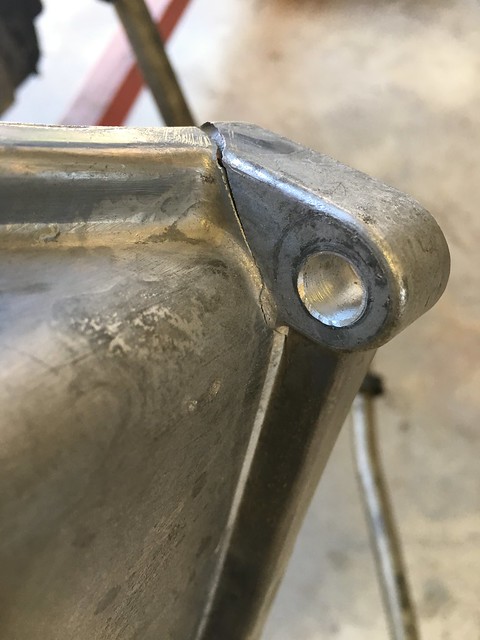
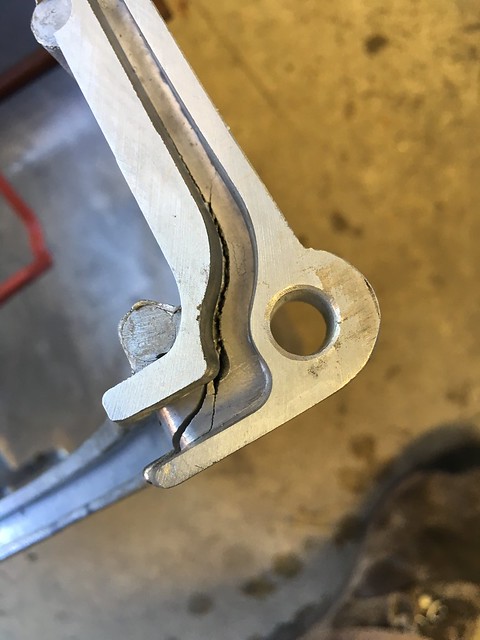
Aluminum Pans Break Easily But Cleanly

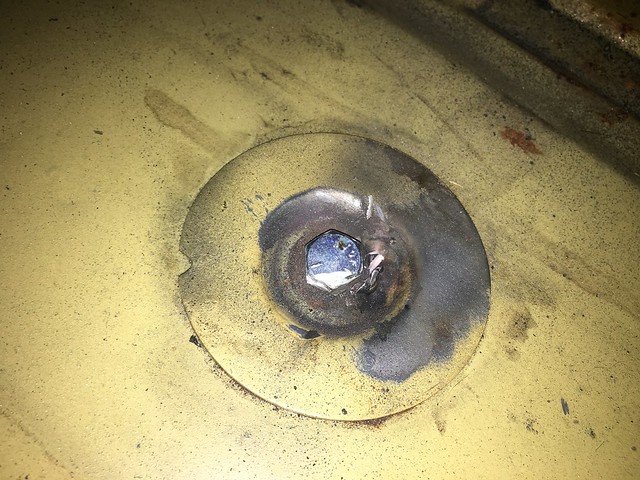
Here's a little tip for anyone doing a big project like this. Maybe you've all thought of this already, but it bit me in the ***** today. If you're buying a bunch of parts, but won't be putting them on immediately - like my oil pan I ordered back in April - at least take the time to pull the part out and inspect it for any damage. I found today that the pan had a big crack at one of the corners. No apparent damage to the box, and I certainly didn't damage it while pulling it out. But, RockAuto won't take it back since it's after the refund period. Fortunately the price on the pans went down $10 since I last purchased. But still... that's a $200 oil pan at this point...

New Pan Crack
While I'm waiting for the wiring parts, and now the stupid oil pan, to come in I picked up this sweet Brady wire labeler. Gonna do my best to make the rest of the truck wiring as tidy as the Howell harness.
Brady Labeler and Heat Shrink Labels

Fancy Labels
I've received most of the parts for the fuel lines, but I'm starting to wonder if I need all of them. I picked up 2 adapters to turn the hard lines coming out of the tank sender into -6AN fittings instead of barbs. But I'm wondering if I need this to be high pressure or not. Since the pump is down-stream of these hoses will there be high pressure on these? If not it'd be a lot easy to keep them barbs and simply clamped. Left is return, middle is feed, right is vent from the filler. Anyone with thoughts?
FBJR
Adventurer
Cool labeler, was it pricey? Think I need a throttle body for mine, the screws broke off in the shafts.
I would call rock auto on the pan. Fairly obvious and they should stand behind that even after the date. Have you looked at getting it tiged? Not a high stress part and cheaper than $200.
Sure the exhaust is in the way? Unless your frame is narrower than the 06 you should be fine. Not like you change it everyday.
MTCK
Observer
Just my $0.02, but have you considered an in-tank pump? I did the in-line pump on an EFI retrofit, it was extremely loud and eventually burnt up the pump that was right near the exhaust. It also was above the bottom of the tank which is not ideal. I have in tank pumps now and they are nice and quiet. Technically those lines will not be high pressure.
FBJR
Adventurer
Cool labeler, was it pricey? Think I need a throttle body for mine, the screws broke off in the shafts.
I would call rock auto on the pan. Fairly obvious and they should stand behind that even after the date. Have you looked at getting it tiged? Not a high stress part and cheaper than $200.
Sure the exhaust is in the way? Unless your frame is narrower than the 06 you should be fine. Not like you change it everyday.
I would call rock auto on the pan. Fairly obvious and they should stand behind that even after the date. Have you looked at getting it tiged? Not a high stress part and cheaper than $200.
Sure the exhaust is in the way? Unless your frame is narrower than the 06 you should be fine. Not like you change it everyday.
camp4x4
Adventurer
Cool labeler, was it pricey? Think I need a throttle body for mine, the screws broke off in the shafts.
I would call rock auto on the pan. Fairly obvious and they should stand behind that even after the date. Have you looked at getting it tiged? Not a high stress part and cheaper than $200.
Sure the exhaust is in the way? Unless your frame is narrower than the 06 you should be fine. Not like you change it everyday.
Labeler was $99 and the cartridge was $45 on top of that, so yeah, kind of pricey. But the last engine swap I did was a rat's nest of wires. Total mess, and ended up making things super confusing. SO I'm kind of dedicated to making this project better. So kind of worth it too. Plus I've got a buddy who wants to add an aux battery and fuse box, so I'll probably help him and use this on that.
The second oil pan was only $92 - first was $102 - so between the two I'll have 1 working one for $200. That said, getting the first one tigged is just gonna be too much of a hassle, plus being that the seal didn't seem to fit properly I'd expect it would leak. Not something I want after going through all this.
We'll see about the exhaust and oil filter after I get the engine in. I'm using 454 exhaust manifolds from a truck that should have had the same frame as mine, so I'm not concerned about frame clearance, just oil filter.
Just my $0.02, but have you considered an in-tank pump? I did the in-line pump on an EFI retrofit, it was extremely loud and eventually burnt up the pump that was right near the exhaust. It also was above the bottom of the tank which is not ideal. I have in tank pumps now and they are nice and quiet. Technically those lines will not be high pressure.
Yeah... seems to be the trend. Gonna go down this road, probably gonna kick myself, but hey... we all gotta learn our lessons...
Just read a bit on the reasoning for putting the pump below the tank... I'll have to check if where i plan to mount is above or below the tank. I'm thinking it'll be about even with it. I get the idea behind it... keep the siphon working to feed the pump rather than force the pump to "suck" the fuel out.
snowblind
Adventurer
Just read a bit on the reasoning for putting the pump below the tank... I'll have to check if where i plan to mount is above or below the tank. I'm thinking it'll be about even with it. I get the idea behind it... keep the siphon working to feed the pump rather than force the pump to "suck" the fuel out.
Another 2¢ option: Use your stock pump and fittings to fill a 1 gallon "slosh" tank that houses the intake for the high pressure pump. This eliminates any fuel starvation / baffle issues from using the stock tank and keeps a bunch fuel at the ready for when you floor it. Mount this above the stock tank and it makes it easy to drain into the old tank if needed.
Matt
camp4x4
Adventurer
Another 2¢ option: Use your stock pump and fittings to fill a 1 gallon "slosh" tank that houses the intake for the high pressure pump. This eliminates any fuel starvation / baffle issues from using the stock tank and keeps a bunch fuel at the ready for when you floor it. Mount this above the stock tank and it makes it easy to drain into the old tank if needed.
Matt
The stock pump outta the '73 is a mechanical external that sat on the old engine. Probably not gonna go rigging that up for a slosh tank. If the external Bosch 044 is too loud, or craps out or whatever, I'll just transition to an internal high pressure pump on an extra TBI sending unit I have.
camp4x4
Adventurer
Hey everyone! Remember me?
It's been a couple months since I've been able to really work on this project, so I haven't had much to update the thread with. The usual things have been taking my time away from it - family events, work, etc.
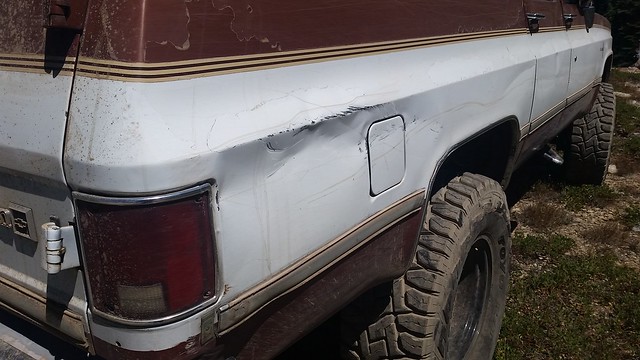
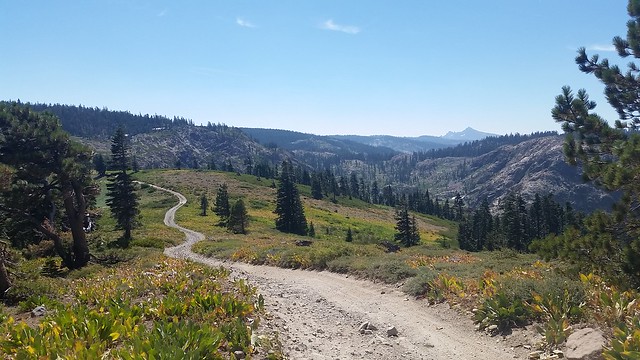
Back in early August I got together with a buddy I met on the ham radio net I run, who owns a beautiful Pinzgauer 710, to run the Poker Flat trail as a shake-down of the newly rebuilt transmission in the '87. Oh yeah, that happened - the direct drive for 3rd and reverse crapped out requiring a fair amount of money to be diverted from this project to getting that truck running again. Anyway, Poker Flat was terrific. We stopped by Saddleback Mountain fire look out on the way (see drone video below), and had lunch at the campground next to the river. The trail getting there wasn't much but on the way out it was certainly fun. As we had another day to explore we decided to take an alternate route out and home. I'd found a trail that would link up to the Gold Lake trail by Snake Lake. From what I'd seen and read that trail should have been fairly mellow, with only a couple tricky sections on the North part of the loop, which we could avoid. Boy was I wrong. Taking the 900 Rd east from Delahunty Lake we found a campground on Jamison Creek and got a good nights sleep. We needed it for the next day. Coming out of camp we continued on OHV trails to Hawley Lake. That was an amazing route, and definitely on the list of places to take people back to. Very easy for anything with decent tires and 4wd to do. But, as soon as we took a left up to Snake Lake, things got really hairy really quickly. Rocks, roots, holes and steep inclines challenged us from the get go. I have to say I was really impressed with Ron and his Pinz. I never intended to take him on anything so gnarly as he's fairly new to any serious offroading. He stepped up to the challenge well, and in his own words, "learned more in that one day than 3 years of driving the Pinz." I learned a bit too - namely, my truck can really handle itself! Other than a squeeze rock that I bounced the rear quarter panel into, the 'Burb hardly complained over anything, and came out the other side unscathed. On the last major obstacle of the day we were worried about the Pinz's hot clutch and high center of gravity, and Ron's flagging patience, so we opted to winch it. That worked out perfectly, keeping tension on the nose of Pinz and allowing Ron to focus on putting putting the tires in just the right place. All in all, a helluva lot of fun and a real trial by fire for Ron.
Boom Boom and the Pinz

Cooking up breakfast
Pulling the Pinz up
I Kissed a Boulder and I Didn't Really Like It
Stunning Ridge-Top View
The wife and I took 4 days to drive the '87 'Burb up to Idaho to watch the Eclipse reach totality. That was a pretty amazing event. We found an incredibly beautiful meadow from which to view it just north of Ketchum in the Boulder Lakes Basin. The road up had been pretty well trashed by the winter storms (there was still a good amount of snow on the edge of the meadow!) and in 2 sections we had to drive up a bed of loose baby-head rocks with flowing water. A couple spots required the judicious use of throttle, but for the most part the '87 did amazingly well walking up things.
On both trips the 'Burb performed incredibly well, especially in the tough spots. The Toyo's, the Truetrack and the 1-tons did their jobs terrifically. I can't wait to get them under the '73.
But now, finally, I'm jumpstarting this project again. I spent the weekend in the shop with my buddy Chris - https://www.instagram.com/hankthetruck/ - who had a whole load of new goodies he was installing.
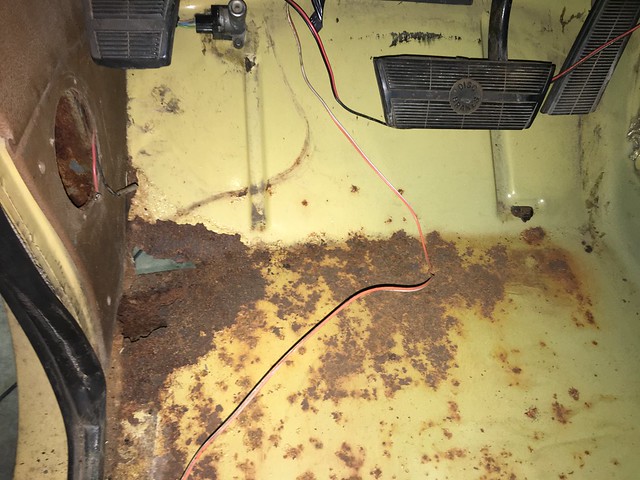
Saturday started off with an immediate curve ball. After test fitting the engine and trans a couple months ago I'd decided a 1" body lift was in order. The clearance with the firewall was just too tight for both the bell housing and the eventual path of the passenger exhaust. So, I'd picked up an ORD lift kit. I have to say that normally ORD's instruction sheets are fairly helpful. In this case, not so much. After a bit of head scratching I came to the very unpleasant realization that I was going to have to remove the interior to get at the captive bolts I'd have to replace with ORD's longer ones. I pulled the seats, pulled the belts, and with some struggle pulled the carpet. And guess what I found! Rust. And holes. Both footwells had some pretty nasty, flakey rust that had chewed through to the other side. The first of the two driver side holes goes to an interior cavity that held one of the captive nuts for the front body mount. I still have to inspect further to see how badly rotted the body mount support is. Same thing on the passenger side. I'm hoping I can dump a bunch of Corroseal down there and be done with it. The second on the driver side is higher up and went to inner fender well area, so looking down you can see through to the floor. Clearly these are going to need to be patched to some extent.
After that disconcerting discovery I pretty much lost all motivation and moved on to helping Chris finish up his stuff before it got too late.
Sunday started with renewed motivation. Knowing now what I needed to do I got right after it. I starting by removing all the captive bolts. I separated the tack welds with a cutoff wheel fairly easily, then one by one jacked the body off the mounts and slid in the 1" pucks in place, lining everything up with the new bolts. Overall a fairly simple process. Save 1 thing: there's 2 mounts - one on each side - that I clearly have bolts for, yet neither seems to have a captive nut in place in the body, or a captive bolt to replace. And since there's no hardware list or illustration to go by I'm going to have to call up ORD to find out ****** I'm supposed to do for this mount. :ugh:
After getting the majority of the body mounts on I could clearly see the 1" difference in space between the body and the frame. I'm now considering running my wiring on top of the frame instead of along it. We'll see how easy that ends up being.
The extra space made sliding the engine and trans back in MUCH easier than the first time around. Very little adjustment of the hoist was necessary this time, where as last time it was a fiddly endeavor. There's clearly much more room for the exhaust and bellhousing now, so I'm very pleased with the result of the body lift.
Next up will be the engine accessories and wiring harness. I'm going to make a plate to mount the fuel pump, filter and pressure regulator on, then mount the whole plate to the framed. I'm thinking this will make things a bit easier and require less new holes in the frame. To finish up the body mounts I'll be tack welding the captive bolt heads in - and figuring out what to do with the those 2 bolt-less mounts.
My new goal is to have the truck done by the end of the year. 4 months seems sufficient....
Onward!!!
It's been a couple months since I've been able to really work on this project, so I haven't had much to update the thread with. The usual things have been taking my time away from it - family events, work, etc.
Back in early August I got together with a buddy I met on the ham radio net I run, who owns a beautiful Pinzgauer 710, to run the Poker Flat trail as a shake-down of the newly rebuilt transmission in the '87. Oh yeah, that happened - the direct drive for 3rd and reverse crapped out requiring a fair amount of money to be diverted from this project to getting that truck running again. Anyway, Poker Flat was terrific. We stopped by Saddleback Mountain fire look out on the way (see drone video below), and had lunch at the campground next to the river. The trail getting there wasn't much but on the way out it was certainly fun. As we had another day to explore we decided to take an alternate route out and home. I'd found a trail that would link up to the Gold Lake trail by Snake Lake. From what I'd seen and read that trail should have been fairly mellow, with only a couple tricky sections on the North part of the loop, which we could avoid. Boy was I wrong. Taking the 900 Rd east from Delahunty Lake we found a campground on Jamison Creek and got a good nights sleep. We needed it for the next day. Coming out of camp we continued on OHV trails to Hawley Lake. That was an amazing route, and definitely on the list of places to take people back to. Very easy for anything with decent tires and 4wd to do. But, as soon as we took a left up to Snake Lake, things got really hairy really quickly. Rocks, roots, holes and steep inclines challenged us from the get go. I have to say I was really impressed with Ron and his Pinz. I never intended to take him on anything so gnarly as he's fairly new to any serious offroading. He stepped up to the challenge well, and in his own words, "learned more in that one day than 3 years of driving the Pinz." I learned a bit too - namely, my truck can really handle itself!
Other than a squeeze rock that I bounced the rear quarter panel into, the 'Burb hardly complained over anything, and came out the other side unscathed. On the last major obstacle of the day we were worried about the Pinz's hot clutch and high center of gravity, and Ron's flagging patience, so we opted to winch it. That worked out perfectly, keeping tension on the nose of Pinz and allowing Ron to focus on putting putting the tires in just the right place. All in all, a helluva lot of fun and a real trial by fire for Ron.Boom Boom and the Pinz
Cooking up breakfast
Pulling the Pinz up
I Kissed a Boulder and I Didn't Really Like It
Stunning Ridge-Top View
The wife and I took 4 days to drive the '87 'Burb up to Idaho to watch the Eclipse reach totality. That was a pretty amazing event. We found an incredibly beautiful meadow from which to view it just north of Ketchum in the Boulder Lakes Basin. The road up had been pretty well trashed by the winter storms (there was still a good amount of snow on the edge of the meadow!) and in 2 sections we had to drive up a bed of loose baby-head rocks with flowing water. A couple spots required the judicious use of throttle, but for the most part the '87 did amazingly well walking up things.
On both trips the 'Burb performed incredibly well, especially in the tough spots. The Toyo's, the Truetrack and the 1-tons did their jobs terrifically. I can't wait to get them under the '73.
But now, finally, I'm jumpstarting this project again. I spent the weekend in the shop with my buddy Chris - https://www.instagram.com/hankthetruck/ - who had a whole load of new goodies he was installing.
Saturday started off with an immediate curve ball. After test fitting the engine and trans a couple months ago I'd decided a 1" body lift was in order. The clearance with the firewall was just too tight for both the bell housing and the eventual path of the passenger exhaust. So, I'd picked up an ORD lift kit. I have to say that normally ORD's instruction sheets are fairly helpful. In this case, not so much. After a bit of head scratching I came to the very unpleasant realization that I was going to have to remove the interior to get at the captive bolts I'd have to replace with ORD's longer ones. I pulled the seats, pulled the belts, and with some struggle pulled the carpet. And guess what I found! Rust. And holes. Both footwells had some pretty nasty, flakey rust that had chewed through to the other side. The first of the two driver side holes goes to an interior cavity that held one of the captive nuts for the front body mount. I still have to inspect further to see how badly rotted the body mount support is. Same thing on the passenger side. I'm hoping I can dump a bunch of Corroseal down there and be done with it. The second on the driver side is higher up and went to inner fender well area, so looking down you can see through to the floor. Clearly these are going to need to be patched to some extent.
After that disconcerting discovery I pretty much lost all motivation and moved on to helping Chris finish up his stuff before it got too late.
Sunday started with renewed motivation. Knowing now what I needed to do I got right after it. I starting by removing all the captive bolts. I separated the tack welds with a cutoff wheel fairly easily, then one by one jacked the body off the mounts and slid in the 1" pucks in place, lining everything up with the new bolts. Overall a fairly simple process. Save 1 thing: there's 2 mounts - one on each side - that I clearly have bolts for, yet neither seems to have a captive nut in place in the body, or a captive bolt to replace. And since there's no hardware list or illustration to go by I'm going to have to call up ORD to find out ****** I'm supposed to do for this mount. :ugh:
After getting the majority of the body mounts on I could clearly see the 1" difference in space between the body and the frame. I'm now considering running my wiring on top of the frame instead of along it. We'll see how easy that ends up being.
The extra space made sliding the engine and trans back in MUCH easier than the first time around. Very little adjustment of the hoist was necessary this time, where as last time it was a fiddly endeavor. There's clearly much more room for the exhaust and bellhousing now, so I'm very pleased with the result of the body lift.
Next up will be the engine accessories and wiring harness. I'm going to make a plate to mount the fuel pump, filter and pressure regulator on, then mount the whole plate to the framed. I'm thinking this will make things a bit easier and require less new holes in the frame. To finish up the body mounts I'll be tack welding the captive bolt heads in - and figuring out what to do with the those 2 bolt-less mounts.
My new goal is to have the truck done by the end of the year. 4 months seems sufficient....
Onward!!!


FBJR
Adventurer
That guys with the Pinzgauer wouldn't be from Vacaville would he? Couple of those around here.
When you said Saddleback I was thinking SOCal where I used to run. Doesn't look the some though and Poker run is up this way I think.
What drone was that? Have a couple toys but looking at a Mavic Pro.
When you said Saddleback I was thinking SOCal where I used to run. Doesn't look the some though and Poker run is up this way I think.
What drone was that? Have a couple toys but looking at a Mavic Pro.
Forum statistics
Members online
- CammmyDee
- Fores
- Verkstad
- pluton
- vertical.dan
- Tgeo
- ARDOR
- dizzydom
- halseyt
- greg.potter
- Mojavejohn
- CoMtnExpl
- Mel.Specs
- Diamond Jim
- NatersXJ6
- LordExplorer
- pedalwrench
- CowpokePaul
- DaveB
- dustfens
- Johan H Marais
- Czechsix
- jjx0.usa
- motosickle
- PirateMcGee
- pgchustla
- Roaming Robertsons
- Obsessed2findARuggedHybid
- Markoff8585
- Deleted Member 183
- blasgi
- Blowby
- WT5speed
- Gravity
- ThundahBeagle
- Big Ern
- JCDriller
- Byrdseye
- Semiquixotic
Total: 1,067 (members: 40, guests: 1,027)