2-Door JK JeepKitchen - AT Chaser - Globetrotter - National Luna build thread

Justincredible

Adventurer
I don't spend a lot of time on the forums these days (stop in maybe once or twice a month), but when I do I appreciate seeing new things on your build.
I myself don't document my build for much the same reason as you're describing (a lot of time and work for little to no payout), so I totally get where you're coming from.
I say keep documenting the build. Maybe you're not getting a lot of comments now, but I think over months and years this (being one of the few 2 door builds) will get a steady flow of visitors looking for ideas/inspiration for their own space limited work.

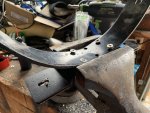
Simple and clever solution to the front overhang problem. I like it.
 
Last edited:

jacobconroy

Hillbilly of Leisure
Well, I'll keep at it then. Planning to get the propane, heater, and electrical up and running this week. Glad that somebody is reading the thread. :p

As for my GVW, I don't know yet. But I'll bet a dollar that it's too heavy. We have a family campout on Easter weekend so I will be loaded up and ready to go for that and will make sure to get down to weigh it then. I wasn't smart enough to weight before I started to rebuild, but the stock weight shouldn't be too hard to come by.

It is handling much better so far (when compared to the initial build). I'm moving as much weight forward as I can, downsized the tires from 35 to 34 (and narrower), went with E-rated tires, heavy Helwig rear ant-sway bar, AEV 2.5 inch Durasport lift, and air bags. I've been buying lighter gear for the rear too. Seems like keeping the weight out of the rear is worth all the time and money you spend doing it. My JeepKitchen weighs about 200 lbs. alone (best guess). I can't lift or carry it when fully assembled (empty). The Kanz Kitchen is about 30 lbs. with the stove installed (otherwise empty). So, big gain there. Drawers just aren't worth the weight, money, or sacrificed space in my opinion. Also cleaned out a bunch of crap from the old drawer system that I just never used, ordered much lighter chairs, etc. We will find out if all this was worth the trouble in a month or two.
 

jacobconroy

Hillbilly of Leisure
We have had several rainy and/or snowy days, but today I said "to heck with it" and got the propane tank mounted.

After sitting around and staring at stuff for an hour, I remembered that I had two "low profile" RTT brackets from Front Runner that I have never used for anything. Now they are propane tank bracket bases. The forward bracket is factory. I used my vise to roughly match the shape of the propane bracket:
507424

These were not the finished product. Since I had four bracket I doubled them for two double-thick brackets in the end. I had hoped that by the time everything was bolted together they would "tension" out flat and be stronger.

507425

This is one of the trusty old propane brackets from earlier in the thread (first gen build). I used a Sawsall with metal blade to cut the welds off, then used my Festool grinder to take the welds down. I'm going to leave them like this for a month or so. If all is well with the setup, I'll take the whole mess down to get powder-coated (and the Propex box too).
507427

The second bracket-removal grinding. I'd grind a little, then pour water on, repeat until finished:
507428

A lot of time went into drilling everything. This is the final point where I had to countersink the new stainless screws into the iron brackets:

507430

And the test fit. Everything worked out on the first try. I may have to move the tent forward just a little bit. Will find out when I open it to work on the heater system.
507431

And here it is. I would have preferred it to sit a bit lower, but I don't anticipate too much wind resistance the way it is.
507432

And with the hasp and lock installed. I wish that propane tank was black darnit.
507433

And here is a visual of how much higher the tank is than the RTT. Not much.
507434

Might start on rebuilding the Propex toolbox tomorrow. Turns out that Wabasto makes a snap-on bulkhead fitting for 60mm ducting and I have half of the parts already. Tonight I'll order the other half. This will let me have nice black ports on the outside of the heater toolbox so I can easily snap on the supply and return ducting that runs into the tent.

For now, I'm using the toolbox. Not ready to commit to drilling holes through everything just yet.
 

Attachments

  • 5.jpg
    5.jpg
    245 KB · Views: 13

jacobconroy

Hillbilly of Leisure
Time to finish up the tent. I grabbed my huevos with both hands and sanded down my RTT vent covers to clear the rack. Turned out that it didn't take very long and was pretty easy.

508353

I really went wrong somewhere. The scribe line is over a 1/4 inch too high (higher then the rack). I think it's because the C-channel under the RTT hangs about 1/4 inch down and they actually sit on the slats...not the fiberglass. Since my scribe jig was referenced off the fiberglass floor....oops.

But it doesn't look too bad from ground level.
508354

It dawned on my today that I can run the thermostat wire in through the RTT vent and this will negate the need to drill a hole through the floor. So I did that and it worked well. Next I mounted the thermostat in the RTT by cutting some Kydex to fit close the back of the thermostat and found some longer M6 bolts:
508355

508356

Then I simply poked two holes through the cloth sleeve that covers the gas shock system and mounted the thermostat at roughly "head-level" when sleeping:
508357

Some washers and nuts sealed the deal. It turned out later that closing the tent allows the thermostat to smoosh against the mattress. Safe enough for me.
508358

Here is a better sense of scale in the Baroud Space:
508359
 

jacobconroy

Hillbilly of Leisure
Took some time to reinstall the Isothermic insulation kit because I need around here in spring and fall. This is the first time I installed it "correctly". No cursing was involved.

The trick is to snake the insulation behind all the struts and start at the center of the tent rear (tall part):
508360

Then apply the velcro around both sides to meet towards the front.
508361

And all installed and tucked in under the matress:
508362

An idea of how it looks from the outside when the regular doors are open:
508363

Add pillows and a quilt, and we are ready to camp (except for the heater/fan system).
508364

It is tougher to close the tent with the isothermic kit in there, but it Will close.
 

jacobconroy

Hillbilly of Leisure
I decided to have a local fellow weld new aluminum plates to each end of the Propex toolbox so that I can utilize some bulkhead connectors for the ducting and route the other connections through the bottom for a more water resistant setup. The box will be permanently mounted on the roof rack now. Some before pics:
508365


I'm not convinced that this box actually came from Adventure Trailers. The "factory" welds are pretty rough.

Today the dude brought the box back with the new plates. Damned guy ground off the welds and I think it looks like a six-year-old did the welding. I paid him his $100.00 though. Last god-dammed dollar he will ever make off of me. I took it around to show all my old construction buddies...just so that the word will get around. Shame on this hack.

508367

508368

He was also supposed to weld new plates on the ends of the lid so that things would match (parts were provided). Didn't do that either. He didn't bother straightening anything.....unbelievable.

508369

Home-made ********. Pardon my french. This is the most childish example of "professional work" I've ever seen...and I live amongst hillbillies!!!!!!

Anyway, I can put the heater system together tomorrow. Once it has been installed and it works I'll pull it out, pay a competent welder to pretty it up, and have it powder coated.
 

Attachments

  • 14.jpg
    14.jpg
    268.5 KB · Views: 11

jadmt

ignore button user
That sux. When retire I’m taking a welding class. I used to be certified 40 years ago but have not welded for many years that is pathetic to say the least. The guy should have told he did not know how to weld aluminum instead of chicken ******** it together.
 

jacobconroy

Hillbilly of Leisure
That sux. When retire I’m taking a welding class. I used to be certified 40 years ago but have not welded for many years that is pathetic to say the least. The guy should have told he did not know how to weld aluminum instead of chicken **** it together.

Agreed. I'm seriously thinking about buying a TIG setup for aluminum only. Seriously...how hard can it be? Just think of all the very cool, rustproof stuff a guy could build if he could work with aluminum. The big upshot is I can cut aluminum sheet goods in my wood shop with mucho precision.

Hmmm. Much Googling to do about this.
 

jacobconroy

Hillbilly of Leisure
Started working on the Propex today. These are the Webasto bulkhead connectors. I drilled new 2.5 inch holes to mount them.
509594

509595

This is the "snap fitting" that will make connecting the ducts easy, requiring no clamps or internal access to the box. These things are really, really tight and I can't pull them off without a pry tool. I plan to lightly sand them until they can be removed without tools.
509596

The length of the plastic pushed the Propex back 1/2 inch, so I used a hot knife to cut the supply connector down.
509597

Now the Propex is back in it's original location. Two short chunks of 60 mm ducting and four clamps will finish it up.
509598

I then measured and drilled holes in the bottom of the box to fit the roof rack T slots and test mounted it to the Jeep.
509599

And then...found out that I can't find the correct propane fittings in town. The parts were ordered today and I should be able to finish this up this weekend.
 

jacobconroy

Hillbilly of Leisure
A big pile of parts arrived today for the Propex setup and I spent 90 minutes down town collecting little bits and pieces. Here are most of them. This is not a cheap project (nothing about Propex heat is cheap):
509877

A test fit of all the regulator parts. I added two 1/4 inch bulkhead fittings (one on each end of the regulator). The plan was to build brackets between the roof rack slats with holes that the bulkhead fittings would mount into:
509878

Next I had to install the wye and make sure that everything was going to work and that there is enough clearance to deal with removable fittings. It is very close. I don't like the way that the feed for the chuck box hangs over the back...but I will find a way to deal with that later.
509879

This will be the appr. location of the regulator for the Propex. I am altering a "tall" Front Runner tent mount bracket to hang down underneath the slats. I had intended to keep everything above so that I could add another Front Runner table under here....but it didn't work out that way. I have a campout next weekend and this darned thing needs to be done!
509880

Here is the Front Runner tent mount bracket after being bent to fit between the slats. Four holes have been added for a mounting plate (for the regulator). As you can see, I abandoned the 1/4 inch bulkhead fitting idea. I'll use them later when I run some air lines around the Jeep.
509881

I then cut out the mounting plate and bolted it on. It's heavy plastic because I didn't have any suitable metal around the house and I'm tired of running down town to search for parts.
509882

I then mounted the regulator:
509883

509884

And installed it:
509885

509886

It worked out and is very solid. The copper propane line into the propex should be less than 12 inches long. This is the project that I kept procrastinating about because I really didn't want to deal with fabbing the bracket. This took me three hours. Thank god it's done. Now there is a very real chance of the propex being installed this weekend. We will see. Next post should be the mounting of the Propex box and the Propex.
 

jacobconroy

Hillbilly of Leisure
Well, today was the day. I now have heat and trailer park A/C in my tent. This heater project was about $250 in parts and took me lots and lots of hours to get done. The best part is that I still need to dismantle it all at some point for powder coating. ?

First I cut some screen door patches to block the combustion intake/exhaust ports. Don't want any mud daubers building hotels in there. I'm going to do this again and figure out how to make it look a little neater.
510732

This is the point where we are almost ready for final assembly outside. Had to monkey around with drilling holes for grommets and bending/planning the copper propane line. Lots of putting together, measuring, taking apart, repeat, repeat, repeat.
510733

The copper propane line is finally done. It runs through the bottom with a rubber grommet. Overall, the copper is about 8 inches long.
510734

Brought in the power and thermostat lines, then mounted the Propex...hopefully for good.
510735

510736

Ran the 60mm heat and return lines, then tested everything.
510737

A little work with a chainsaw file loosened the bulkhead fittings so that I remove/insert them by hand, but they will not come loose on their own.
510738

These are the original duct fittings that come with the bulkhead connectors. This will allow me to keep the bee hives out of the Propex when it's sitting idle between trips.
510740

The inside. The curved (longer) duct is the supply so I can aim it where I want it. The short duct is the return.
510741

Tada! Heated, air conditioned RTT. When at camp, turn on propane, open tent, connect ducts (which are stored with the bedding), and turn on fan or heat.
510742

What a bunch of work! If this solution makes the Propex easy to use and reliable....I will come up with a way to permanently install the ducting into the bottom of the RTT, insulate it, and cover it with some sort of protector. But not yet. Tonight I will sleep in it with the CM detector to make sure that the combustion exhaust isn't too close to the tent. If it is, then I'll have to extend it out to somewhere else.
 

jacobconroy

Hillbilly of Leisure
Since I don't want to monkey around with propane fittings again anytime soon, I finished up the chuckbox quick-release today too. Turns out that an old Front Runner "high" tent bracket that I had was the ticket.

First I had to buy a sweep 90 to turn the 5 foot high-pressure propane line from the tank wye:
510743

Then fabbed the bracket, mounted it, and went to work with pipe dope and wrenches. I assembled this with the awning open to ensure that I can get to it easily no matter what. Here is the Partner Steel regulator plugged in to the quick-release fitting.
510744

And success. How cooking is a little easier and I can be under the awning if need be.
510745

You might notice that I moved the stove to the left. Running the hose through the hole on the right is a major PITA because you can reach the fitting easily to tighten it. Moving the stove left makes it so that I can leave this fitting hooked up all the time. I'll need to make a sheet metal cover for the hose where it's next to the right burner soon.

Easter camping trip this weekend. Thank god I will have heat. It's at 6500 feet and usually drops to about 15º at night (we go to the same spot every year). The rest of the week will be finishing touches. The Jeep is now camp-ready.

Not sure what's next. I'm either going to get a Road Shower 4S to mount on the upper/front of the rack, or a Quick Pitch En-Suite. But, I heard a rumor (from a dude that would know) that Alu Cab is releasing an En-Suite in the next month or two that will match my awning. So, I'll probably wait to see what that looks like before committing to a shower stall.
 

jacobconroy

Hillbilly of Leisure
Slept in the tent last night. I kept an eye on the carbon monoxide detector and it never rose above 0 ppm. So, in my opinion, there is officially no reason to extend the combustion exhaust more than 12 inches from a window or opening (per Propex specs). I always keep the detector in there when using heat though. If it ever registers any CM I'll update this thread.

The Propex always threw out heat, but shortening the ducts make the output considerably warmer. Almost too warm. And, since the tent is so small the lowest thermostat setting seems to be too much. I might have to take the insulation kit out of the RTT.

I probably should mention that for most folks, a Propex might be overkill for a small RTT. Lotsa money, time, and fabrication to implement. But I need to have air blowing in my face to fall asleep (like a fan). Always have. Not optional unless I get really, really drunk before bed. In the past I had used a 12 volt RV fan in the tent, but it's big, too powerful on the lowest setting, and doubled my aH usage when using heat too. Now I run the fan setting on the Propex all night long. If I wake up cold, a flick of the thermostat provides instant heat. Pretty convenient on the first try.
 

jacobconroy

Hillbilly of Leisure
Got my backpack hung today (to replace my drawer system). This should allow me to quickly and easily access little things at camp.

I decided to keep it simple and drilled a hole in my Alu Cab awning case to hang the backpack:
510863

Here is the backpack all loaded for camp (first aid, clothing, fire starting, tools, knives, etc.).
510864

Quick access:
510865

Full access:
510866

And accessible with awning or not:
510867

I like that I won't have to run and put it away if it starts to rain. The backpack is fully protected by the awning. There is a company that makes an internal organizer for this pack that allows labels and makes much better use of the space...but it's really darned pricey. If this works out I'll probably pick up the organizer later.
 

Forum statistics

Threads
185,893
Messages
2,879,524
Members
225,497
Latest member
WonaWarrior
Top