You are using an out of date browser. It may not display this or other websites correctly.
You should upgrade or use an alternative browser.
You should upgrade or use an alternative browser.
2000 Frontier (Supercharged) Build and Adventures - Babe the Blue Ox
- Thread starter paulforeman
- Start date
paulforeman
Active member
Interesting about those trak-motive cv’s. Ive seen they had them for F150’s but have not run into anyone using them on the F150 forums. Im not sure the F150 axles bind unless maybe people have issues with really big leveling kits.
They're definitely helpful for this Nissan platform. The CV axles are pretty short compared to other IFS setups. I'll have to post a picture of the Nissan CVs next to our 4th gen 4Runner CVs - they're definitely shorter hence the binding issues!
paulforeman
Active member
Well, I actually built a thing on my "build" thread... Been a little bit since I actually did something new.
Updating coming soon...


Updating coming soon...
LRNAD90
Adventurer
Not a lot of aftermarket support for Nissans unfortunately. I had a WD21 Pathfinder years ago, and had to go the fabrication route for many of my modifications as well, but it was a damn good truck, and surprised a lot of people off-road.
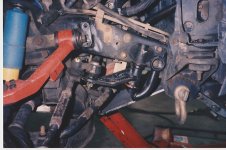
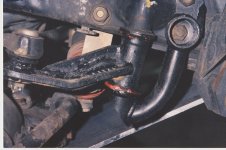
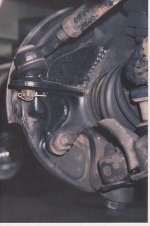
Here are the idler arm and steering knuckle re-enforcements I had fabricated, looks like it may be roughly applicable to your configuration as well. I never had an issue prior to the bracing, but when I went to larger tires and lockers thought it good preventative..
Here are the idler arm and steering knuckle re-enforcements I had fabricated, looks like it may be roughly applicable to your configuration as well. I never had an issue prior to the bracing, but when I went to larger tires and lockers thought it good preventative..
Attachments
Last edited:
paulforeman
Active member
That looks very similar to what I have done indeed! I didn't have a problem until I went to big tires and started wheeling harder than I used to... But I think it's solid enough now to withstand quite a bit of beating.Not a lot of aftermarket support for Nissans unfortunately. I had a WD21 Pathfinder years ago, and had to go the fabrication route for many of my modifications as well, but it was a damn good truck, and surprised a lot of people off-road.
Here are the idler arm and steering knuckle re-enforcements I had fabricated, looks like it may be roughly applicable to your configuration as well. I never had an issue prior to the bracing, but when I went to larger tires and lockers thought it good preventative..
paulforeman
Active member
Thanks @xwazmtb - Glad you're getting out there. What a beautiful state we live in!I always enjoy seeing this Frontier and how it evolves! Nice to see you are local as well, I put some of the trails you mentioned on my list to complete in the near future.
Trucks Looks Awesome!
Bed Removal, Holes Patched, Wiring Fixed, & LINE-X Coating
TL,DR = See title above.... ^^^
To be honest, I have abused this truck over the last 8 years (hard to believe I've had it since 2016!). This was partly due to the fact that I never thought this truck would last this long. But now I'm sniffing at 300,000 miles and I have regrets... I have been a bit too friendly with my grinder and drill when it comes to mounting things to the bed.
Pulled the Bed (Process Documented Here) and got to work getting this thing cleaned up a bit. I stripped all the auxiliary power supply setup out of the bed (fuse block, power outlets, and compressors). I will rebuild the electrical system in the posts to come.
With the bed off I cleaned up all the auxiliary wiring for the compressors, rear lights, topper lights, etc. I put all the power, ground, and switch signal wires into split loom and re-routed it to follow the factory wiring harness pretty closely. Much cleaner than the hodge-podge that I had going on from multiple iterations of "just get it done" wiring methodology. (Hard to believe that I put my first set of rear-lights on the truck in March of 2017! So some of this wiring was almost exactly 7 years old. Well over-due for a refresh/clean up).


All Holes/Cutouts Fixed
This was a long, messy, ugly process, but I closed any and all holes in the bed and rails. Most of them were from things I had mounted to the bed over the years but some were rust holes. I pulled the bed so that I could weld the holes in the tub from the underside and then paint/seal them so that they would not rust out from the bottom in the future. I didn't get a lot of pictures of the finished product, but I welded, ground-down, and primed all holes, notches, etc.

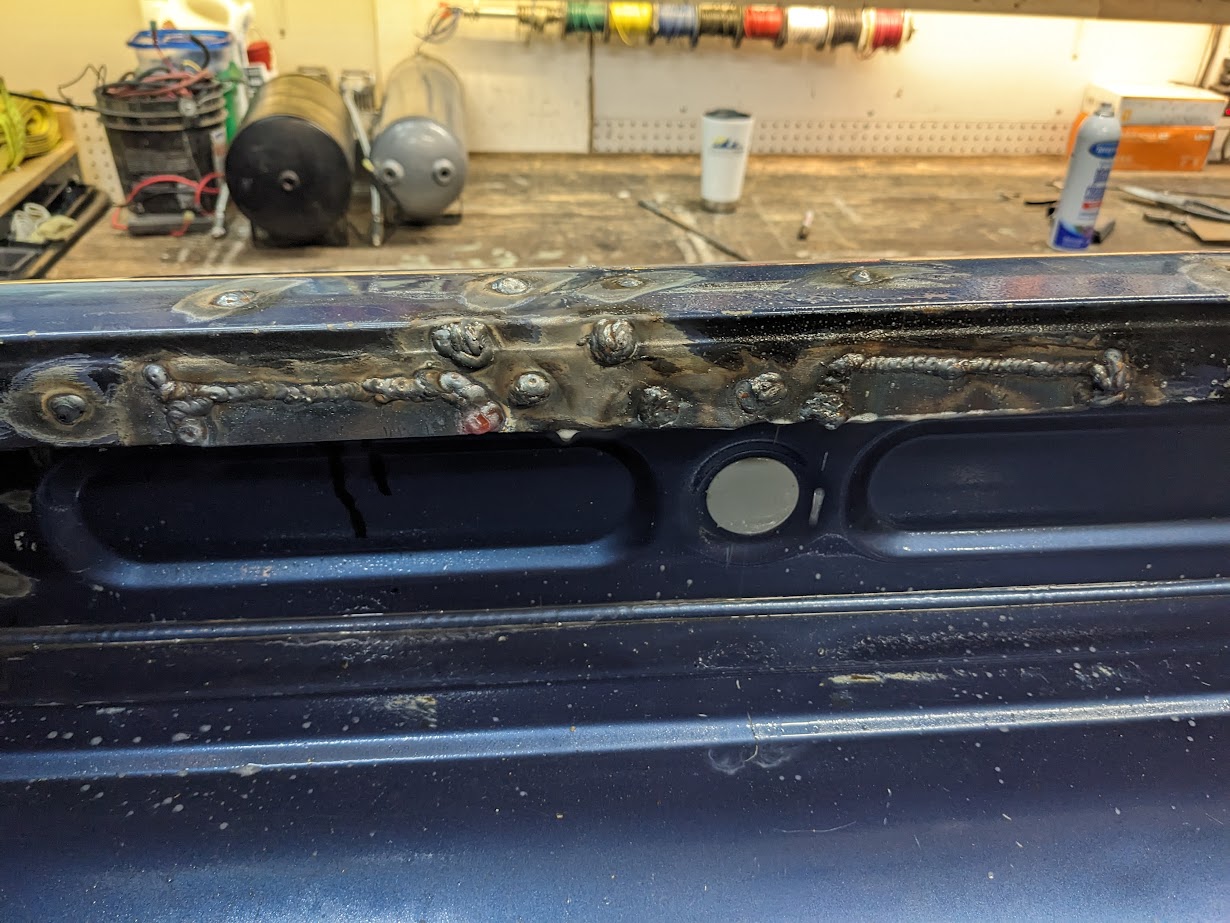


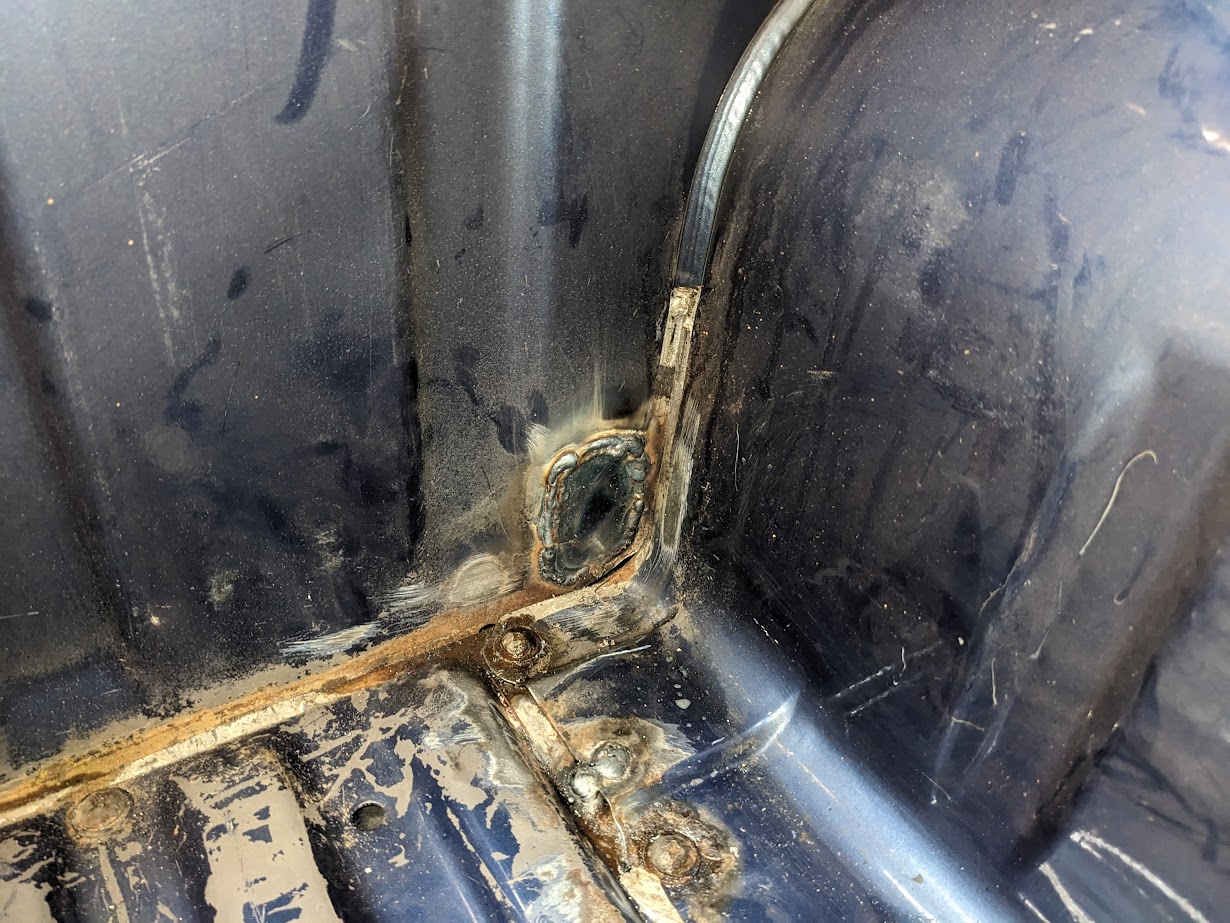

It was a mess, but well worth all the work. I ground down and primed all the raw metal, then pressure-washed the bed out to remove all the loose paint, metal dust, sticks, and leaves.
Line-X Coating
Took the truck to Line-X of South Denver and go the bed and tailgate coated. The truck bed is dramatically improved.


It's a bit like lipstick on a pig, as the truck is still pretty rough, the tailgate is still bent, and the paint is pretty much garbage at this point. But I'm very glad to have it done. I think I'll do this immediately if I ever get a different truck. So clean, super durable, and has a lifetime warranty.
Had it back on the trail the next day.

More to come - I have been working on some additional wiring, compressor setup, etc.
Cheers.
NudeLobster
Member
Love finding build threads like this!
If you ever want another tag along, shoot me a message. I'm down in Co springs!
If you ever want another tag along, shoot me a message. I'm down in Co springs!
paulforeman
Active member
Thanks man! I'm always down to meet new folks, so we'll have to get connected at some point. Maybe run China Wall or something out by Tarryall - That's kinda in between you and me.Love finding build threads like this!
If you ever want another tag along, shoot me a message. I'm down in Co springs!
paulforeman
Active member
Redone Auxiliary Wiring and Air Compressor Setup
Welp, this is another wordy post... it was a lot of work, test fitting, figuring, etc. I'll try to be succinct. Pictures are included for any of you who, like me, don't like reading but do like pictures")
As stated before, I need to be able to use the truck for hauling dirt and shrubs, wheels, tires, furniture, etc. You know, truck stuff... even though it's a small truck, it's still useful with an open bed.
My previous wiring situation was in desperate need of a clean up. It was all tucked under the wooden box/cover I had before, so I couldn't see it... out of sight, out of mind, right? So I ignored it. My previous compressor setup had been jumbled and patched together as far back as 2017!
I wanted to be able to flip the truck from "camping mode" to "truck mode" pretty quickly. The biggest challenge was the air compressors.
Basic goals:
Electrical:
The main power wires and compressor switch wire now comes up through the right-hand taillight cavity instead of through a ghetto hole in the front of the bed. The wires are secured through a 1" hole with a gland nut. I put all the wires into split loom for additional wear protection.


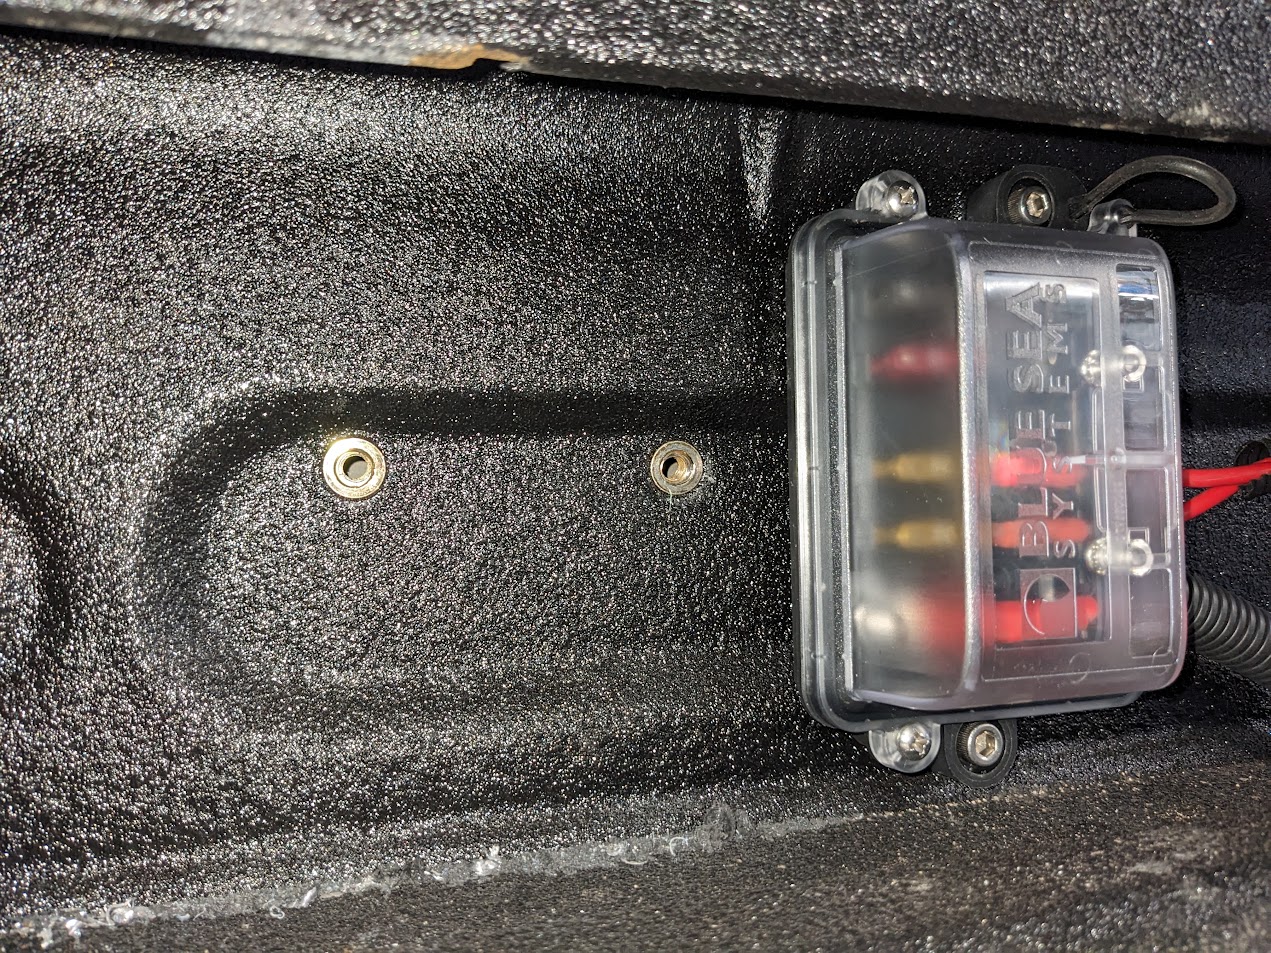

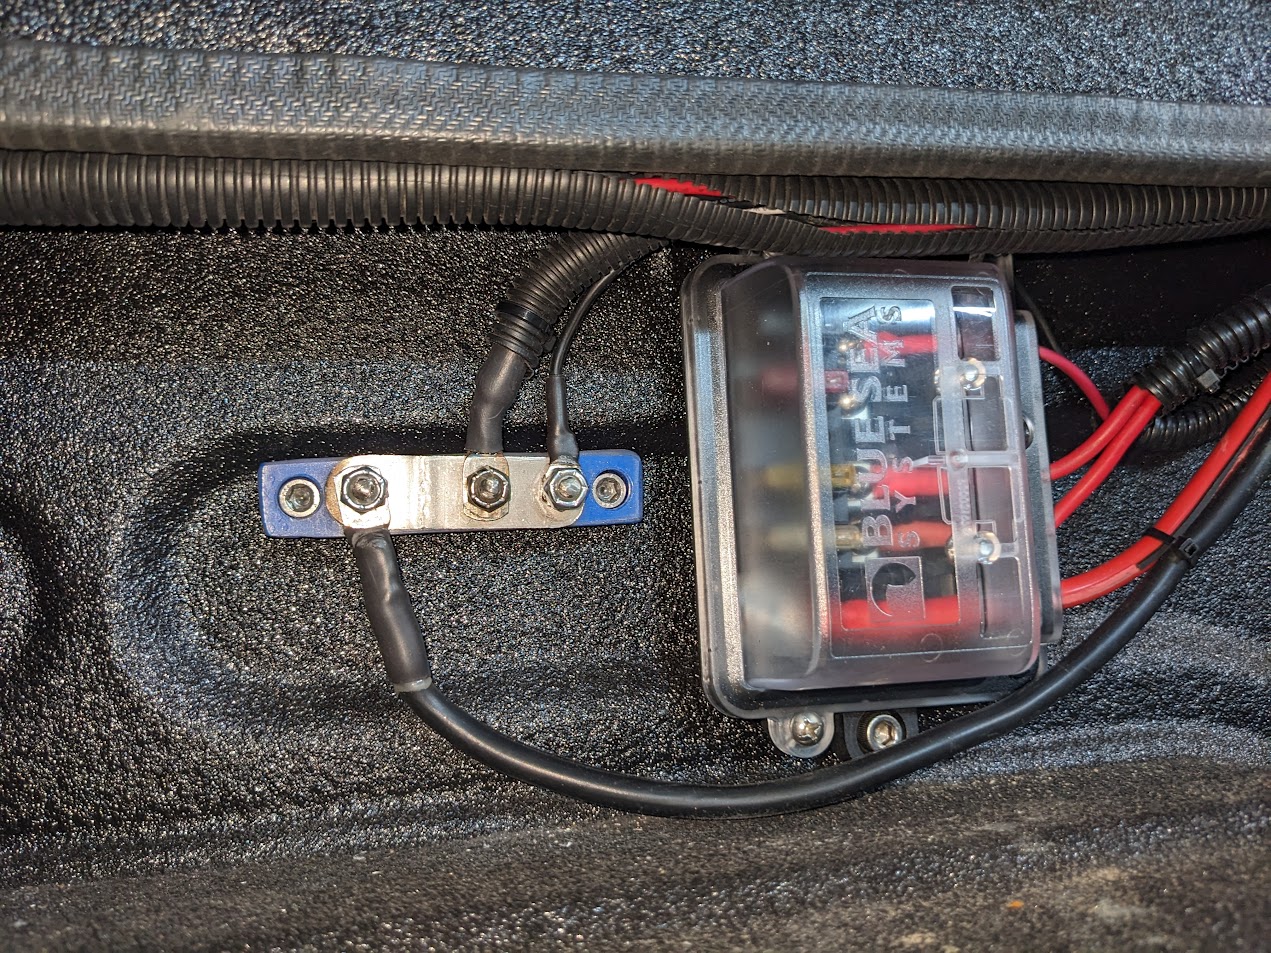
The grounding block is made out of an stainless L-bracket, some socket-head screws, and a piece of retired snow blower skid. I didn't have a grounding block the right size and so I just made one for free with stuff I had laying around. Ghetto? Yes, but it's just the grounds, so it's fine to have them exposed. Got a new fuse-block from Blue Sea. It's water-resistant so that I can spray out the bed if I do use it for dirt, branches, etc.


All the wires and the topper-light relay are tucked up under the bed-rail and secured with stainless steel hardware and rubberized cable clamps. This keeps them all out of the way, but easily accessible if I need to modify the routing, etc. Put some edge trim on the bed rail joint to protect my hands from sharp edges when getting in and out of the truck with the topper off. Pretty cool stuff - I've used it a few placed and like how many sizes are available!
Compressors:
I built the 2 Viair 450c air compressors and 2 Firestone 2-gallon air tanks onto a skid with wire connectors for the switch signals, grounds, and compressor power. (I previously had the compressors mounted to a bracket I had bolted through the bed liner, but obviously it was not easily removable - See post #22).
I didn't take a lot of detailed pictures, but I had a bunch of "scrap" aluminum plates from some commercial Boeing aircrafts (long story) that I bolted together in a big L shape. Then I bolted both tanks and both air compressors to the plates. The routing and fittings are definitely "exotic" (or, chaotic). But it all works and has no leaks.


The inlets are at the top and the outlets are at the bottom, so I have no need for dedicated tank drains - any water just leaves the system when I use the air supply.
Currently I'm just strapping the whole thing into the bed with a cam strap, but once I get everything sorted out, I think I'll use some sort of nut-n-bolt combo at attach it more securely.
I can have the compressor/tank skid installed in the truck for camping and wheeling, but can easily remove it to haul stuff if the tanks are in the way.
Lessons Learned:
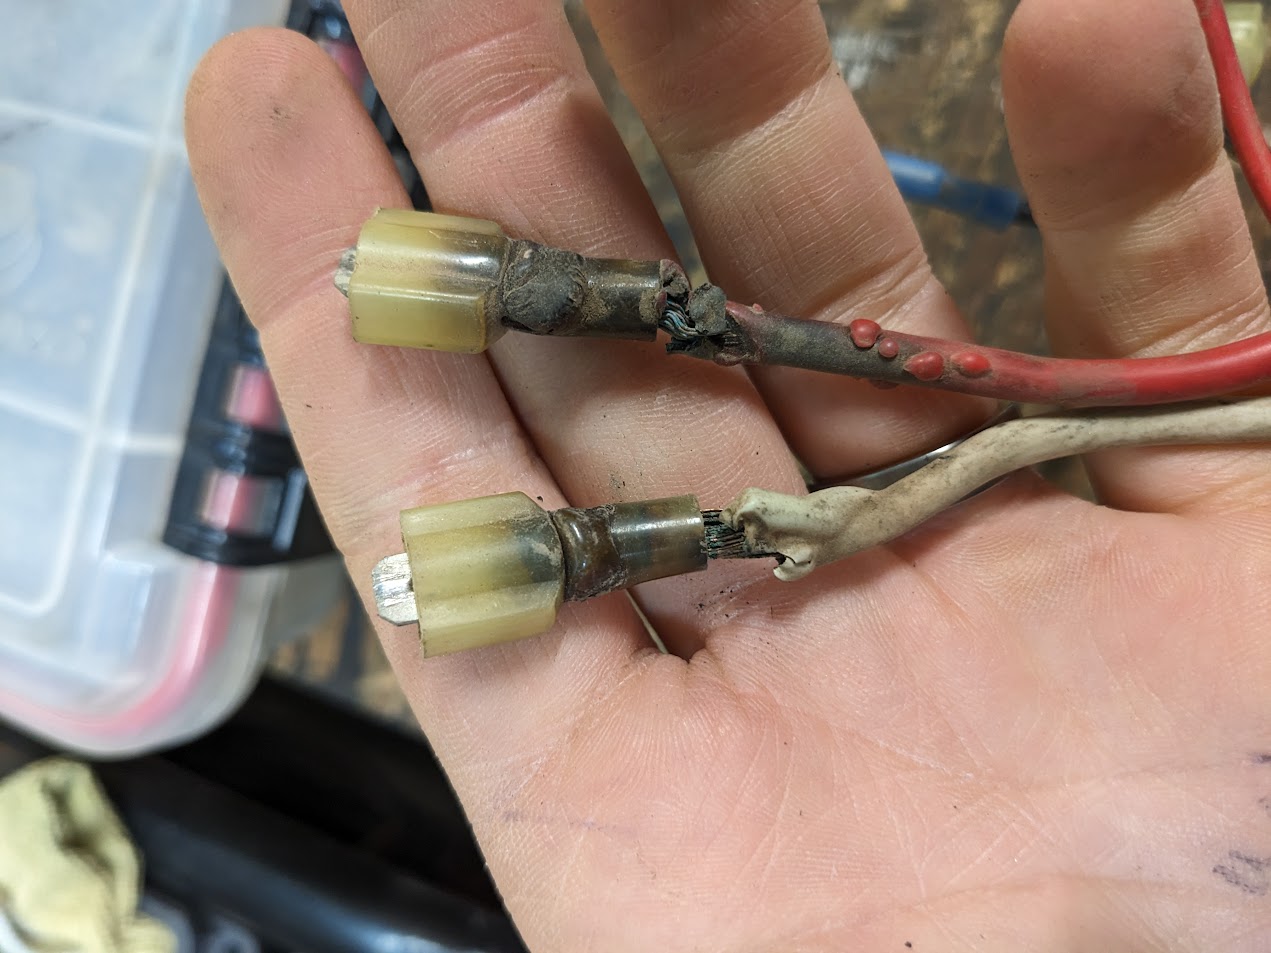
Each tank has its own pop-off valve, its own compressor inlet, its own outlet, and its own pressure switch. This is all intentionally redundant to ensure the system doesn't have any over-pressure situations and to avoid a car-fire due to overloading compressor wires. I was previously running both compressors (which have a max draw of 19A) off of 1 Viair pressure switch. Although Viair claims this can handle 40A draw, (and I had a 40A fuse installed), the pressure switch wires were apparently getting too hot over the years... And the fuse block I was using claimed "100A" capability but the power stud had melted the case around it at only 40A! The fuse block guts were fine, and this did take about 5 years of use, but still... lesson learned; I will be using higher quality electrical components for higher-current accessories. I'm sure this fuse block would be more than fine for running some little LED lights, but if it was melting at 40A, I definitely wouldn't want to run 100A like it said it could!


So, that's it... this is the culmination of a lot of work... probably too much. But it gave me something to do.
Cheers.
Welp, this is another wordy post... it was a lot of work, test fitting, figuring, etc. I'll try to be succinct. Pictures are included for any of you who, like me, don't like reading but do like pictures
As stated before, I need to be able to use the truck for hauling dirt and shrubs, wheels, tires, furniture, etc. You know, truck stuff... even though it's a small truck, it's still useful with an open bed.
My previous wiring situation was in desperate need of a clean up. It was all tucked under the wooden box/cover I had before, so I couldn't see it... out of sight, out of mind, right? So I ignored it. My previous compressor setup had been jumbled and patched together as far back as 2017!
I wanted to be able to flip the truck from "camping mode" to "truck mode" pretty quickly. The biggest challenge was the air compressors.
Basic goals:
1. Clean up the auxiliary electrical system.
2. Make the whole air system easily removable.
Electrical:
The main power wires and compressor switch wire now comes up through the right-hand taillight cavity instead of through a ghetto hole in the front of the bed. The wires are secured through a 1" hole with a gland nut. I put all the wires into split loom for additional wear protection.
The grounding block is made out of an stainless L-bracket, some socket-head screws, and a piece of retired snow blower skid. I didn't have a grounding block the right size and so I just made one for free with stuff I had laying around. Ghetto? Yes, but it's just the grounds, so it's fine to have them exposed. Got a new fuse-block from Blue Sea. It's water-resistant so that I can spray out the bed if I do use it for dirt, branches, etc.
All the wires and the topper-light relay are tucked up under the bed-rail and secured with stainless steel hardware and rubberized cable clamps. This keeps them all out of the way, but easily accessible if I need to modify the routing, etc. Put some edge trim on the bed rail joint to protect my hands from sharp edges when getting in and out of the truck with the topper off. Pretty cool stuff - I've used it a few placed and like how many sizes are available!
Compressors:
I built the 2 Viair 450c air compressors and 2 Firestone 2-gallon air tanks onto a skid with wire connectors for the switch signals, grounds, and compressor power. (I previously had the compressors mounted to a bracket I had bolted through the bed liner, but obviously it was not easily removable - See post #22).
I didn't take a lot of detailed pictures, but I had a bunch of "scrap" aluminum plates from some commercial Boeing aircrafts (long story) that I bolted together in a big L shape. Then I bolted both tanks and both air compressors to the plates. The routing and fittings are definitely "exotic" (or, chaotic). But it all works and has no leaks.
The inlets are at the top and the outlets are at the bottom, so I have no need for dedicated tank drains - any water just leaves the system when I use the air supply.
Currently I'm just strapping the whole thing into the bed with a cam strap, but once I get everything sorted out, I think I'll use some sort of nut-n-bolt combo at attach it more securely.
I can have the compressor/tank skid installed in the truck for camping and wheeling, but can easily remove it to haul stuff if the tanks are in the way.
Lessons Learned:
Each tank has its own pop-off valve, its own compressor inlet, its own outlet, and its own pressure switch. This is all intentionally redundant to ensure the system doesn't have any over-pressure situations and to avoid a car-fire due to overloading compressor wires. I was previously running both compressors (which have a max draw of 19A) off of 1 Viair pressure switch. Although Viair claims this can handle 40A draw, (and I had a 40A fuse installed), the pressure switch wires were apparently getting too hot over the years... And the fuse block I was using claimed "100A" capability but the power stud had melted the case around it at only 40A! The fuse block guts were fine, and this did take about 5 years of use, but still... lesson learned; I will be using higher quality electrical components for higher-current accessories. I'm sure this fuse block would be more than fine for running some little LED lights, but if it was melting at 40A, I definitely wouldn't want to run 100A like it said it could!
So, that's it... this is the culmination of a lot of work... probably too much. But it gave me something to do.
Cheers.
paulforeman
Active member
I need to do a few more entries...
Upgraded U-bolts (big boys from Barnes 4x4)
Snow wheeling (Broken CV...)
Fuel tank leaking (finally fixed? TBD)
Upgraded U-bolts (big boys from Barnes 4x4)
Snow wheeling (Broken CV...)
Fuel tank leaking (finally fixed? TBD)
paulforeman
Active member
5/8" Leaf Spring U-Bolt Upgrade
Had some cheap, grade-2 u-bolts from O'Reilly for the last many years. They've gotten sloppy and I think the axle was clunking around in the pockets but when I tried to toque the u-bolt nuts down, they stripped out... should have known better. They did not have deep nuts like u-bolts are supposed to. Time for an upgrade!
I got a set of 5/8" square u-bolts from Barnes 4x4. These are a big upgrade over the factory metric M12 u-bolts (5/8" is almost an M16 equivalent - so 2 steps bigger diameter!!)
They are "cold drawn 1541 alloy that is stress relieved. This produces an alloy that has grade 8 strength but not grade 8 hardness. The threads on our U-bolts are 5/8"-18 fine threads and are manufactured with a smooth rolled thread. The mating Hi-Nuts are hardened as well as the thick washers and are manufactured with sharp cut threads."
... Yeah, whatever, sounds good to me - Now to install them. These are the Barnes u-bolts vs. the 1/2" O'Reilly specials. Picture does it justice.

I cut them to length and beveled the ends for easy threading.

The leaf spring/shock mount plates needed to be drilled out. I used my drill press because I like to pretend I'm some sort of machinist.

I also am adding a 2.5-degree axle shim to help compensate for some driveline vibrations during acceleration (probably due to the lift). I've had the vibration for years; these seemed to help a bit. Probably going with a 1-piece driveshaft soon anyways, which will help the angle too.

New u-bolts installed and torqued to 100 ft-lbs. These things are way nicer than any other ones I've had installed so far.


They are probably a hair too long, but this will allow for more leaf springs to be added later if necessary, larger axle shims, or whatever.
That's it for now - Got a few more snow-wheeling trips in this winter. I'll post about it here soon...
Cheers.
Had some cheap, grade-2 u-bolts from O'Reilly for the last many years. They've gotten sloppy and I think the axle was clunking around in the pockets but when I tried to toque the u-bolt nuts down, they stripped out... should have known better. They did not have deep nuts like u-bolts are supposed to. Time for an upgrade!
I got a set of 5/8" square u-bolts from Barnes 4x4. These are a big upgrade over the factory metric M12 u-bolts (5/8" is almost an M16 equivalent - so 2 steps bigger diameter!!)
They are "cold drawn 1541 alloy that is stress relieved. This produces an alloy that has grade 8 strength but not grade 8 hardness. The threads on our U-bolts are 5/8"-18 fine threads and are manufactured with a smooth rolled thread. The mating Hi-Nuts are hardened as well as the thick washers and are manufactured with sharp cut threads."
... Yeah, whatever, sounds good to me - Now to install them. These are the Barnes u-bolts vs. the 1/2" O'Reilly specials. Picture does it justice.
I cut them to length and beveled the ends for easy threading.
The leaf spring/shock mount plates needed to be drilled out. I used my drill press because I like to pretend I'm some sort of machinist.
I also am adding a 2.5-degree axle shim to help compensate for some driveline vibrations during acceleration (probably due to the lift). I've had the vibration for years; these seemed to help a bit. Probably going with a 1-piece driveshaft soon anyways, which will help the angle too.
New u-bolts installed and torqued to 100 ft-lbs. These things are way nicer than any other ones I've had installed so far.
They are probably a hair too long, but this will allow for more leaf springs to be added later if necessary, larger axle shims, or whatever.
That's it for now - Got a few more snow-wheeling trips in this winter. I'll post about it here soon...
Cheers.
Last edited:
paulforeman
Active member
Broken Parts... but Snow Wheeling trips
Broke another Bilstein shock - I think this was the 3rd or 4th one. I have a warranty from 4WP, so I just take them in and get a new one every time. But it's annoying. Been thinking about trying to fit something else... they're about the same length as 2003-2024 4Runner rear shocks, so if I could figure out the top mount, that would open up all kinds of options... TBD.

Broke a Trakmotive CV axle. To be fair, my truck has ...
There were a lot of hype about these when they came out, so I bought in... it's a good idea in theory, but lost of people are finding them to be worse than OEM due to strength issues and due to very quick outer boot failure. Although I broke an inner joint, the outer boots were both also ripped after maybe 300 miles in 4x4.... The rubber is too stiff and the boots are shorter than OEM (which doesn't make sense... Trakmotive makes other OEM-style CVs with regular length and material boots, so I'm not sure why they did the shorter boots on this axle).


SNOW WHEELING
I'll just photo-dump. There are bout 4-5 different trips in here. Sadly, the day I broke the CV axle, we had barely gotten started on the trail and we were first tracks in 3 feet deep of fluffy powder! Oh well... it happens.


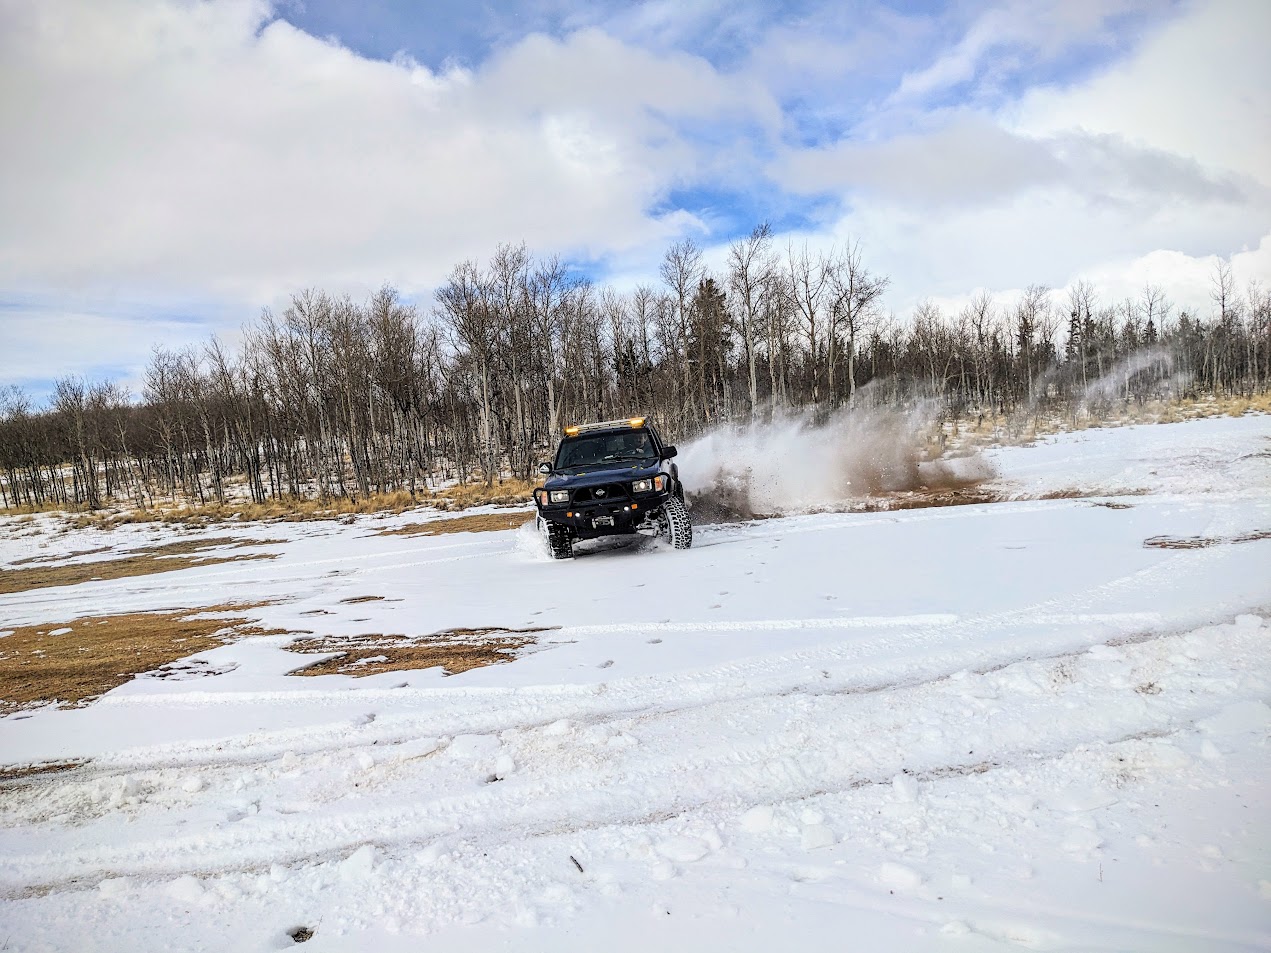
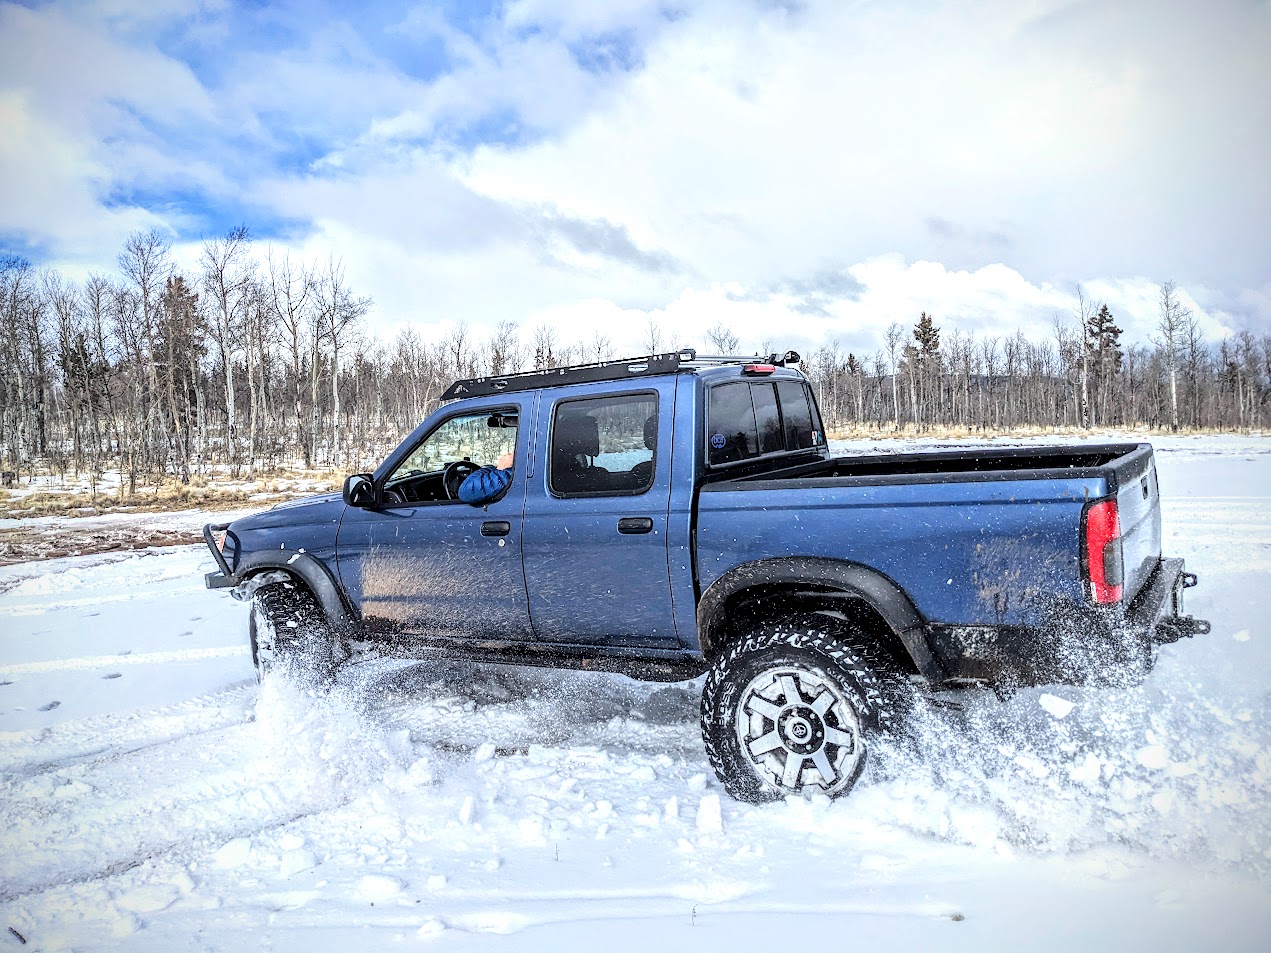


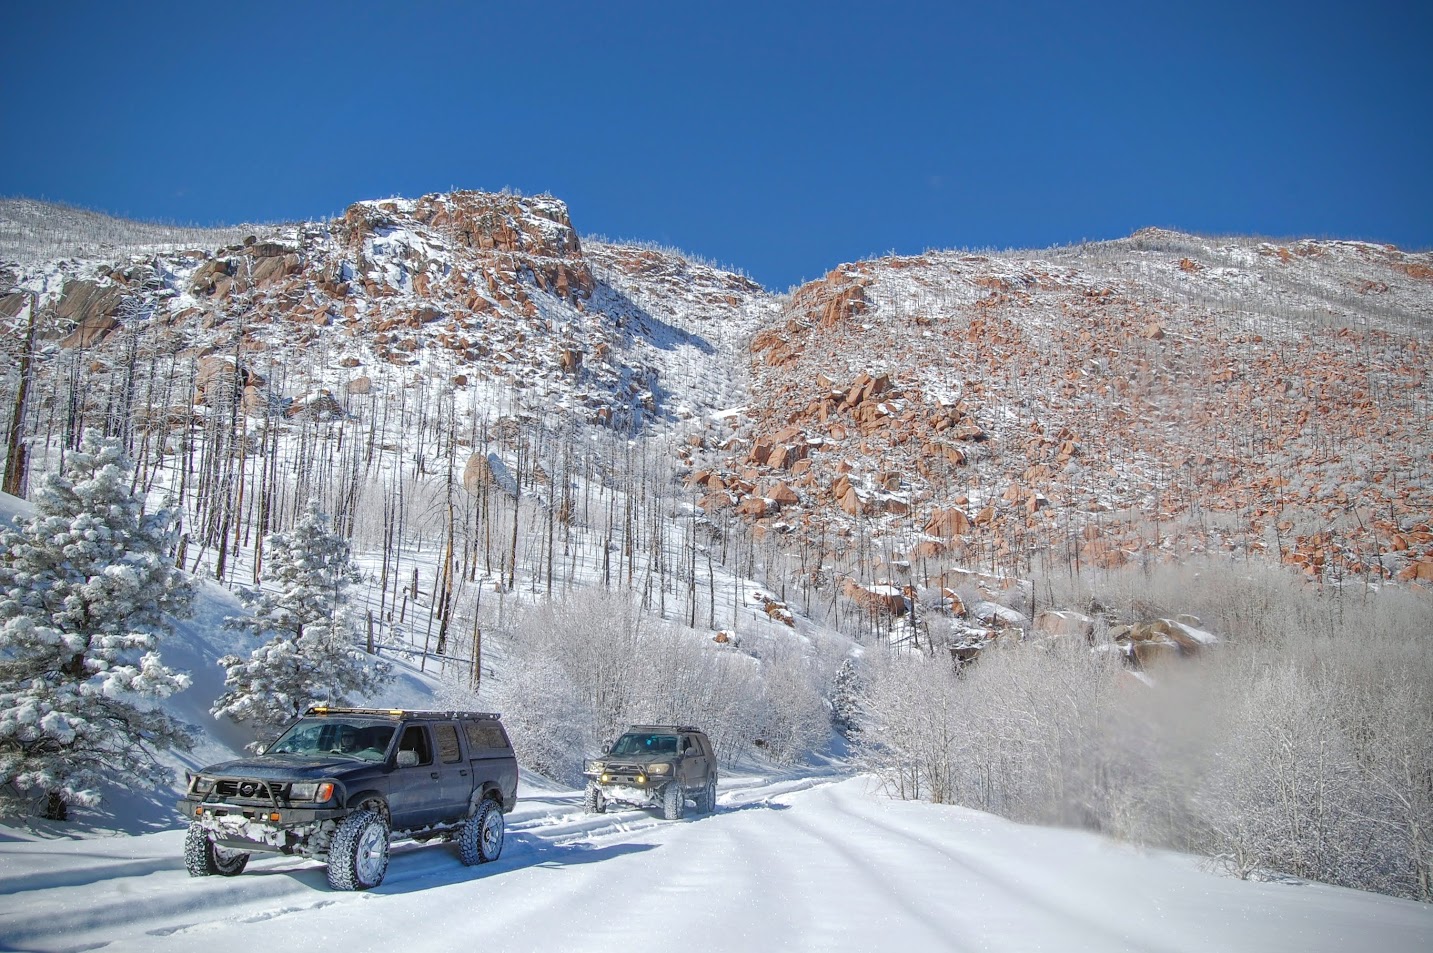


Overall a good winter for snow-wheeling. We may even get 1 more snowy trip in before the season is over.
Cheers.
Broke another Bilstein shock - I think this was the 3rd or 4th one. I have a warranty from 4WP, so I just take them in and get a new one every time. But it's annoying. Been thinking about trying to fit something else... they're about the same length as 2003-2024 4Runner rear shocks, so if I could figure out the top mount, that would open up all kinds of options... TBD.
Broke a Trakmotive CV axle. To be fair, my truck has ...
- 33" tires (so, more rotational inertia)
- 4:1 low-range gears (so, more torque output)
- Supercharger (so, more torque output)
- Undersized S/C pulley (so, more torque output)
- An adult child driver with a heavy foot (so, more... broken parts)
There were a lot of hype about these when they came out, so I bought in... it's a good idea in theory, but lost of people are finding them to be worse than OEM due to strength issues and due to very quick outer boot failure. Although I broke an inner joint, the outer boots were both also ripped after maybe 300 miles in 4x4.... The rubber is too stiff and the boots are shorter than OEM (which doesn't make sense... Trakmotive makes other OEM-style CVs with regular length and material boots, so I'm not sure why they did the shorter boots on this axle).
SNOW WHEELING
I'll just photo-dump. There are bout 4-5 different trips in here. Sadly, the day I broke the CV axle, we had barely gotten started on the trail and we were first tracks in 3 feet deep of fluffy powder! Oh well... it happens.
Overall a good winter for snow-wheeling. We may even get 1 more snowy trip in before the season is over.
Cheers.
Last edited:
llamalander
Well-known member
I needed almost 70K miles to bust my OME struts, the springs are still fine-- might give them a try, I'm happily on my second set.